Lexmark CX510 Voice Guidance Kit Installation Guide
Summary
Enhance the usability of your Lexmark printer with the Voice Guidance Kit, designed to dramatically improve accessibility features. This comprehensive guide provides step-by-step instructions for installing every component: the control box, keyboard mount base, and keypad overlay. It ensures optimal integration of speech recognition and tactile labeling, allowing users familiar with models including the CX510, MX610 Series, MX710 Series, MX810 Series, and MX910 Series to activate advanced voice guidance functions.
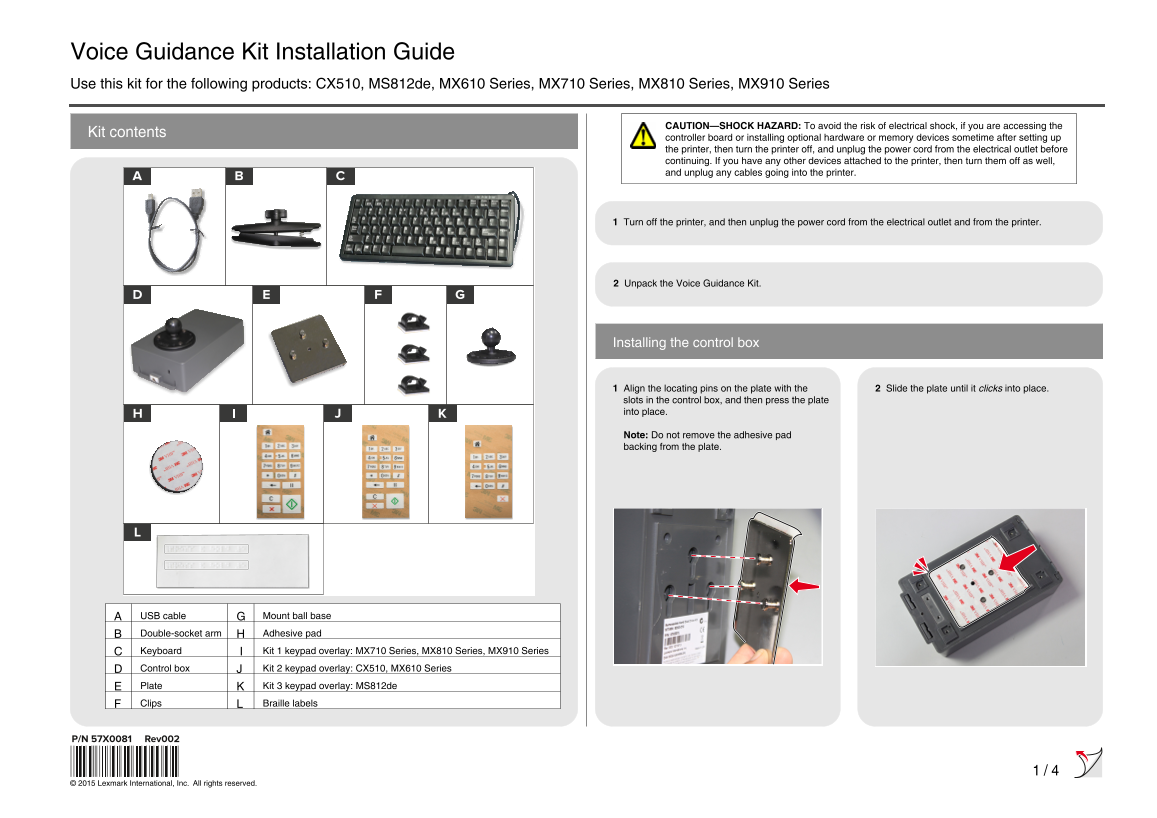
Page 1 Text Content
Voice Guidance Kit Installation Guide Use this kit for the following products: CX510, MS812de, MX610 Series, MX710 Series, MX810 Series, MX910 Series
CAUTION—SHOCK HAZARD: To avoid the risk of electrical shock, if you are accessing the
Kit contents
controller board or installing optional hardware or memory devices sometime after setting up the printer, then turn the printer off, and unplug the power cord from the electrical outlet before continuing. If you have any other devices attached to the printer, then turn them off as well, and unplug any cables going into the printer.
1 Turn off the printer, and then unplug the power cord from the electrical outlet and from the printer.
2 Unpack the Voice Guidance Kit.
Installing the control box
1 Align the locating pins on the plate with the 2 Slide the plate until it clicks into place. slots in the control box, and then press the plate into place.
Note: Do not remove the adhesive pad backing from the plate.
USB cable Mount ball base Double-socket arm Adhesive pad
Keyboard Kit 1 keypad overlay: MX710 Series, MX810 Series, MX910 Series Control box Kit 2 keypad overlay: CX510, MX610 Series Plate Kit 3 keypad overlay: MS812de
Clips Braille labels
© 2015 Lexmark International, Inc. All rights reserved.
Page Summary Contents For Lexmark CX510 Voice Guidance Kit Installation Guide
Manual Details
| Brand | Lexmark |
|---|---|
| Pages | 4 |
| File Size | 3.51 MB |
| Published | June 03, 2026 |
Enter the captcha to get the download link:

Frequently Asked Questions
What safety precautions should I take before installing optional hardware?
Turn off the printer, unplug the power cord from the electrical outlet, and also turn off/unplug any other attached devices.
How do I attach a keypad overlay to the control box?
Align it, place it facedown on a flat surface, press on the backing, peel the back, align it to the buttons, and then press it into place.
What should I do if the focus cursor isn't visible after installing the keypad overlay?
Check the keyboard connection to the control box, check the control box connection to the printer, or consider replacing the keyboard/control box.
How do I properly connect the keyboard and USB cable?
Attach the mount ball base [to the keyboard], attach the double-socket arm [to the printer], thread the cable through the clips, and then connect the other end to the rear USB port on the printer.