Honeywell H80 Temperature and Humidity Sensor Installation Manual
Summary
Designed for environmental monitoring professionals, this wall-mount Temperature/Humidity Transmitter provides reliable current output for critical control systems. The accompanying manual is a comprehensive guide covering flawless installation, advanced wiring techniques, and detailed operational procedures. It empowers users to accurately calibrate the unit's performance through various modes—including zero and span adjustments for both temperature (4-20mA) and humidity ranges—ensuring optimal long-term data acquisition in industrial or commercial settings.
Page 1 Text Content
Temperature / Humidity Transmitter (Current Output) Manual
感謝您購買本公司的產品!為使產品能正常運作,請您詳閱使用手冊,並請依照說明操作。謝謝! Thanks for choosing our product! Please read carefully and follow this instruction before using!
產品附件清單 Product accessories list 產品:壁掛式 Wall mount 附件:如下 傳訊器 數量:1 螺絲 Screws 數量:4 使用說明書 Manual 數量:1 產品中有害物質的名稱及含量 數量:1
安裝方式 Installations
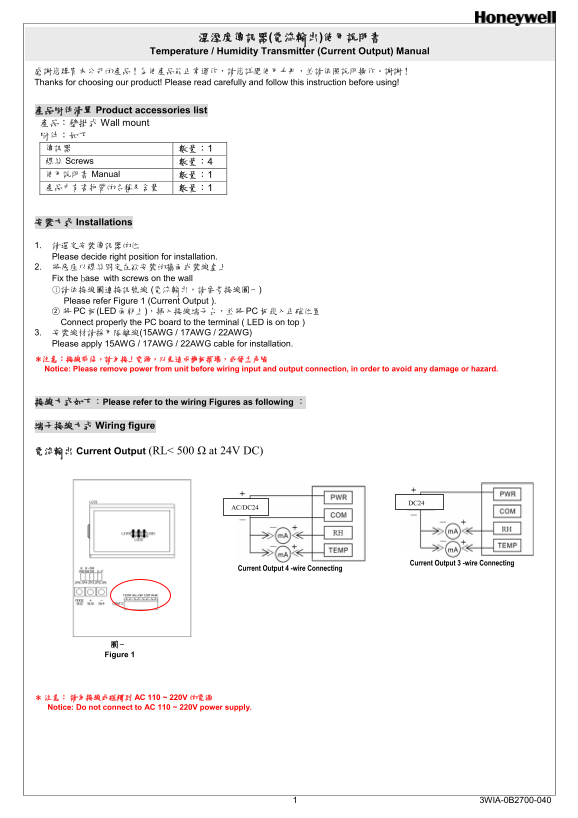
1. 請選定安裝傳訊器的位 Please decide right position for installation. 2. 將底座以螺絲固定在欲安裝的牆面或裝線盒上 Fix the base with screws on the wall ○1 請依接線圖連接訊號線 (電流輸出,請參考接線圖一) Please refer Figure 1 (Current Output ). ○2 PC板(LED面朝上),插入接線端子台,並將 PC板崁入正確位置 Connect properly the PC board to the terminal ( LED is on top ) 3. 安裝線材請採用隔離線(15AWG / 17AWG / 22AWG) Please apply 15AWG / 17AWG / 22AWG cable for installation. *注意:接線前後,請勿接上電源,以免造成機板損壞,或發生危險 Notice: Please remove power from unit before wiring input and output connection, in order to avoid any damage or hazard.
接線方式如下:Please refer to the wiring Figures as following :
端子接線方式 Wiring figure
電流輸出 Current Output (RL< 500 Ω at 24V DC)
AC/DC24
Current Output 3 -wire Connecting
Current Output 4 -wire Connecting
圖一 Figure 1
* 注意: 請勿接線或碰觸到 AC 110 ~ 220V的電源 Notice: Do not connect to AC 110 ~ 220V power supply.
3WIA-0B2700-040 1
Page Summary Contents For Honeywell H80 Temperature and Humidity Sensor Installation Manual
Manual Details
| Brand | Honeywell |
|---|---|
| Pages | 3 |
| File Size | 500.30 KB |
| Published | June 03, 2026 |
Enter the captcha to get the download link:

Frequently Asked Questions
如何安全地接線此設備?
請先斷電,才能進行訊號和電源的連接,以避免損壞或發生危險。且注意不要連接 AC 110 ~ 220V 電源。
需要使用什麼尺寸的隔離線來安裝設備?
建議採用 15AWG / 17AWG / 22AWG 的隔離線進行安裝。
如何進入溼度校正或溫度校正模式?
切換到 Mode 2 (溼度) 或 Mode 3 (溫度),然後使用 SW3(+)和SW4(-)調整所需數值。
如果想重置所有校正值,該怎麼操作?
按七次 SW2 可進入 Reset 模式;若要讓所有校正值歸零(YES),需在該模式下切換確認。