Epson Artisan 800 Start Guide
Summary
Get hands-on with the Artisan 800 Series printer using this comprehensive setup guide. The manual walks new users through every step of the printing process, from unboxing high-capacity color ink cartridges to connecting power and software components. You will learn how to properly load various photo paper sizes, establish date/time settings, and configure the unit for optimal performance, ensuring you can start creating beautiful prints immediately.
Page 1 Text Content
Series
Start Here
2 Press the On button, then lift the 2 Squeeze the edge guides and slide them out. Then insert paper with the
control panel to raise it. Install ink cartridges4
glossy or printable side face-down.
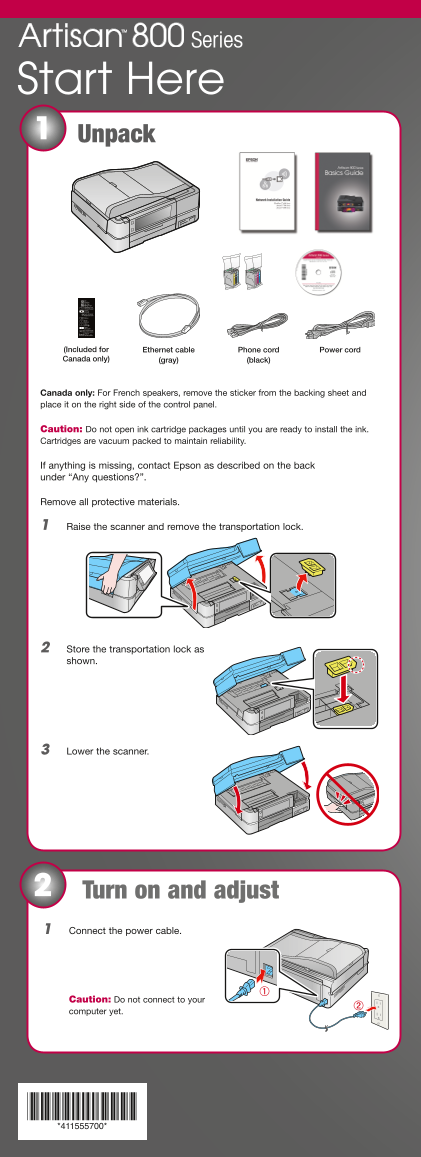
Unpack1
Note: Don’t load paper before installing the ink cartridges.
1 Raise the scanner.
To lower the control panel, press the Unlock button.
Caution: To avoid damaging your Artisan 800 Series, always press the Unlock button to lower the control panel.
3 Slide the edge guides against the paper.
Make settings3
2 Unpack the ink cartridges.
1 Select your language and country.
(Included for Ethernet cable Phone cord Power cord
Touch the screen to select the desired option. Press or to see more
Canada only) (gray) (black)
countries.
Canada only: For French speakers, remove the sticker from the backing sheet and
4 Lower the photo tray.
3 Remove only the yellow tape from each cartridge.
place it on the right side of the control panel.
Caution: Don’t remove any other seals from the cartridges.
Caution: Do not open ink cartridge packages until you are ready to install the ink. Cartridges are vacuum packed to maintain reliability.
If anything is missing, contact Epson as described on the back
under “Any questions?”. 2 For the Daylight Saving Time setting, select Summer if your region uses Daylight Saving Time and it’s currently in effect. (DST is effective from spring through summer.) Otherwise, select Winter to turn off the setting.
Remove all protective materials.
Press OK.
4 Insert the cartridges in the holder for each color. Press the cartridges
Raise the scanner and remove the transportation lock. down until they click. 5 Squeeze the edge guides and slide them out. Then insert 4 x 6-inch or
5 x 7-inch photo paper with the glossy or printable side face-down.
3 Select the date format.
Store the transportation lock as 5 Lower the scanner. shown.
Note: Make sure the paper fits under the edge guides.
6 Slide the edge guides against the paper.
4 Use the numeric keypad to set the date, then press OK.
Lower the scanner.
6 Wait while ink charges. Charging takes about 5 minutes. Note: Your Artisan 800 Series ships with full cartridges. Part of the ink from
7 Keep the cassette flat as you insert it.
the first cartridges is used for priming the Artisan 800 Series. Replacement cartridges will print more pages.
5 Select the time format. Caution: Don’t turn off the Artisan 800 Series while the ink system is initializing or you’ll waste ink.
Turn on and adjust2
Load paper
Connect the power cable.
The paper cassette has 2 trays. The main tray is for letter-size, legal-size,
8 Extend the output tray and flip up the stopper.
6 Use the numeric keypad to set the time. or 8 x 10-inch paper. The photo tray is for 4 x 6- or 5 x 7-inch photo paper.
1 Pull out the paper cassette. Then slide back the photo tray and lift it up.
Caution: Do not connect to your computer yet.
7 Press OK when done. Note: You can change the date and time settings by pressing the Home button, selecting Setup, selecting Printer Setup, then Date/Time.
Page Summary Contents For Epson Artisan 800 Start Guide
Manual Details
| Brand | Epson |
|---|---|
| Pages | 8 |
| File Size | 6.08 MB |
| Published | June 03, 2026 |
Enter the captcha to get the download link:

Frequently Asked Questions
What is the procedure for installing the ink cartridges?
Unpack them, remove protective materials, and insert them in the holder for each color.
Before loading paper, what action must be taken?
You must install the ink cartridges first. Note that the unit ships with full cartridges to prime the system.
What size photo paper is compatible with the Artisan 800 Series?
It supports 4 x 6-inch or 5 x 7-inch glossy or printable side face-down paper, and up to 8 x 10-inch paper in the main cassette.
How should I set the date and time settings?
You can change these settings by pressing the Home button, selecting Setup, then Printer Setup, followed by Date/Time.