Dell Rail Installation Guide
Summary
This document is the Rail Installation Guide for Dell A10 sliding rail assemblies for 1U and 2U rack-mounted systems. It provides multilingual instructions for rail kit identification, front and rear installation, and safety warnings. The guide details extending brackets, aligning end pieces with rack flanges, and securing latches. It specifies compatibility with square hole and round hole racks. Target users are data center technicians rack-mounting Dell server hardware.
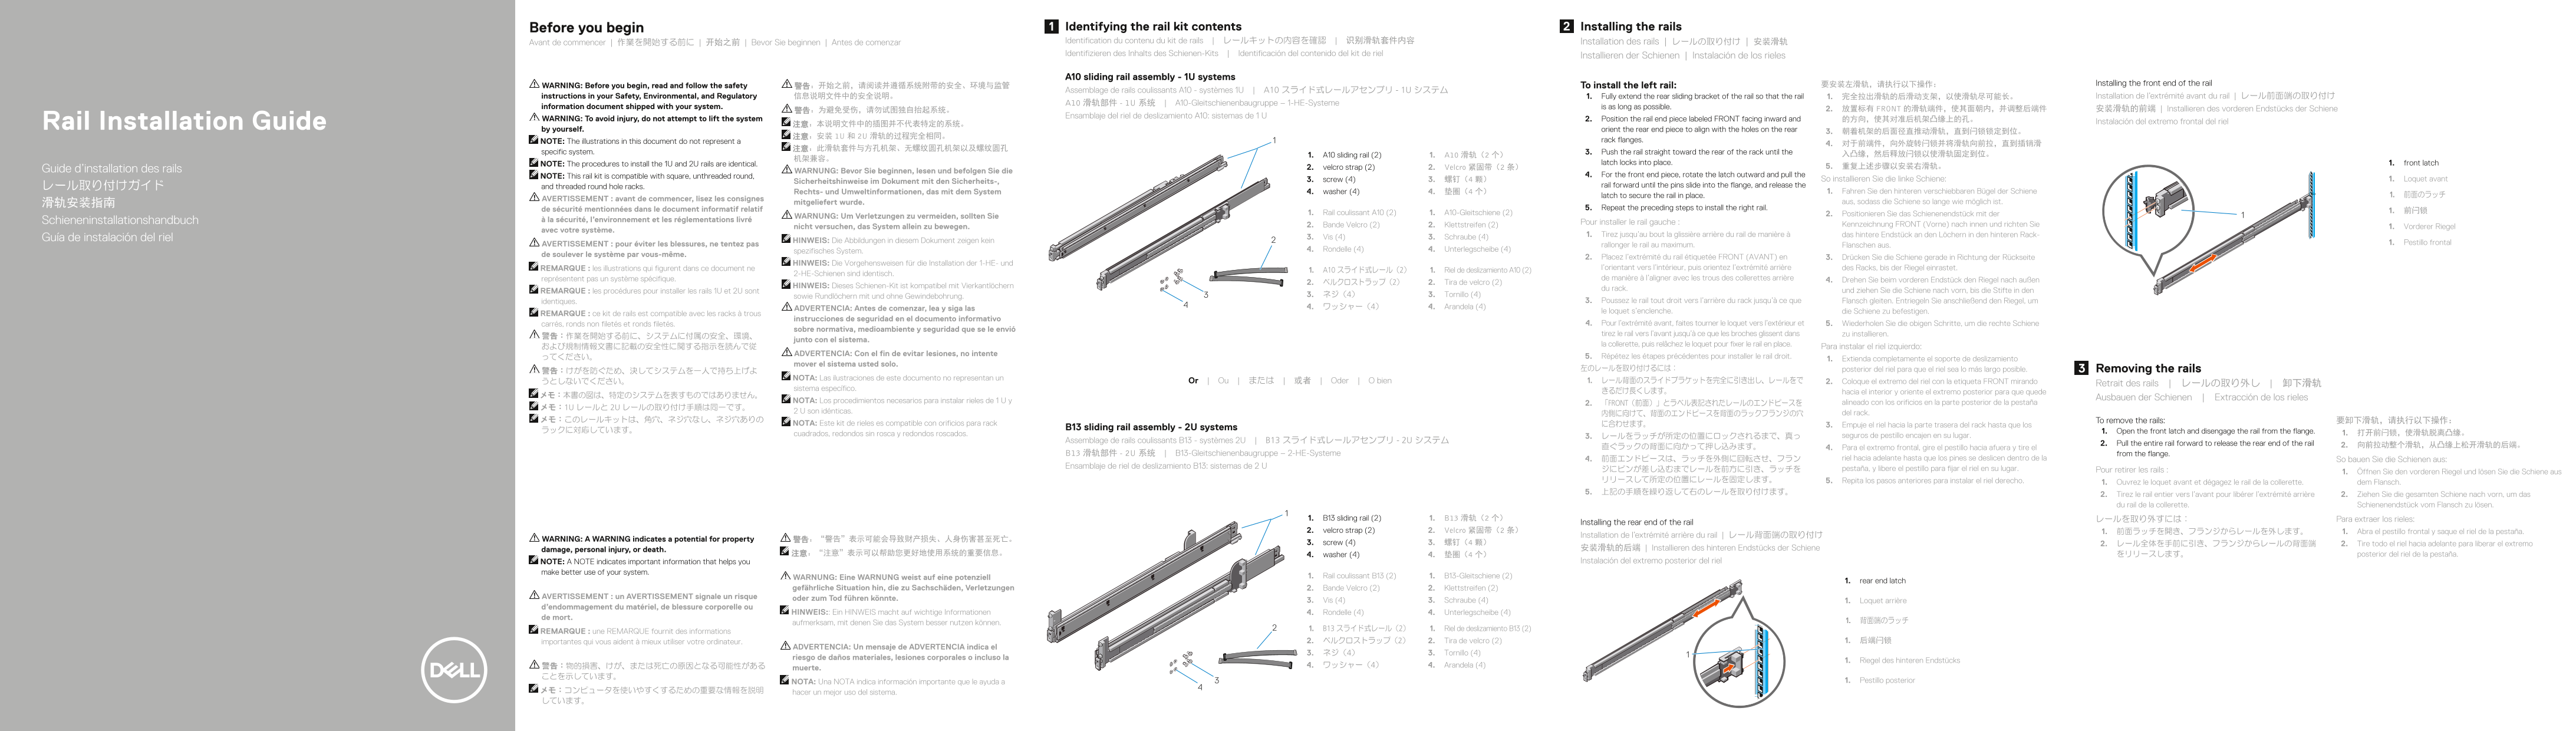
Page 1 Text Content
Before you begin Identifying the rail kit contents Installing the rails
Avant de commencer | 作業を開始する前に | 开始之前 | Bevor Sie beginnen | Antes de comenzar Identification du contenu du kit de rails | レールキットの内容を確認 | 识别滑轨套件内容 Installation des rails | レールの取り付け | 安装滑轨 Identifizieren des Inhalts des Schienen-Kits | Identificación del contenido del kit de riel
Installieren der Schienen | Instalación de los rieles
A10 sliding rail assembly - 1U systems
WARNING: Before you begin, read and follow the safety 警告:开始之前,请阅读并遵循系统附带的安全、环境与监管 要安装左滑轨,请执行以下操作: Installing the front end of the rail
To install the left rail:
Assemblage de rails coulissants A10 - systèmes 1U | A10 スライド式レールアセンブリ - 1U システム
instructions in your Safety, Environmental, and Regulatory 信息说明文件中的安全说明。 1. Fully extend the rear sliding bracket of the rail so that the rail 1. 完全拉出滑轨的后滑动支架,以使滑轨尽可能长。 Installation de l’extrémité avant du rail | レール前面端の取り付け
A10 滑轨部件 - 1U 系统 | A10-Gleitschienenbaugruppe – 1-HE-Systeme
information document shipped with your system. is as long as possible. 2. 放置标有 FRONT 的滑轨端件,使其面朝内,并调整后端件 安装滑轨的前端 | Installieren des vorderen Endstücks der Schiene
Ensamblaje del riel de deslizamiento A10: sistemas de 1 U
WARNING: To avoid injury, do not attempt to lift the system 2. Position the rail end piece labeled FRONT facing inward and 的方向,使其对准后机架凸缘上的孔。
Rail Installation Guide 注意:本说明文件中的插图并不代表特定的系统。 Instalación del extremo frontal del riel
by yourself. orient the rear end piece to align with the holes on the rear 3. 朝着机架的后面径直推动滑轨,直到闩锁锁定到位。
NOTE: The illustrations in this document do not represent a rack flanges.
specific system. 3. Push the rail straight toward the rear of the rack until the 入凸缘,然后释放闩锁以使滑轨固定到位。
1. A10 sliding rail (2) 1. A10 滑轨(2 个)
NOTE: The procedures to install the 1U and 2U rails are identical. latch locks into place. 1. front latch
2. velcro strap (2) 2. Velcro 紧固带(2 条) 5. 重复上述步骤以安装右滑轨。
Guide d’installation des rails WARNUNG: Bevor Sie beginnen, lesen und befolgen Sie die
NOTE: This rail kit is compatible with square, unthreaded round, 4. For the front end piece, rotate the latch outward and pull the
3. screw (4) 3. 螺钉(4 颗) So installieren Sie die linke Schiene: 1. Loquet avant
Sicherheitshinweise im Dokument mit den Sicherheits-,
レール取り付けガイド and threaded round hole racks. rail forward until the pins slide into the flange, and release the
Rechts- und Umweltinformationen, das mit dem System 4. washer (4) 4. 垫圈(4 个) 1. Fahren Sie den hinteren verschiebbaren Bügel der Schiene
latch to secure the rail in place. 1. 前面のラッチ
AVERTISSEMENT : avant de commencer, lisez les consignes
滑轨安装指南 mitgeliefert wurde. aus, sodass die Schiene so lange wie möglich ist.
de sécurité mentionnées dans le document informatif relatif 5. Repeat the preceding steps to install the right rail.
1. Rail coulissant A10 (2) 1. A10-Gleitschiene (2) 1. 前闩锁
WARNUNG: Um Verletzungen zu vermeiden, sollten Sie 2. Positionieren Sie das Schienenendstück mit der
Schieneninstallationshandbuch à la sécurité, l’environnement et les réglementations livré
Pour installer le rail gauche : Kennzeichnung FRONT (Vorne) nach innen und richten Sie
nicht versuchen, das System allein zu bewegen. 2. Bande Velcro (2) 2. Klettstreifen (2) 1. Vorderer Riegel
avec votre système.
1. Tirez jusqu’au bout la glissière arrière du rail de manière à das hintere Endstück an den Löchern in den hinteren Rack-
Guía de instalación del riel 3. Vis (4) 3. Schraube (4)
HINWEIS: Die Abbildungen in diesem Dokument zeigen kein 1. Pestillo frontal
AVERTISSEMENT : pour éviter les blessures, ne tentez pas rallonger le rail au maximum. Flanschen aus.
spezifisches System. 4. Rondelle (4) 4. Unterlegscheibe (4)
de soulever le système par vous-même.
2. Placez l’extrémité du rail étiquetée FRONT (AVANT) en 3. Drücken Sie die Schiene gerade in Richtung der Rückseite
HINWEIS: Die Vorgehensweisen für die Installation der 1-HE- und
REMARQUE : les illustrations qui figurent dans ce document ne l’orientant vers l’intérieur, puis orientez l’extrémité arrière des Racks, bis der Riegel einrastet.
1. A10 スライド式レール(2) 1. Riel de deslizamiento A10 (2)
2-HE-Schienen sind identisch.
représentent pas un système spécifique. de manière à l’aligner avec les trous des collerettes arrière 4. Drehen Sie beim vorderen Endstück den Riegel nach außen
2. ベルクロストラップ(2) 2. Tira de velcro (2)
HINWEIS: Dieses Schienen-Kit ist kompatibel mit Vierkantlöchern
du rack. und ziehen Sie die Schiene nach vorn, bis die Stifte in den
REMARQUE : les procédures pour installer les rails 1U et 2U sont
sowie Rundlöchern mit und ohne Gewindebohrung. 3. ネジ(4) 3. Tornillo (4)
identiques. 3. Poussez le rail tout droit vers l’arrière du rack jusqu’à ce que Flansch gleiten. Entriegeln Sie anschließend den Riegel, um
ADVERTENCIA: Antes de comenzar, lea y siga las 4. ワッシャー(4) 4. Arandela (4)
le loquet s’enclenche. die Schiene zu befestigen.
REMARQUE : ce kit de rails est compatible avec les racks à trous
instrucciones de seguridad en el documento informativo
carrés, ronds non filetés et ronds filetés. 4. Pour l’extrémité avant, faites tourner le loquet vers l’extérieur et 5. Wiederholen Sie die obigen Schritte, um die rechte Schiene
sobre normativa, medioambiente y seguridad que se le envió
tirez le rail vers l’avant jusqu’à ce que les broches glissent dans zu installieren.
junto con el sistema.
la collerette, puis relâchez le loquet pour fixer le rail en place.
および規制情報文書に記載の安全性に関する指示を読んで従 Para instalar el riel izquierdo:
ADVERTENCIA: Con el fin de evitar lesiones, no intente
ってください。 5. Répétez les étapes précédentes pour installer le rail droit.
1. Extienda completamente el soporte de deslizamiento
mover el sistema usted solo.
左のレールを取り付けるには: posterior del riel para que el riel sea lo más largo posible. Removing the rails
NOTA: Las ilustraciones de este documento no representan un
うとしないでください。 Or | Ou | または | 或者 | Oder | O bien 1. レール背面のスライドブラケットを完全に引き出し、レールをで 2. Coloque el extremo del riel con la etiqueta FRONT mirando
Retrait des rails | レールの取り外し | 卸下滑轨
sistema específico.
きるだけ長くします。 hacia el interior y oriente el extremo posterior para que quede
Ausbauen der Schienen | Extracción de los rieles
NOTA: Los procedimientos necesarios para instalar rieles de 1 U y alineado con los orificios en la parte posterior de la pestaña
2. 「FRONT(前面)」とラベル表記されたレールのエンドピースを
2 U son idénticas. del rack.
メモ:このレールキットは、角穴、ネジ穴なし、ネジ穴ありの To remove the rails: 要卸下滑轨,请执行以下操作:
NOTA: Este kit de rieles es compatible con orificios para rack に合わせます。 3. Empuje el riel hacia la parte trasera del rack hasta que los
ラックに対応しています。 B13 sliding rail assembly - 2U systems
1. Open the front latch and disengage the rail from the flange. 1. 打开前闩锁,使滑轨脱离凸缘。
cuadrados, redondos sin rosca y redondos roscados. seguros de pestillo encajen en su lugar.
Assemblage de rails coulissants B13 - systèmes 2U | B13 スライド式レールアセンブリ - 2U システム
2. Pull the entire rail forward to release the rear end of the rail 2. 向前拉动整个滑轨,从凸缘上松开滑轨的后端。
直ぐラックの背面に向かって押し込みます。 4. Para el extremo frontal, gire el pestillo hacia afuera y tire el
B13 滑轨部件 - 2U 系统 | B13-Gleitschienenbaugruppe – 2-HE-Systeme from the flange.
4. 前面エンドピースは、ラッチを外側に回転させ、フラン riel hacia adelante hasta que los pines se deslicen dentro de la So bauen Sie die Schienen aus:
Ensamblaje de riel de deslizamiento B13: sistemas de 2 U pestaña, y libere el pestillo para fijar el riel en su lugar.
ジにピンが差し込むまでレールを前方に引き、ラッチを Pour retirer les rails :
1. Öffnen Sie den vorderen Riegel und lösen Sie die Schiene aus
リリースして所定の位置にレールを固定します。 5. Repita los pasos anteriores para instalar el riel derecho.
1. Ouvrez le loquet avant et dégagez le rail de la collerette. dem Flansch.
2. Tirez le rail entier vers l’avant pour libérer l’extrémité arrière 2. Ziehen Sie die gesamten Schiene nach vorn, um das du rail de la collerette. Schienenendstück vom Flansch zu lösen.
1. B13 sliding rail (2) 1. B13 滑轨(2 个) レールを取り外すには: Para extraer los rieles:
Installing the rear end of the rail
2. velcro strap (2) 2. Velcro 紧固带(2 条) 1. 前面ラッチを開き、フランジからレールを外します。 1. Abra el pestillo frontal y saque el riel de la pestaña.
Installation de l’extrémité arrière du rail | レール背面端の取り付け
WARNING: A WARNING indicates a potential for property 警告:“警告”表示可能会导致财产损失、人身伤害甚至死亡。
3. screw (4) 3. 螺钉(4 颗) 2. レール全体を手前に引き、フランジからレールの背面端 2. Tire todo el riel hacia adelante para liberar el extremo
damage, personal injury, or death. 安装滑轨的后端 | Installieren des hinteren Endstücks der Schiene
注意:“注意”表示可以帮助您更好地使用系统的重要信息。 4. washer (4) 4. 垫圈(4 个) をリリースします。 posterior del riel de la pestaña.
NOTE: A NOTE indicates important information that helps you Instalación del extremo posterior del riel
make better use of your system.
WARNUNG: Eine WARNUNG weist auf eine potenziell 1. Rail coulissant B13 (2) 1. B13-Gleitschiene (2)
1. rear end latch
gefährliche Situation hin, die zu Sachschäden, Verletzungen 2. Bande Velcro (2) 2. Klettstreifen (2)
AVERTISSEMENT : un AVERTISSEMENT signale un risque oder zum Tod führen könnte.
3. Vis (4) 3. Schraube (4) 1. Loquet arrière
d’endommagement du matériel, de blessure corporelle ou
HINWEIS:: Ein HINWEIS macht auf wichtige Informationen 4. Rondelle (4) 4. Unterlegscheibe (4)
de mort.
aufmerksam, mit denen Sie das System besser nutzen können. 1. 背面端のラッチ
1. B13 スライド式レール(2) 1. Riel de deslizamiento B13 (2)
REMARQUE : une REMARQUE fournit des informations
importantes qui vous aident à mieux utiliser votre ordinateur. 2. ベルクロストラップ(2) 2. Tira de velcro (2) 1. 后端闩锁
ADVERTENCIA: Un mensaje de ADVERTENCIA indica el
3. ネジ(4) 3. Tornillo (4)
riesgo de daños materiales, lesiones corporales o incluso la
1. Riegel des hinteren Endstücks
警告:物的損害、けが、または死亡の原因となる可能性がある 4. ワッシャー(4) 4. Arandela (4)
muerte.
NOTA: Una NOTA indica información importante que le ayuda a 1. Pestillo posterior
メモ:コンピュータを使いやすくするための重要な情報を説明 hacer un mejor uso del sistema. しています。
Page Summary Contents For Dell Rail Installation Guide
Manual Details
| Brand | Dell |
|---|---|
| Pages | 2 |
| File Size | 1.52 MB |
| Published | June 23, 2026 |
Enter the captcha to get the download link:

Frequently Asked Questions
Is the A10 sliding rail kit compatible with all types of racks?
Yes, it is compatible with square, unthreaded round hole, and threaded round hole racks.
What safety precautions should I follow before installing the rails?
Read the safety instructions in the Safety, Environmental, and Regulatory information document and do not attempt to lift the system alone to avoid injury.
How do I install the rails on a rack with round holes without threads?
Mount only the screw using the CMA bracket slot, omitting the conical washer.
What tools are required to secure the rails to the rack?
You need a #2 Phillips screwdriver to insert and tighten the screws into the designated U-spaces.
Do the installation procedures differ between 1U and 2U rails?
No, the procedures to install the 1U and 2U rails are identical.