Roland RK-300 VIMA Recreational Keyboard Quick Start GuideUser Manual
Summary
Comprehensive setup instructions for the RK-300 music unit. This manual is essential for new users, guiding every step of integration, including connecting external CD drives, setting up stands, and linking USB memory devices. Learn how to properly power on the keyboard, format user memory, and begin enjoying all features immediately after following the easy connection process.
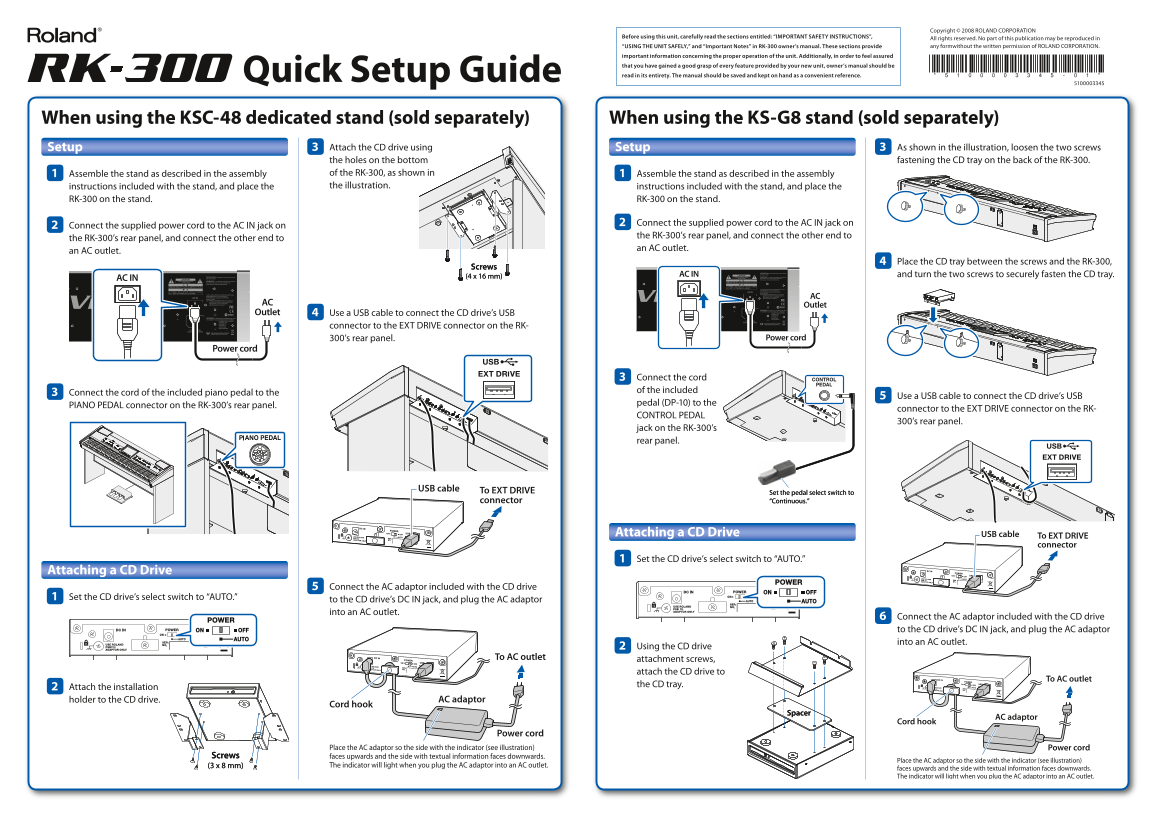
Page 1 Text Content
Copyright © 2008 ROLAND CORPORATION
Before using this unit, carefully read the sections entitled: “IMPORTANT SAFETY INSTRUCTIONS”, All rights reserved. No part of this publication may be reproduced in
“USING THE UNIT SAFELY,” and “Important Notes” in RK-300 owner’s manual. These sections provide any formwithout the written permission of ROLAND CORPORATION.
important information concerning the proper operation of the unit. Additionally, in order to feel assured that you have gained a good grasp of every feature provided by your new unit, owner’s manual should be Quick Setup Guide read in its entirety. The manual should be saved and kept on hand as a convenient reference.
When using the KSC-48 dedicated stand (sold separately) When using the KS-G8 stand (sold separately)
Setup Attach the CD drive using Setup As shown in the illustration, loosen the two screws the holes on the bottom fastening the CD tray on the back of the RK-300.
g.CDtray Screw-2.eps
Assemble the stand as described in the assembly of the RK-300, as shown in Assemble the stand as described in the assembly instructions included with the stand, and place the the illustration. instructions included with the stand, and place the
RK-300 on the stand. RK-300 on the stand.
Connect the supplied power cord to the AC IN jack on
Connect the supplied power cord to the AC IN jack on
the RK-300’s rear panel, and connect the other end to
the RK-300’s rear panel, and connect the other end to
an AC outlet.
an AC outlet.
g.Power Cord_e.eps
g.Power Cord_e.eps Place the CD tray between the screws and the RK-300,
Screws
(4 x 16 mm) AC IN and turn the two screws to securely fasten the CD tray.
AC IN
g.CDtray Set-2.eps
AC Outlet Outlet Use a USB cable to connect the CD drive’s USB
connector to the EXT DRIVE connector on the RK-
300’s rear panel. Power cord
Power cord g.CDD-USB.eps
Connect the cord of the included
Connect the cord of the included piano pedal to the
Use a USB cable to connect the CD drive’s USB
pedal (DP-10) to the
PIANO PEDAL connector on the RK-300’s rear panel.
connector to the EXT DRIVE connector on the RK-
g.Set Piano Pedal.eps CONTROL PEDAL
300’s rear panel.
jack on the RK-300’s
g.CDD-EXTDRIVE_e.eps
rear panel.
USB cable To EXT DRIVE
Set the pedal select switch to
connector “Continuous.”
Attaching a CD Drive USB cable
To EXT DRIVE connector
Set the CD drive’s select switch to “AUTO.” g.CDDPower SW.eps
Attaching a CD Drive
Connect the AC adaptor included with the CD drive
Set the CD drive’s select switch to “AUTO.”
to the CD drive’s DC IN jack, and plug the AC adaptor
g.CDDPower SW.eps
into an AC outlet.
Connect the AC adaptor included with the CD drive
g.CDD-PSB.eps
to the CD drive’s DC IN jack, and plug the AC adaptor into an AC outlet.
Using the CD drive
g.CDD-PSB.eps
To AC outlet attachment screws,
attach the CD drive to
To AC outlet
the CD tray.
Attach the installation
holder to the CD drive. AC adaptor
Cord hook
Spacer
AC adaptor
Cord hook
Power cord
Place the AC adaptor so the side with the indicator (see illustration) Power cord
Screws faces upwards and the side with textual information faces downwards.
Place the AC adaptor so the side with the indicator (see illustration)
(3 x 8 mm) The indicator will light when you plug the AC adaptor into an AC outlet.
faces upwards and the side with textual information faces downwards. The indicator will light when you plug the AC adaptor into an AC outlet.
Page Summary Contents For Roland RK-300 VIMA Recreational Keyboard Quick Start GuideUser Manual
Manual Details
| Brand | Roland |
|---|---|
| Pages | 2 |
| File Size | 2.97 MB |
| Published | June 05, 2026 |
Enter the captcha to get the download link:

Frequently Asked Questions
How do I connect an external CD drive?
Use a USB cable to connect the CD drive’s USB connector to the EXT DRIVE connector on the rear panel, and plug the included AC adaptor into a power outlet.
What process is needed before using USB memory as 'user memory'?
You must format it by accessing <Format User Memory> within the menu structure. Note that the entire contents of the user memory will be formatted.
If I encounter an error message, where should I find troubleshooting help?
Please consult the section labeled “Error Messages” located on page 209 of the Owner's Manual.