Roland TD-30 Drum Synthesizer Quick Start User Manual
Summary
The TD-30 is a professional electronic drum kit designed for comprehensive practice and live performance. This guide provides essential instructions on setup, customizing your sound, and utilizing its advanced features. Users will learn to master 100 diverse drum kits, adjust individual pad volumes using faders, execute nuanced techniques (like rim shots), play back music via USB, and connect with friends worldwide through V-Drums Friend Jam. Ideal for drummers of all levels seeking a versatile and robust rhythm experience.
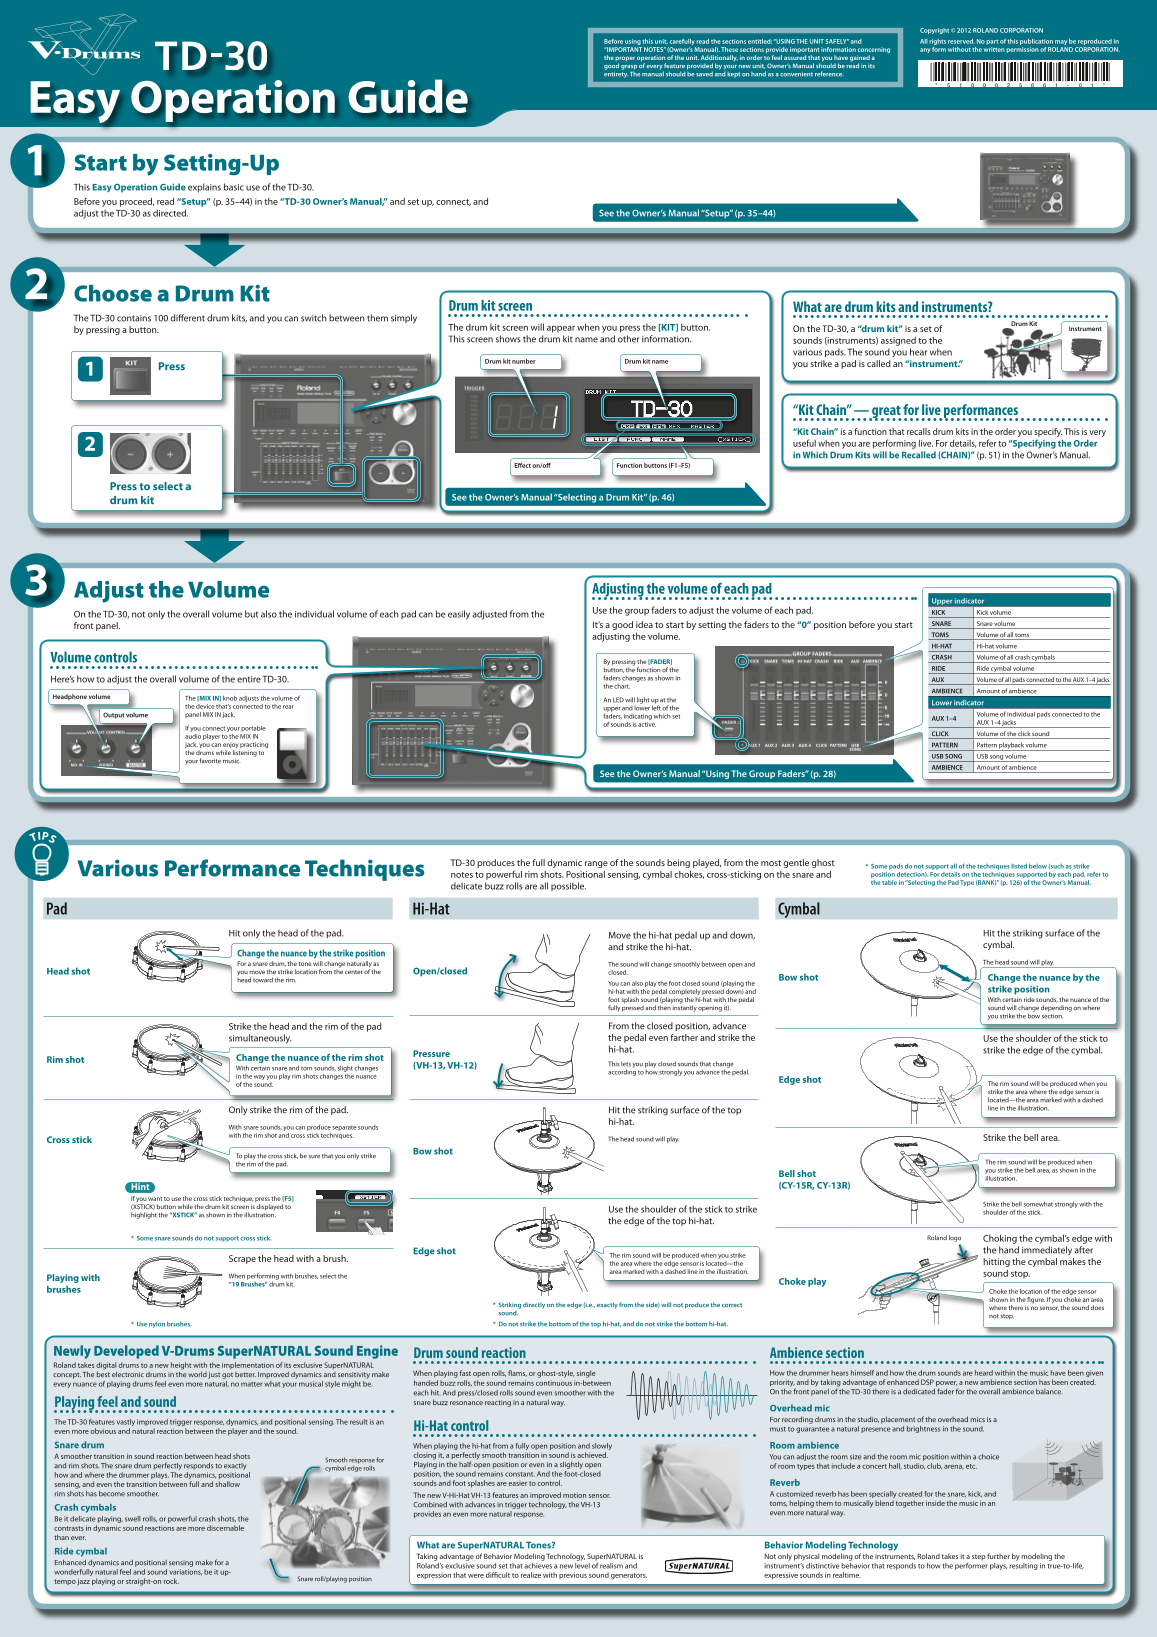
Page 1 Text Content
Copyright © 2012 ROLAND CORPORATION Before using this unit, carefully read the sections entitled: “USING THE UNIT SAFELY” and All rights reserved. No part of this publication may be reproduced in “IMPORTANT NOTES” (Owner’s Manual). These sections provide important information concerning any form without the written permission of ROLAND CORPORATION.
the proper operation of the unit. Additionally, in order to feel assured that you have gained a good grasp of every feature provided by your new unit, Owner’s Manual should be read in its entirety. The manual should be saved and kept on hand as a convenient reference.
Easy Operation Guide Start by Setting-Up This Easy Operation Guide explains basic use of the TD-30. Before you proceed, read “Setup” (p. 35–44) in the “TD-30 Owner’s Manual,” and set up, connect, and
adjust the TD-30 as directed. See the Owner’s Manual “Setup” (p. 35–44)
Choose a Drum Kit
Drum kit screen What are drum kits and instruments?
The TD-30 contains 100 different drum kits, and you can switch between them simply
Drum Kit
by pressing a button. The drum kit screen will appear when you press the [KIT] button. On the TD-30, a “drum kit” is a set of Instrument This screen shows the drum kit name and other information. sounds (instruments) assigned to the
various pads. The sound you hear when
Drum kit number Drum kit name
you strike a pad is called an “instrument.”
Press
“Kit Chain” — great for live performances “Kit Chain” is a function that recalls drum kits in the order you specify. This is very useful when you are performing live. For details, refer to “Specifying the Order in Which Drum Kits will be Recalled (CHAIN)” (p. 51) in the Owner’s Manual.
Effect on/off Function buttons (F1–F5)
Press to select a
See the Owner’s Manual “Selecting a Drum Kit” (p. 46)
drum kit
Adjust the Volume Adjusting the volume of each pad
Upper indicator
Use the group faders to adjust the volume of each pad. KICK Kick volume
On the TD-30, not only the overall volume but also the individual volume of each pad can be easily adjusted from the
It’s a good idea to start by setting the faders to the “0” position before you start SNARE Snare volume
front panel.
TOMS Volume of all toms
adjusting the volume.
HI-HAT Hi-hat volume Volume controls CRASH Volume of all crash cymbals
By pressing the [FADER]
button, the function of the RIDE Ride cymbal volume
Here’s how to adjust the overall volume of the entire TD-30. faders changes as shown in AUX Volume of all pads connected to the AUX 1–4 jacks the chart.
AMBIENCE Amount of ambience
Headphone volume The [MIX IN] knob adjusts the volume of
An LED will light up at the
Lower indicator
the device that’s connected to the rear upper and lower left of the
Output volume panel MIX IN jack. Volume of individual pads connected to the
faders, indicating which set
AUX 1–4
AUX 1–4 jacks
of sounds is active.
If you connect your portable
CLICK Volume of the click sound
audio player to the MIX IN jack, you can enjoy practicing PATTERN Pattern playback volume the drums while listening to
USB SONG USB song volume
your favorite music.
AMBIENCE Amount of ambience
See the Owner’s Manual “Using The Group Faders” (p. 28)
TD-30 produces the full dynamic range of the sounds being played, from the most gentle ghost
* Some pads do not support all of the techniques listed below (such as strike
Various Performance Techniques notes to powerful rim shots. Positional sensing, cymbal chokes, cross-sticking on the snare and position detection). For details on the techniques supported by each pad, refer to
the table in “Selecting the Pad Type (BANK)” (p. 126) of the Owner’s Manual.
delicate buzz rolls are all possible.
Pad Hi-Hat Cymbal
Hit only the head of the pad. Move the hi-hat pedal up and down, Hit the striking surface of the
and strike the hi-hat. cymbal.
Change the nuance by the strike position
For a snare drum, the tone will change naturally as The head sound will play.
The sound will change smoothly between open and
Head shot you move the strike location from the center of the Open/closed closed.
head toward the rim. Bow shot Change the nuance by the
You can also play the foot closed sound (playing the
hi-hat with the pedal completely pressed down) and strike position foot splash sound (playing the hi-hat with the pedal With certain ride sounds, the nuance of the fully pressed and then instantly opening it). sound will change depending on where you strike the bow section.
Strike the head and the rim of the pad From the closed position, advance simultaneously. the pedal even farther and strike the Use the shoulder of the stick to hi-hat. strike the edge of the cymbal.
Pressure
Rim shot Change the nuance of the rim shot
(VH-13, VH-12) This lets you play closed sounds that change
With certain snare and tom sounds, slight changes
according to how strongly you advance the pedal.
in the way you play rim shots changes the nuance
Edge shot
of the sound. The rim sound will be produced when you strike the area where the edge sensor is located—the area marked with a dashed line in the illustration.
Only strike the rim of the pad. Hit the striking surface of the top
hi-hat.
With snare sounds, you can produce separate sounds with the rim shot and cross stick techniques.
Cross stick The head sound will play. Strike the bell area.
Bow shot
To play the cross stick, be sure that you only strike
The rim sound will be produced when
the rim of the pad.
you strike the bell area, as shown in the
Bell shot
illustration.
Hint (CY-15R, CY-13R)
If you want to use the cross stick technique, press the [F5]
Strike the bell somewhat strongly with the
(XSTICK) button while the drum kit screen is displayed to
Use the shoulder of the stick to strike
shoulder of the stick.
highlight the “XSTICK” as shown in the illustration.
the edge of the top hi-hat.
* Some snare sounds do not support cross stick. Roland logo Choking the cymbal’s edge with
Edge shot the hand immediately after
The rim sound will be produced when you strike
Scrape the head with a brush.
the area where the edge sensor is located—the hitting the cymbal makes the
area marked with a dashed line in the illustration.
When performing with brushes, select the sound stop.
Playing with
“19 Brushes” drum kit. Choke play
brushes Choke the location of the edge sensor
shown in the figure. If you choke an area
* Striking directly on the edge (i.e., exactly from the side) will not produce the correct
where there is no sensor, the sound does
sound.
not stop.
* Use nylon brushes. * Do not strike the bottom of the top hi-hat, and do not strike the bottom hi-hat.
Newly Developed V-Drums Super NATURAL Sound Engine Drum sound reaction Ambience section Roland takes digital drums to a new height with the implementation of its exclusive Super NATURAL
concept. The best electronic drums in the world just got better. Improved dynamics and sensitivity make When playing fast open rolls, flams, or ghost-style, single How the drummer hears himself and how the drum sounds are heard within the music have been given every nuance of playing drums feel even more natural, no matter what your musical style might be. handed buzz rolls, the sound remains continuous in-between priority, and by taking advantage of enhanced DSP power, a new ambience section has been created. each hit. And press/closed rolls sound even smoother with the On the front panel of the TD-30 there is a dedicated fader for the overall ambience balance.
Playing feel and sound snare buzz resonance reacting in a natural way.
Overhead mic For recording drums in the studio, placement of the overhead mics is a
The TD-30 features vastly improved trigger response, dynamics, and positional sensing. The result is an
Hi-Hat control must to guarantee a natural presence and brightness in the sound.
even more obvious and natural reaction between the player and the sound. Snare drum When playing the hi-hat from a fully open position and slowly Room ambience
A smoother transition in sound reaction between head shots closing it, a perfectly smooth transition in sound is achieved. You can adjust the room size and the room mic position within a choice
Smooth response for
and rim shots. The snare drum perfectly responds to exactly Playing in the half-open position or even in a slightly open of room types that include a concert hall, studio, club, arena, etc.
cymbal edge rolls
how and where the drummer plays. The dynamics, positional position, the sound remains constant. And the foot-closed sensing, and even the transition between full and shallow sounds and foot splashes are easier to control. Reverb
rim shots has become smoother. The new V-Hi-Hat VH-13 features an improved motion sensor. A customized reverb has been specially created for the snare, kick, and
Combined with advances in trigger technology, the VH-13 toms, helping them to musically blend together inside the music in an
Crash cymbals
provides an even more natural response. even more natural way.
Be it delicate playing, swell rolls, or powerful crash shots, the contrasts in dynamic sound reactions are more discernable than ever.
What are Super NATURAL Tones? Behavior Modeling Technology
Ride cymbal
Taking advantage of Behavior Modeling Technology, Super NATURAL is Not only physical modeling of the instruments, Roland takes it a step further by modeling the
Enhanced dynamics and positional sensing make for a
Roland’s exclusive sound set that achieves a new level of realism and instrument’s distinctive behavior that responds to how the performer plays, resulting in true-to-life,
wonderfully natural feel and sound variations, be it up-
expression that were difficult to realize with previous sound generators. expressive sounds in realtime.
Snare roll/playing position
tempo jazz playing or straight-on rock.
Page Summary Contents For Roland TD-30 Drum Synthesizer Quick Start User Manual
Manual Details
| Brand | Roland |
|---|---|
| Pages | 2 |
| File Size | 5.29 MB |
| Published | May 31, 2026 |
Enter the captcha to get the download link:

Frequently Asked Questions
Where should I start if I'm using the TD-30 for the first time?
You must read the 'Setup' section (pages 35–44) in the Owner's Manual to set up, connect, and adjust the unit properly.
How can I change the drum kit sounds on the TD-30?
Press the [KIT] button. The device contains 100 different drum kits, and you switch between them using this screen.
What function is 'Kit Chain' used for?
It recalls specified drum kits in a set order, which is particularly useful during live performances.
How do I adjust the overall volume of all pads?
Use the group faders on the front panel to control the comprehensive sound output.