PHILIPS DVD+RW&CD-R RW Internal drives Quick User Guide (English)
Summary
Upgrade your system with this Philips DVD+RW or CD-R/RW internal drive unit. This comprehensive manual is designed for PC owners needing professional, step-by-step guidance on installation and setup. It guides you through all the necessary procedures, covering both physical hardware connections—including IDE cable placement and power wiring—and software initialization via the included Setup program. Ensure seamless integration of your new optical drive into any desktop computer system.
Page 1 Text Content
CDRW internal 28-11-2001 13:08 Pagina 1
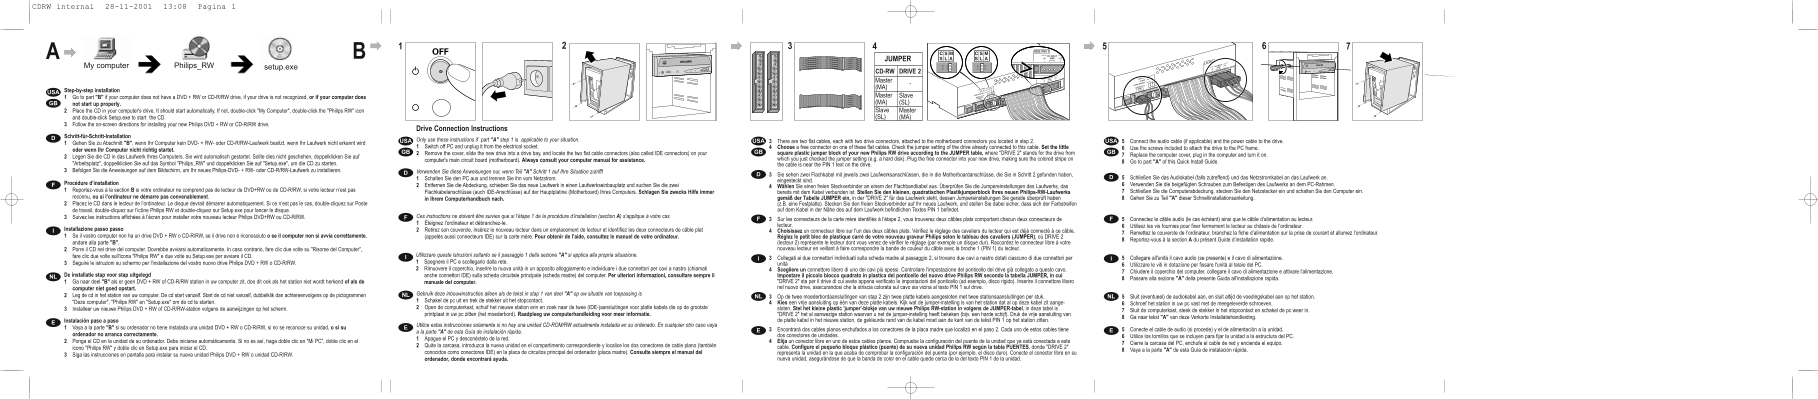
43B JUMPER
Philips_RW setup.exe My computer
CD-RW DRIVE 2 Master (MA)
Step-by-step installation USA
1 Go to part "B" if your computer does not have a DVD + RW or CD-R/RW drive, if your drive is not recognized, or if your computer does Master Slave GB not start up properly. (MA) (SL) 2 Place the CD in your computer's drive. It should start automatically. If not, double-click "My Computer", double-click the "Philips RW" icon Slave Master and double-click Setup.exe to start the CD. (SL) (MA)
3 Follow the on-screen directions for installing your new Philips DVD + RW or CD-R/RW drive.
Drive Connection Instructions
Schritt-für-Schritt-Installation
USA Only use these instructions if part "A" step 1 is applicable to your situation. USA There are two flat cables, each with two drive connectors, attached to the motherboard connectors you located in step 2. USA Connect the audio cable (if applicable) and the power cable to the drive.
1 Gehen Sie zu Abschnitt "B", wenn Ihr Computer kein DVD- + RW- oder CD-R/RW-Laufwerk besitzt, wenn Ihr Laufwerk nicht erkannt wird
Switch off PC and unplug it from the electrical socket. Choose a free connector on one of these flat cables. Check the jumper setting of the drive already connected to this cable. Set the little Use the screws included to attach the drive to the PC frame.
oder wenn Ihr Computer nicht richtig startet.
GB Remove the cover, slide the new drive into a drive bay, and locate the two flat cable connectors (also called IDE connectors) on your GB square plastic jumper block of your new Philips RW drive according to the JUMPER table, where "DRIVE 2" stands for the drive from GB
2 Legen Sie die CD in das Laufwerk Ihres Computers. Sie wird automatisch gestartet. Sollte dies nicht geschehen, doppelklicken Sie auf Replace the computer cover, plug in the computer and turn it on.
computer's main circuit board (motherboard). Always consult your computer manual for assistance. which you just checked the jumper setting (e.g. a hard disk). Plug the free connector into your new drive, making sure the colored stripe on
"Arbeitsplatz", doppelklicken Sie auf das Symbol "Philips_RW" und doppelklicken Sie auf "Setup.exe", um die CD zu starten. Go to part "A" of this Quick Install Guide.
the cable is near the PIN 1 text on the drive.
3 Befolgen Sie die Anweisungen auf dem Bildschirm, um Ihr neues Philips-DVD- + RW- oder CD-R/RW-Laufwerk zu installieren. Verwenden Sie diese Anweisungen nur, wenn Teil "A" Schritt 1 auf Ihre Situation zutrifft
Sie sehen zwei Flachkabel mit jeweils zwei Laufwerksanschlüssen, die in die Motherboardanschlüsse, die Sie in Schritt 2 gefunden haben,
Schalten Sie den PC aus und trennen Sie ihn vom Netzstrom. Schließen Sie das Audiokabel (falls zutreffend) und das Netzstromkabel an das Laufwerk an.
eingesteckt sind.
Procédure d’installation Verwenden Sie die beigefügten Schrauben zum Befestigen des Laufwerks an dem PC-Rahmen.
Entfernen Sie die Abdeckung, schieben Sie das neue Laufwerk in einen Laufwerkseinbauplatz und suchen Sie die zwei Wählen Sie einen freien Steckverbinder an einem der Flachbandkabel aus. Überprüfen Sie die Jumpereinstellungen des Laufwerks, das
1 Reportez-vous à la section B si votre ordinateur ne comprend pas de lecteur de DVD+RW ou de CD-R/RW, si votre lecteur n’est pas Schließen Sie die Computerabdeckung, stecken Sie den Netzstecker ein und schalten Sie den Computer ein.
Flachkabelanschlüsse (auch IDE-Anschlüsse) auf der Hauptplatine (Motherboard) Ihres Computers. Schlagen Sie zwecks Hilfe immer bereits mit dem Kabel verbunden ist. Stellen Sie den kleinen, quadratischen Plastikjumperblock Ihres neuen Philips-RW-Laufwerks
reconnu, ou si l’ordinateur ne démarre pas convenablement. gemäß der Tabelle JUMPER ein, in der "DRIVE 2" für das Laufwerk steht, dessen Jumpereinstellungen Sie gerade überprüft haben Gehen Sie zu Teil "A" dieser Schnellinstallationsanleitung.
in Ihrem Computerhandbuch nach.
2 Placez le CD dans le lecteur de l’ordinateur. Le disque devrait démarrer automatiquement. Si ce n’est pas le cas, double-cliquez sur Poste (z.B. eine Festplatte). Stecken Sie den freien Steckverbinder auf Ihr neues Laufwerk, und stellen Sie dabei sicher, dass sich der Farbstreifen
de travail, double-cliquez sur l’icône Philips RW et double-cliquez sur Setup.exe pour lancer le disque. auf dem Kabel in der Nähe des auf dem Laufwerk befindlichen Textes PIN 1 befindet.
3 Suivez les instructions affichées à l’écran pour installer votre nouveau lecteur Philips DVD+RW ou CD-R/RW. Ces instructions ne doivent être suivies que si l’étape 1 de la procédure d’installation (section A) s’applique à votre cas
Sur les connecteurs de la carte mère identifiés à l’étape 2, vous trouverez deux câbles plats comportant chacun deux connecteurs de Connectez le câble audio (le cas échéant) ainsi que le câble d’alimentation au lecteur.
Éteignez l’ordinateur et débranchez-le.
lecteur. Utilisez les vis fournies pour fixer fermement le lecteur au châssis de l’ordinateur.
Installazione passo passo Retirez son couvercle, insérez le nouveau lecteur dans un emplacement de lecteur et identifiez les deux connecteurs de câble plat Choisissez un connecteur libre sur l'un des deux câbles plats. Vérifiez le réglage des cavaliers du lecteur qui est déjà connecté à ce câble.
Remettez le couvercle de l’ordinateur, branchez la fiche d’alimentation sur la prise de courant et allumez l’ordinateur.
1 Se il vostro computer non ha un drive DVD + RW o CD-R/RW, se il drive non è riconosciuto o se il computer non si avvia correttamente, (appelés aussi connecteurs IDE) sur la carte mère. Pour obtenir de l’aide, consultez le manuel de votre ordinateur. Réglez le petit bloc de plastique carré de votre nouveau graveur Philips selon le tableau des cavaliers (JUMPER), où DRIVE 2
Reportez-vous à la section A du présent Guide d’installation rapide.
andare alla parte "B". (lecteur 2) représente le lecteur dont vous venez de vérifier le réglage (par exemple un disque dur). Raccordez le connecteur libre à votre 2 Porre il CD nel drive del computer. Dovrebbe avviarsi automaticamente. In caso contrario, fare clic due volte su "Risorse del Computer", nouveau lecteur en veillant à faire correspondre la bande de couleur du câble avec la broche 1 (PIN 1) du lecteur.
fare clic due volte sull'icona "Philips RW" e due volte su Setup.exe per avviare il CD. Utilizzare queste istruzioni soltanto se il passaggio 1 della sezione "A" si applica alla propria situazione.
Collegati ai due connettori individuati sulla scheda madre al passaggio 2, si trovano due cavi a nastro dotati ciascuno di due connettori per Collegare all'unità il cavo audio (se presente) e il cavo di alimentazione.
3 Seguire le istruzioni su schermo per l'installazione del vostro nuovo drive Philips DVD + RW o CD-R/RW. Spegnere il PC e scollegarlo dalla rete.
unità Utilizzare le viti in dotazione per fissare l'unità al telaio del PC.
Rimuovere il coperchio, inserire la nuova unità in un apposito alloggiamento e individuare i due connettori per cavi a nastro (chiamati Scegliere un connettore libero di uno dei cavi più spessi. Controllare l'impostazione del ponticello del drive già collegato a questo cavo.
Chiudere il coperchio del computer, collegare il cavo di alimentazione e attivare l'alimentazione.
De installatie stap voor stap uitgelegd anche connettori IDE) sulla scheda circuitale principale (scheda madre) del computer. Per ulteriori informazioni, consultare sempre il Impostare il piccolo blocco quadrato in plastica del ponticello del nuovo drive Philips RW secondo la tabella JUMPER, in cui NL Passare alla sezione "A" della presente Guida all'installazione rapida.
1 Ga naar deel "B" als er geen DVD + RW of CD-R/RW station in uw computer zit, doe dit ook als het station niet wordt herkend of als de manuale del computer. "DRIVE 2" sta per il drive di cui avete appena verificato le impostazioni del ponticello (ad esempio, disco rigido). Inserire il connettore libero computer niet goed opstart. nel nuovo drive, assicurandosi che la striscia colorata sul cavo sia vicina al testo PIN 1 sul drive.
2 Leg de cd in het station van uw computer. De cd start vanzelf. Start de cd niet vanzelf, dubbelklik dan achtereenvolgens op de pictogrammen NL Gebruik deze inbouwinstructies alleen als de tekst in stap 1 van deel "A" op uw situatie van toepassing is
NL Op de twee moederbordaansluitingen van stap 2 zijn twee platte kabels aangesloten met twee stationsaansluitingen per stuk. NL Sluit (eventueel) de audiokabel aan, en sluit altijd de voedingskabel aan op het station.
"Deze computer", "Philips RW" en "Setup.exe" om de cd te starten. Schakel de pc uit en trek de stekker uit het stopcontact.
Kies een vrije aansluiting op één van deze platte kabels. Kijk wat de jumper-instelling is van het station dat al op deze kabel zit aange- Schroef het station in uw pc vast met de meegeleverde schroeven.
3 Installeer uw nieuwe Philips DVD + RW of CD-R/RW-station volgens de aanwijzingen op het scherm. Open de computerkast, schuif het nieuwe station erin en zoek naar de twee (IDE-)aansluitingen voor platte kabels die op de grootste sloten. Stel het kleine plastic 'jumper'-blokje van uw nieuwe Philips RW-station in volgens de JUMPER-tabel, in deze tabel is
Sluit de computerkast, steek de stekker in het stopcontact en schakel de pc weer in.
printplaat in uw pc zitten (het moederbord). Raadpleeg uw computerhandleiding voor meer informatie. "DRIVE 2" het al aanwezige station waarvan u net de jumper-instelling heeft bekeken (bijv. een harde schijf). Druk de vrije aansluiting van
Ga naar tekst "A" van deze Verkorte Installatiehandleiding.
Instalación paso a paso de platte kabel in het nieuwe station, de gekleurde rand van de kabel moet aan de kant van de tekst PIN 1 op het station zitten.
Utilice estas instrucciones solamente si no hay una unidad CD-ROM/RW actualmente instalada en su ordenado. En cualquier otro caso vaya
1 Vaya a la parte "B" si su ordenador no tiene instalada una unidad DVD + RW o CD-R/RW, si no se reconoce su unidad, o si su Encontrará dos cables planos enchufados a los conectores de la placa madre que localizó en el paso 2. Cada uno de estos cables tiene Conecte el cable de audio (si procede) y el de alimentación a la unidad.
a la parte "A" de esta Guía de instalación rápida.
ordenador no arranca correctamente. dos conectores de unidades. Utilice los tornillos que se incluyen para fijar la unidad a la estructura del PC.
Apague el PC y desconéctelo de la red.
2 Ponga el CD en la unidad de su ordenador. Debe iniciarse automáticamente. Si no es así, haga doble clic en "Mi PC", doble clic en el Elija un conector libre en uno de estos cables planos. Compruebe la configuración del puente de la unidad que ya está conectada a este Cierre la carcasa del PC, enchufe el cable de red y encienda el equipo.
Quite la carcasa, introduzca la nueva unidad en el compartimento correspondiente y localice los dos conectores de cable plano (también cable. Configure el pequeño bloque plástico (puente) de su nueva unidad Philips RW según la tabla PUENTES, donde "DRIVE 2"
icono "Philips RW" y doble clic en Setup.exe para iniciar el CD. Vaya a la parte "A" de esta Guía de instalación rápida.
conocidos como conectores IDE) en la placa de circuitos principal del ordenador (placa madre). Consulte siempre el manual del representa la unidad en la que acaba de comprobar la configuración del puente (por ejemplo, el disco duro). Conecte el conector libre en su
3 Siga las instrucciones en pantalla para instalar su nueva unidad Philips DVD + RW o unidad CD-R/RW.
ordenador, donde encontrará ayuda. nueva unidad, asegurándose de que la banda de color en el cable quede cerca de la del texto PIN 1 de la unidad.
Page Summary Contents For PHILIPS DVD+RW&CD-R RW Internal drives Quick User Guide (English)
Manual Details
| Brand | Philips |
|---|---|
| Pages | 2 |
| File Size | 307.44 KB |
| Published | June 02, 2026 |
Enter the captcha to get the download link:

Frequently Asked Questions
How do I start the setup process if it doesn't run automatically?
Double-click 'My Computer', then double-click the 'Philips RW' icon, and finally double-click Setup.exe.
What should I check when connecting the new drive cables?
Ensure the colored stripe on the free connector is near the PIN 1 text on the drive unit.
Is there a dedicated manual for this CD-RW drive?
The enclosed CD contains an Install wizard, Manual, Application software, and warranty leaflets.