Nikon COOLPIX S02 User Manual
Summary
Unlock the full potential of your Nikon COOLPIX S02 Digital Camera with this comprehensive user manual. This resource guides first-time and experienced users through every aspect of the compact digital camera experience. Learn detailed instructions on setup, charging, and utilizing advanced features like multiple photo/video modes, zoom control, and motion detection. The guide also covers seamless file transfer using ViewNX 2 and USB connection. Perfect for photographers who require a complete understanding of their camera's capabilities to capture stunning memories effortlessly.
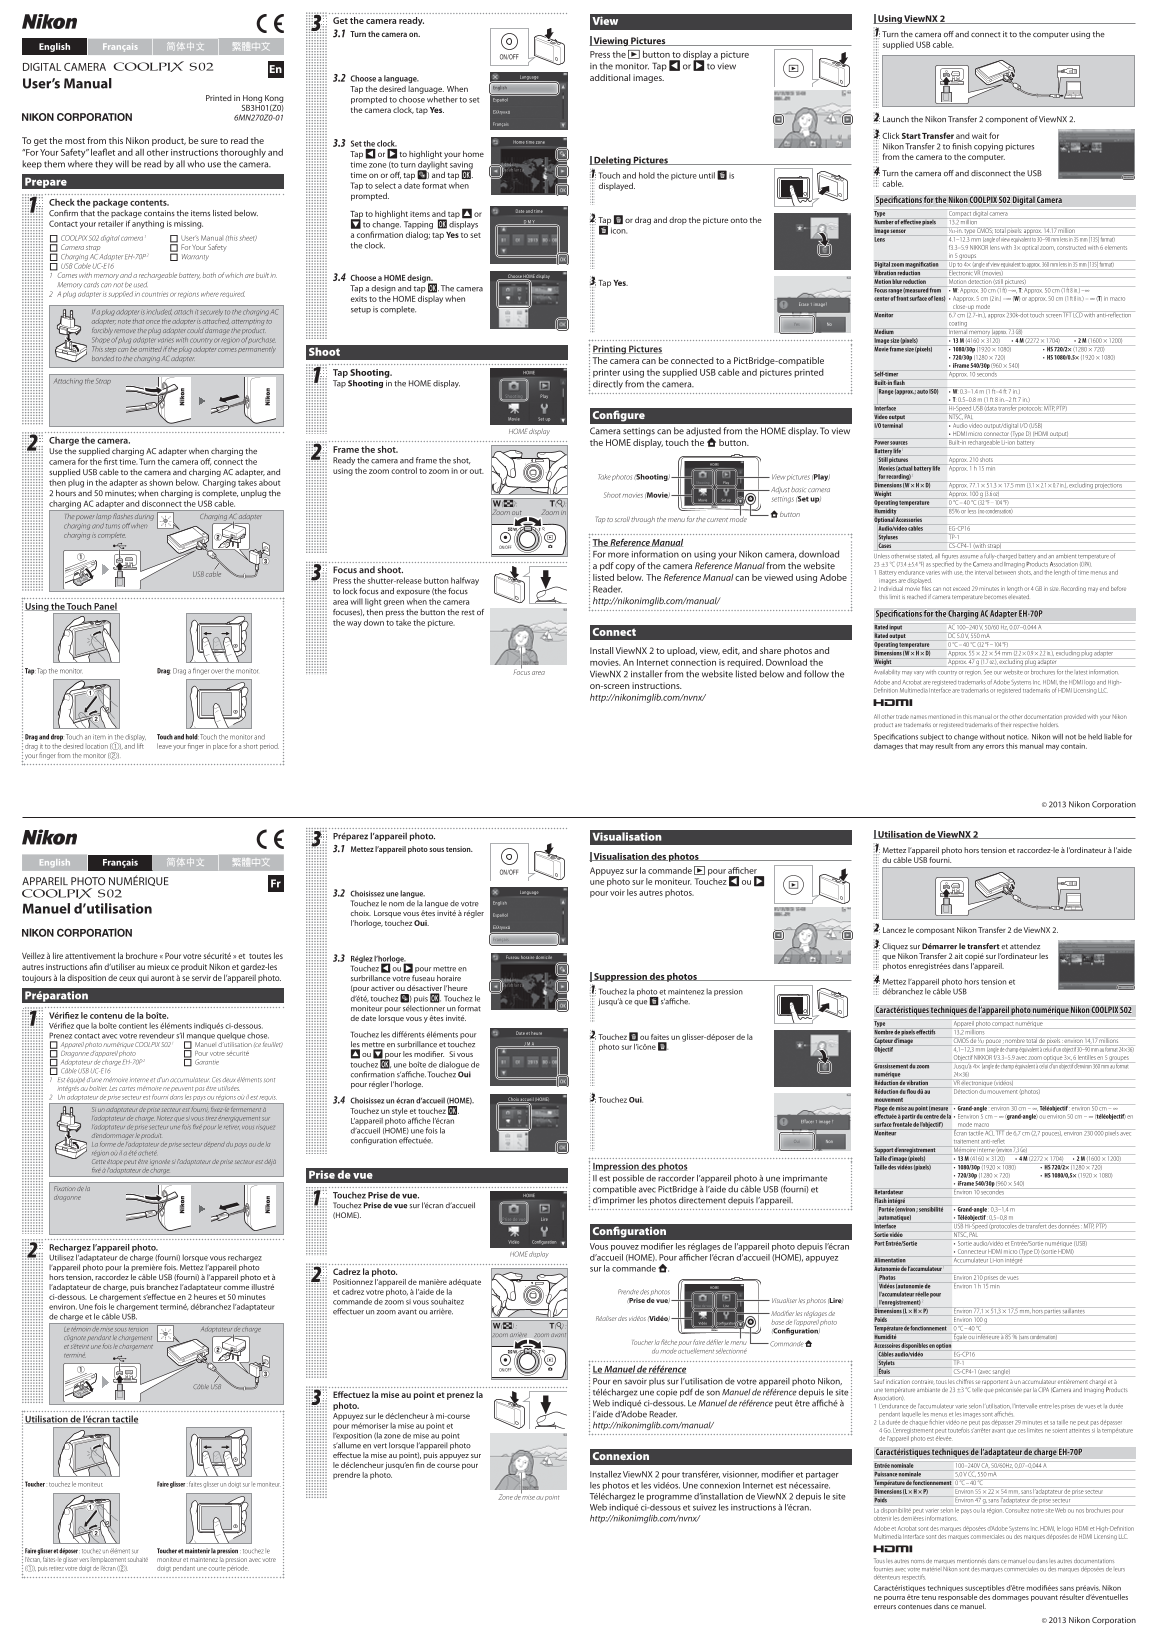
Page 1 Text Content
Get the camera ready. Using View NX
3.1 Turn the camera on. Turn the camera off and connect it to the computer using the
Viewing Pictures
English Français 简体中文 繁體中文 supplied USB cable.
Press the c button to display a picture in the monitor. Tap C or D to view
En DIGITAL CAMERA
3.2 Choose a language. additional images.
User’s Manual
Tap the desired language. When
Printed in Hong Kong prompted to choose whether to set
SB3H01(Z0)
the camera clock, tap Yes.
6MN270Z0-01 Launch the Nikon Transfer 2 component of View NX 2.
Click Start Transfer and wait for
To get the most from this Nikon product, be sure to read the 3.3 Set the clock.
Nikon Transfer 2 to fi nish copying pictures
“For Your Safety” leafl et and all other instructions thoroughly and Tap C or D to highlight your home
from the camera to the computer.
Deleting Pictures
keep them where they will be read by all who use the camera. time zone (to turn daylight saving
time on or off , tap p) and tap I. Turn the camera off and disconnect the USB
Touch and hold the picture until E is
Prepare cable.
Tap to select a date format when displayed. prompted.
Specifi cations for the Nikon COOLPIX S02 Digital Camera
Check the package contents.
Confi rm that the package contains the items listed below. Tap to highlight items and tap A or Type Compact digital camera
Tap E or drag and drop the picture onto the Number of eff ective pixels 13.2 million
Contact your retailer if anything is missing. B to change. Tapping I displays
E icon. Image sensor ⁄-in. type CMOS; total pixels: approx. 14.17 million
a confi rmation dialog; tap Yes to set
COOLPIX S02 digital camera 1 User’s Manual (this sheet) Lens 4.1–12.3 mm (angle of view equivalent to 30–90 mm lens in 35 mm [135] format)
Camera strap For Your Safety the clock. f3.3–5.9 NIKKOR lens with 3× optical zoom, constructed with 6 elements
Charging AC Adapter EH-70P 2 Warranty in 5 groups
Digital zoom magnifi cation Up to 4× (angle of view equivalent to approx. 360 mm lens in 35 mm [135] format)
USB Cable UC-E16
Vibration reduction Electronic VR (movies)
1 Comes with memory and a rechargeable battery, both of which are built in.
3.4 Choose a HOME design.
Tap Yes. Motion blur reduction Motion detection (still pictures)
Memory cards can not be used.
Tap a design and tap I. The camera Focus range (measured from W: Approx. 30 cm (1 ft) –∞, T: Approx. 50 cm (1 ft 8 in.) –∞
2 A plug adapter is supplied in countries or regions where required.
exits to the HOME display when center of front surface of lens) Aapprox. 5 cm (2 in.) –∞ (W) or approx. 50 cm (1 ft 8 in.) – ∞ (T) in macro
close-up mode
setup is complete.
If a plug adapter is included, attach it securely to the charging AC
Monitor 6.7 cm (2.7-in.), approx 230k-dot touch screen TFT LCD with anti-refl ection
adapter; note that once the adapter is attached, attempting to coating forcibly remove the plug adapter could damage the product. Medium Internal memory (approx. 7.3 GB) Shape of plug adapter varies with country or region of purchase. Image size (pixels) 13 M (4160 × 3120)• 4 M (2272 × 1704)• 2 M (1600 × 1200)•
This step can be omitted if the plug adapter comes permanently Printing Pictures Movie frame size (pixels) 1080/30p (1920 × 1080) HS 720/2× (1280 × 720)
Shoot
bonded to the charging AC adapter. 720/30p (1280 × 720) HS 1080/0.5× (1920 × 1080)
The camera can be connected to a Pict Bridge-compatible
i Frame 540/30p (960 × 540)
Tap Shooting. printer using the supplied USB cable and pictures printed Self-timer Approx. 10 seconds
Attaching the Strap Built-in fl ash
Tap Shooting in the HOME display. directly from the camera.
Range (approx.; auto ISO) W: 0.3–1.4 m (1 ft–4 ft 7 in.)
T: 0.5–0.8 m (1 ft 8 in.–2 ft 7 in.)
Interface Hi-Speed USB (data transfer protocols: MTP, PTP)
Confi gure Video output NTSC, PAL
I/O terminal Audio video output/digital I/O (USB)
HOME display Camera settings can be adjusted from the HOME display. To view
HDMI micro connector (Type D) (HDMI output)
Charge the camera. the HOME display, touch the W button. Power sources Built-in rechargeable Li-ion battery
Use the supplied charging AC adapter when charging the Frame the shot. Battery life 1
Ready the camera and frame the shot, Still pictures Approx. 210 shots
camera for the fi rst time. Turn the camera off , connect the
Movies (actual battery life Approx. 1 h 15 min
supplied USB cable to the camera and charging AC adapter, and using the zoom control to zoom in or out.
Take photos (Shooting) View pictures (Play) for recording) 2
then plug in the adapter as shown below. Charging takes about Dimensions (W × H × D) Approx. 77.1 × 51.3 × 17.5 mm (3.1 × 2.1 × 0.7 in.), excluding projections
Adjust basic camera
2 hours and 50 minutes; when charging is complete, unplug the Shoot movies (Movie) Weight Approx. 100 g (3.6 oz)
settings (Set up)
charging AC adapter and disconnect the USB cable. f(h): g(i): Operating temperature 0 °C – 40 °C (32 °F – 104 °F) Zoom out Zoom in Humidity 85% or less (no condensation)
W button
Charging AC adapter The power lamp fl ashes during
Tap to scroll through the menu for the current mode Optional Accessories
charging and turns off when
Audio/video cables EG-CP16
charging is complete. Styluses TP-1
The Reference Manual
Cases CS-CP4-1 (with strap)
For more information on using your Nikon camera, download Unless otherwise stated, all fi gures assume a fully-charged battery and an ambient temperature of
23 ±3 °C (73.4 ±5.4 °F) as specifi ed by the Camera and Imaging Products Association (CIPA).
a pdf copy of the camera Reference Manual from the website
Focus and shoot. 1 Battery endurance varies with use, the interval between shots, and the length of time menus and
USB cable
listed below. The Reference Manual can be viewed using Adobe
Press the shutter-release button halfway images are displayed. Reader. 2 Individual movie fi les can not exceed 29 minutes in length or 4 GB in size. Recording may end before
to lock focus and exposure (the focus
this limit is reached if camera temperature becomes elevated.
area will light green when the camera http://nikonimglib.com/manual/
Using the Touch Panel
focuses), then press the button the rest of Specifi cations for the Charging AC Adapter EH-70P the way down to take the picture.
Rated input AC 100–240 V, 50/60 Hz, 0.07–0.044 A
Connect
Rated output DC 5.0 V, 550 m A Operating temperature 0 °C – 40 °C (32 °F – 104 °F)
Install View NX 2 to upload, view, edit, and share photos and Dimensions (W × H × D) Approx. 55 × 22 × 54 mm (2.2 × 0.9 × 2.2 in.), excluding plug adapter
movies. An Internet connection is required. Download the Weight Approx. 47 g (1.7 oz.), excluding plug adapter
Tap: Tap the monitor. Drag: Drag a fi nger over the monitor. Focus area Availability may vary with country or region. See our website or brochures for the latest information.
View NX 2 installer from the website listed below and follow the
Adobe and Acrobat are registered trademarks of Adobe Systems Inc. HDMI, the HDMI logo and High-
on-screen instructions.
Defi nition Multimedia Interface are trademarks or registered trademarks of HDMI Licensing LLC.
http://nikonimglib.com/nvnx/
All other trade names mentioned in this manual or the other documentation provided with your Nikon product are trademarks or registered trademarks of their respective holders. Drag and drop: Touch an item in the display, Touch and hold: Touch the monitor and Specifi cations subject to change without notice. Nikon will not be held liable for drag it to the desired location (q), and lift leave your fi nger in place for a short period. damages that may result from any errors this manual may contain.
your fi nger from the monitor (w).
Préparez l’appareil photo. Utilisation de View NX 2
Visualisation
3.1 Mettez l’appareil photo sous tension. Mettez l’appareil photo hors tension et raccordez-le à l’ordinateur à l’aide
Visualisation des photos
du câble USB fourni.
English Français 简体中文 繁體中文
Appuyez sur la commande c pour affi cher Fr APPAREIL PHOTO NUMÉRIQUE une photo sur le moniteur. Touchez C ou D 3.2 Choisissez une langue. pour voir les autres photos.
Touchez le nom de la langue de votre
Manuel d’utilisation
choix. Lorsque vous êtes invité à régler l’horloge, touchez Oui.
Lancez le composant Nikon Transfer 2 de View NX 2.
Cliquez sur Démarrer le transfert et attendez Veillez à lire attentivement la brochure « Pour votre sécurité » et toutes les que Nikon Transfer 2 ait copié sur l’ordinateur les
3.3 Réglez l’horloge.
autres instructions afi n d’utiliser au mieux ce produit Nikon et gardez-les photos enregistrées dans l’appareil.
Touchez C ou D pour mettre en
toujours à la disposition de ceux qui auront à se servir de l’appareil photo. surbrillance votre fuseau horaire Suppression des photos
Mettez l’appareil photo hors tension et
(pour activer ou désactiver l’heure
Touchez la photo et maintenez la pression débranchez le câble USB
Préparation
d’été, touchez p) puis I. Touchez le
jusqu’à ce que E s’affi che.
moniteur pour sélectionner un format Caractéristiques techniques de l’appareil photo numérique Nikon COOLPIX S02
Vérifi ez le contenu de la boîte.
de date lorsque vous y êtes invité.
Type Appareil photo compact numérique
Vérifi ez que la boîte contient les éléments indiqués ci-dessous.
Nombre de pixels eff ectifs 13,2 millions
Prenez contact avec votre revendeur s’il manque quelque chose. Touchez les diff érents éléments pour
Touchez E ou faites un glisser-déposer de la
Capteur d’image CMOS de ⁄ pouce ; nombre total de pixels : environ 14,17 millions
Appareil photo numérique COOLPIX S02 1 Manuel d’utilisation (ce feuillet) les mettre en surbrillance et touchez
photo sur l’icône E.
Objectif 4,1–12,3 mm (angle de champ équivalent à celui d’un objectif 30–90 mm au format 24×36)
Dragonne d’appareil photo Pour votre sécurité A ou B pour les modifi er. Si vous
Objectif NIKKOR f/3.3–5.9 avec zoom optique 3×, 6 lentilles en 5 groupes
Adaptateur de charge EH-70P 2 Garantie
touchez I, une boîte de dialogue de Grossissement du zoom Jusqu’à 4× (angle de champ équivalent à celui d’un objectif d’environ 360 mm au format
Câble USB UC-E16
confi rmation s’affi che. Touchez Oui numérique 24×36)
1 Est équipé d’une mémoire interne et d’un accumulateur. Ces deux éléments sont
pour régler l’horloge. Réduction de vibration VR électronique (vidéos)
intégrés au boîtier. Les cartes mémoire ne peuvent pas être utilisées.
Réduction du fl ou dû au Détection du mouvement (photos)
2 Un adaptateur de prise secteur est fourni dans les pays ou régions où il est requis.
3.4 Choisissez un écran d’accueil (HOME). Touchez Oui. mouvement Si un adaptateur de prise secteur est fourni, fi xez-le fermement à Plage de mise au point (mesure Grand-angle : environ 30 cm – ∞, Téléobjectif : environ 50 cm – ∞
Touchez un style et touchez I.
eff ectuée à partir du centre de la Eenviron 5 cm – ∞ (grand-angle) ou environ 50 cm – ∞ (téléobjectif) en
l’adaptateur de charge. Notez que si vous tirez énergiquement sur
L’appareil photo affi che l’écran
surface frontale de l’objectif) mode macro
l’adaptateur de prise secteur une fois fi xé pour le retirer, vous risquez
d’accueil (HOME) une fois la
Moniteur Écran tactile ACL TFT de 6,7 cm (2,7 pouces), environ 230 000 pixels avec
d’endommager le produit.
confi guration eff ectuée. traitement anti-refl et
La forme de l’adaptateur de prise secteur dépend du pays ou de la
Support d’enregistrement Mémoire interne (environ 7,3 Go)
région où il a été acheté.
Taille d’image (pixels) 13 M (4160 × 3120)• 4 M (2272 × 1704)• 2 M (1600 × 1200)•
Cette étape peut être ignorée si l’adaptateur de prise secteur est déjà
Impression des photos Taille des vidéos (pixels) 1080/30p (1920 × 1080) HS 720/2× (1280 × 720)
fi xé à l’adaptateur de charge.
Prise de vue 720/30p (1280 × 720) HS 1080/0,5× (1920 × 1080)
Il est possible de raccorder l’appareil photo à une imprimante
i Frame 540/30p (960 × 540)
Fixation de la compatible avec Pict Bridge à l’aide du câble USB (fourni) et
Retardateur Environ 10 secondes
dragonne Touchez Prise de vue.
d’imprimer les photos directement depuis l’appareil. Flash intégré
Touchez Prise de vue sur l’écran d’accueil
Portée (environ ; sensibilité Grand-angle : 0,3–1,4 m
(HOME). automatique) Téléobjectif : 0,5–0,8 m
Interface USB Hi-Speed (protocoles de transfert des données : MTP, PTP)
Confi guration
Sortie vidéo NTSC, PAL Port Entrée/Sortie Sortie audio/vidéo et Entrée/Sortie numérique (USB)
Rechargez l’appareil photo. Vous pouvez modifi er les réglages de l’appareil photo depuis l’écran
Connecteur HDMI micro (Type D) (sortie HDMI)
HOME display
Utilisez l’adaptateur de charge (fourni) lorsque vous rechargez d’accueil (HOME). Pour affi cher l’écran d’accueil (HOME), appuyez
Alimentation Accumulateur Li-ion intégré
l’appareil photo pour la première fois. Mettez l’appareil photo sur la commande W. Autonomie de l’accumulateur 1
Cadrez la photo.
hors tension, raccordez le câble USB (fourni) à l’appareil photo et à Photos Environ 210 prises de vues
Positionnez l’appareil de manière adéquate
l’adaptateur de charge, puis branchez l’adaptateur comme illustré Vidéos (autonomie de Environ 1 h 15 min
et cadrez votre photo, à l’aide de la Prendre des photos
l'accumulateur réelle pour
ci-dessous. Le chargement s’eff ectue en 2 heures et 50 minutes
commande de zoom si vous souhaitez (Prise de vue) Visualiser les photos (Lire) l'enregistrement) 2
environ. Une fois le chargement terminé, débranchez l’adaptateur
eff ectuer un zoom avant ou arrière. Dimensions (L × H × P) Environ 77,1 × 51,3 × 17,5 mm, hors parties saillantes
Modifi er les réglages de
de charge et le câble USB. Réaliser des vidéos (Vidéo)
Poids Environ 100 g
base de l’appareil photo
Adaptateur de charge Le témoin de mise sous tension Température de fonctionnement 0 °C – 40 °C
(Confi guration)
zoom arrière zoom avant
clignote pendant le chargement Humidité Égale ou inférieure à 85 % (sans condensation)
Toucher la fl èche pour faire défi ler le menu Commande W
et s’éteint une fois le chargement Accessoires disponibles en option
du mode actuellement sélectionné
terminé. Câbles audio/vidéo EG-CP16 Stylets TP-1
Le Manuel de référence Étuis CS-CP4-1 (avec sangle)
Pour en savoir plus sur l’utilisation de votre appareil photo Nikon, Sauf indication contraire, tous les chiff res se rapportent à un accumulateur entièrement chargé et à
Câble USB
une température ambiante de 23 ±3 °C telle que préconisée par la CIPA (Camera and Imaging Products
téléchargez une copie pdf de son Manuel de référence depuis le site
Eff ectuez la mise au point et prenez la
Association).
Web indiqué ci-dessous. Le Manuel de référence peut être affi ché à
photo. 1 L’endurance de l’accumulateur varie selon l’utilisation, l’intervalle entre les prises de vues et la durée l’aide d’Adobe Reader. pendant laquelle les menus et les images sont affi chés.
Appuyez sur le déclencheur à mi-course
Utilisation de l’écran tactile
2 La durée de chaque fi chier vidéo ne peut pas dépasser 29 minutes et sa taille ne peut pas dépasser
pour mémoriser la mise au point et http://nikonimglib.com/manual/
4 Go. L’enregistrement peut toutefois s’arrêter avant que ces limites ne soient atteintes si la température
l’exposition (la zone de mise au point
de l’appareil photo est élevée.
s’allume en vert lorsque l’appareil photo
Caractéristiques techniques de l’adaptateur de charge EH-70P
eff ectue la mise au point), puis appuyez sur Connexion
le déclencheur jusqu’en fi n de course pour Entrée nominale 100–240V CA, 50/60Hz, 0,07–0,044 A prendre la photo. Installez View NX 2 pour transférer, visionner, modifi er et partager Puissance nominale 5,0 V CC, 550 m A Toucher : touchez le moniteur. Faire glisser : faites glisser un doigt sur le moniteur. Température de fonctionnement 0 °C – 40 °C
les photos et les vidéos. Une connexion Internet est nécessaire.
Dimensions (L × H × P) Environ 55 × 22 × 54 mm, sans l’adaptateur de prise secteur
Zone de mise au point Téléchargez le programme d’installation de View NX 2 depuis le site
Poids Environ 47 g, sans l’adaptateur de prise secteur
Web indiqué ci-dessous et suivez les instructions à l’écran.
La disponibilité peut varier selon le pays ou la région. Consultez notre site Web ou nos brochures pour http://nikonimglib.com/nvnx/ obtenir les dernières informations. Adobe et Acrobat sont des marques déposées d’Adobe Systems Inc. HDMI, le logo HDMI et High-Defi nition Multimedia Interface sont des marques commerciales ou des marques déposées de HDMI Licensing LLC.
Faire glisser et déposer : touchez un élément sur Toucher et maintenir la pression : touchez le l’écran, faites-le glisser vers l’emplacement souhaité moniteur et maintenez la pression avec votre Tous les autres noms de marques mentionnés dans ce manuel ou dans les autres documentations (q), puis retirez votre doigt de l’écran (w). doigt pendant une courte période. fournies avec votre matériel Nikon sont des marques commerciales ou des marques déposées de leurs
détenteurs respectifs. Caractéristiques techniques susceptibles d’être modifi ées sans préavis. Nikon ne pourra être tenu responsable des dommages pouvant résulter d’éventuelles erreurs contenues dans ce manuel.
Page Summary Contents For Nikon COOLPIX S02 User Manual
Manual Details
| Brand | Nikon |
|---|---|
| Pages | 2 |
| File Size | 2.24 MB |
| Published | June 04, 2026 |
Enter the captcha to get the download link:

Frequently Asked Questions
How do I transfer pictures to a computer?
Connect the camera to the computer with the USB cable, launch Nikon Transfer 2 component of ViewNX 2, and click Start Transfer.
What are the physical specifications of the COOLPIX S02 camera?
The dimensions are approx. 77.1 × 51.3 × 17.5 mm. The weight is about 100 g.
How long does it take to charge the camera?
Charging takes approximately 2 hours and 50 minutes.
Can I connect this camera to a printer?
Yes, it can connect to a PictBridge-compatible printer using the supplied USB cable.