HP Officejet g85 Multi-Function Printer Series - HP OfficeJet G85 - (English) Quick Setup Poster for Macintosh.
Summary
The complete setup manual for the HP OfficeJet G85 All-in-One printer, designed specifically for Macintosh users. This guide walks you through every step needed to get started, covering secure unpacking, proper physical connections for power and peripherals, and expert cartridge installation. Learn how to load paper, run print head alignments, and install all necessary software so you can immediately begin printing, scanning, copying, and faxing with confidence. Perfect for new owners seeking a comprehensive setup walkthrough.
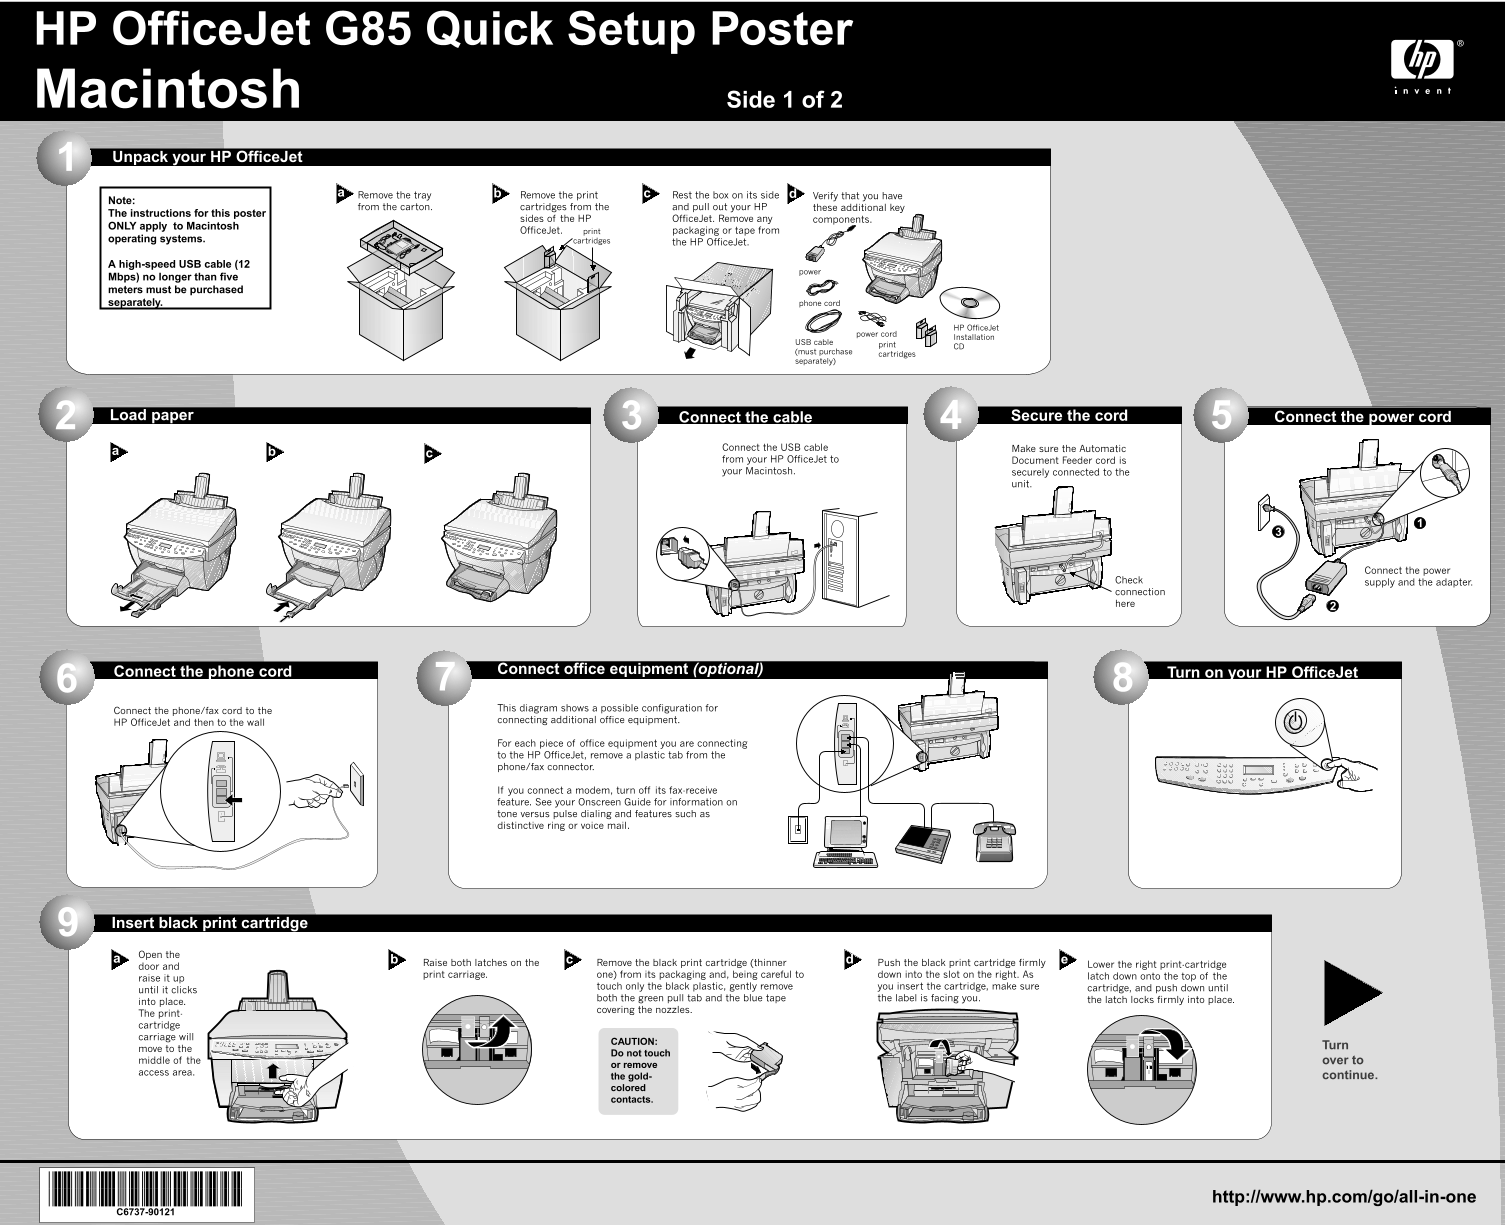
Page 1 Text Content
HP Office Jet G85 Quick Setup Poster Macintosh Side 1 of 2 Unpack your HP Office Jet
Remove the tray Remove the print Rest the box on its side db Verify that you have
Note:
from the carton. cartridges from the and pull out your HP these additional key
The instructions for this poster
sides of the HP Office Jet. Remove any components.
ONLY apply to Macintosh
Office Jet. print packaging or tape from
operating systems. cartridges
the HP Office Jet.
A high-speed USB cable (12
power
Mbps) no longer than five meters must be purchased separately. phone cord
HP Office Jet
power cord
Installation
USB cable
(must purchase
cartridges
separately)
Load paper2 Connect the cable Secure the cord Connect the power cord
Connect the USB cable Make sure the Automatic from your HP Office Jet to Document Feeder cord is your Macintosh. securely connected to the
unit.
Connect the power
Check supply and the adapter. connection here
Connect the phone cord Connect office equipment (optional) Turn on your HP Office Jet
This diagram shows possible configuration for
Connect the phone/fax cord to the
connecting additional office equipment.
HP Office Jet and then to the wall
For each piece of office equipment you are connecting to the HP Office Jet, remove plastic tab from the phone/fax connector.
If you connect modem, turn off its fax-receive feature. See your Onscreen Guide for information on tone versus pulse dialing and features such as distinctive ring or voice mail.
Insert black print cartridge9
Open the
db e Raise both latches on the Remove the black print cartridge (thinner Push the black print cartridge firmly Lower the print-cartridge
door and
print carriage. one) from its packaging and, being careful to down into the slot on the right. As latch down onto the of the
raise it up
touch only the black plastic, gently remove you insert the cartridge, make sure cartridge, and push down until
until it clicks
both the green pull tab and the blue tape the label is facing you. the latch locks firmly into place.
into place.
covering the nozzles.
The print- cartridge carriage will
CAUTION:
move to the
Do not touch
middle of the over to
or remove
access area.
the gold- continue.
colored contacts.
*C6737-90121* http://www.hp.com/go/all-in-one
Page Summary Contents For HP Officejet g85 Multi-Function Printer Series - HP OfficeJet G85 - (English) Quick Setup Poster for Macintosh.
Manual Details
| Brand | HP |
|---|---|
| Pages | 2 |
| File Size | 2.25 MB |
| Published | May 29, 2026 |
Enter the captcha to get the download link:

Frequently Asked Questions
What do I need to do if I connect a phone or fax machine?
Remove a plastic tab from the connector, and if connecting a modem, turn off its fax-receive feature.
Is all necessary connectivity hardware included in the box?
No. A high-speed USB cable (12 Mbps) must be purchased separately.
What is the crucial step after loading the color print cartridge?
Press the ENTER key when prompted on the display to run the automatic alignment process.
What parts should I avoid touching while performing initial setup?
Do not touch the gold-colored contacts or the keypad display.