Medela Symphony Double Pumping Kit Manual
Summary
A comprehensive guide designed for nursing mothers using the Symphony Breastpump system. This manual provides detailed instructions on proper assembly, effective usage techniques, and crucial care guidelines. It covers meticulous cleaning methods—including deep washing, air drying, and specific sterilization protocols (like steam or boiling)—to ensure optimal hygiene after every use. Enhance your pumping experience with confidence knowing you followed manufacturer-recommended care steps for longevity and safety.
Page 1 Text Content
Cleaning and Sterilization n Allow parts to cool before applying external pressure. Follow these directions unless instructed otherwise by If gas sterilization is used, residual testing is your healthcare provider. recommended to determine the proper length of aeration.
IMPORTANT
To Sanitize at Home:
This product’s kit is a single-user item unless
Disassemble all parts that come in contact with breast
properly sterilized between users. Use by more than
and milk.
one user without adequate sterilization may pose a health risk and voids the warranty.
After each use: n Disassemble and wash all parts that come in contact Hygiene with the breast and milk in warm soapy water. Wash hands before touching n Rinse in clear water. breasts or containers, and avoid n Air-dry on clean towel and cover parts when not in touching the inside of containers use.
or lids.
All parts may also be washed in top rack of dishwasher.
First Use
Before first use, disassemble all kit parts and For Quicker Cleaning: sanitize by boiling for 10 minutes. Medela offers Quick Clean™ Micro-Steam™ Bags for daily kit disinfection.
*67099S - has been sterilized and does not require cleaning before first use. Tubing Care
Inspect tubing after each pumping session for
After First Use condensation and/or milk. Follow these cleaning instructions unless you are
told otherwise by your healthcare professional. Prior If condensation appears in tubing:
to cleaning, take apart all parts of your breastpump
To eliminate condensation after you have completed
accessory kit. Be especially sure to remove the valve
pumping, continue running the pump with the tubing
from the breastshield and separate the membrane from
attached for another 1-2 minutes or until dry.
the valve prior to cleaning.
If milk appears in tubing:
To Sterilize in the Hospital: All disassembled parts can be autoclaved to a 1. Turn off the pump and unplug from power source. maximum of 272° F for 3 minutes at 29 PSIG or 250° F 2. Remove and disassemble the tubing, pump for 15-20 minutes at 15 PSIG. connector, piston, cylinder, membranes and membrane
caps (parts vary by pump used). Wash in soapy water,
To avoid damage during and immediately after
then rinse in clear cold water.
sterilization:
3. Shake water droplets out of tubing and hang to air- dry. For faster drying, attach tubing to pump and run
n Sterilize parts without applying external pressure to
pump 1-2 minutes or until dry, or pour a small amount
them.
of isopropyl alcohol through the tubing to dry.
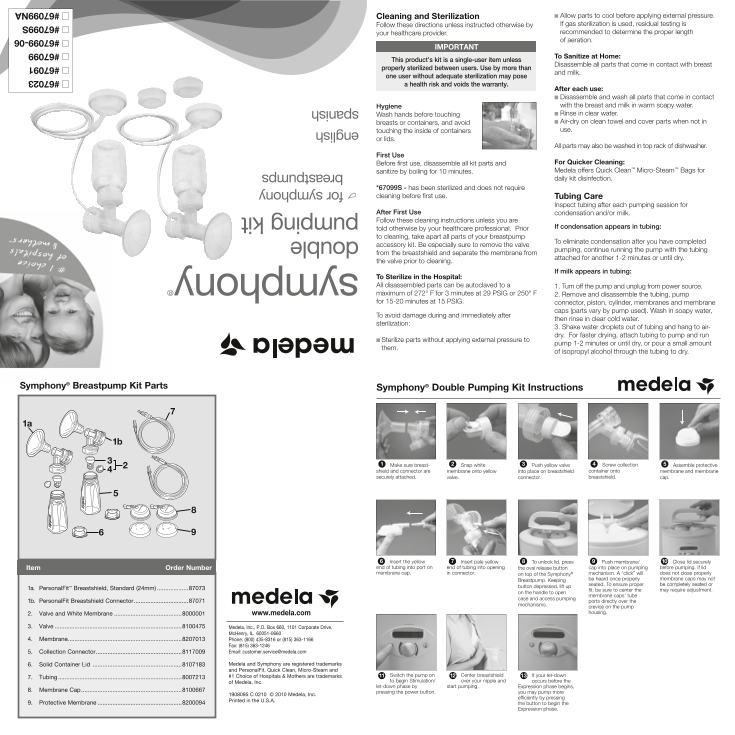
Symphony® Breastpump Kit Parts Symphony® Double Pumping Kit Instructions
symphony
Make sure breast- Snap white Push yellow valve Screw collection Assemble protective shield and connector are membrane onto yellow into place on breastshield container onto membrane and membrane
securely attached. valve. connector. breastshield. cap.
double
pumping kit
for symphony
breastpumps
Insert the yellow Insert pale yellow To unlock lid, press Push membrane/ Close lid securely Item Order Number end of tubing into port on end of tubing into opening the oval release button cap into place on pumping before pumping. If lid membrane cap. in connector. on top of the Symphony® mechanism. A “click” will does not close properly
Breastpump. Keeping be heard once properly membrane caps may not seated. To ensure proper be completely seated or
button depressed, lift up
1a. Personal Fit™ Breastshield, Standard (24mm) ...................87073 fit, be sure to center the may require adjustment.
on the handle to open
membrane caps’ tube
case and access pumping
1b. Personal Fit Breastshield Connector .................................87071 english ports directly over the
mechanisms.
crevice on the pump 2. Valve and White Membrane .........................................8000001 www.medela.com housing.
spanish
3. Valve .............................................................................8100475 Medela, Inc., P.O. Box 660, 1101 Corporate Drive,
Mc Henry, IL 60051-0660
4. Membrane .....................................................................8207013 Phone: (800) 435-8316 or (815) 363-1166
Fax: (815) 363-1246 5. Collection Connector ....................................................8117009 Email: [email protected] #67023
6. Solid Container Lid ......................................................8107183 Medela and Symphony are registered trademarks
and Personal Fit, Quick Clean, Micro-Steam and
#1 Choice of Hospitals & Mothers are trademarks Switch the pump on Center breastshield If your let-down
7. Tubing ...........................................................................8007213
to begin Stimulation/ over your nipple and occurs before the #67099
of Medela, Inc.
let-down phase by start pumping. Expression phase begins,
8. Membrane Cap .............................................................8100667 pressing the power button. you may pump more
1908095 C 0210 © 2010 Medela, Inc. #67099-06
efficiently by pressing
Printed in the U.S.A.
9. Protective Membrane ...................................................8200094 the button to begin the
Expression phase.
#67099NA
Page Summary Contents For Medela Symphony Double Pumping Kit Manual
Manual Details
| Brand | Medela |
|---|---|
| Pages | 2 |
| File Size | 2.08 MB |
| Published | May 26, 2026 |
Enter the captcha to get the download link:

Frequently Asked Questions
How should I clean the parts after use?
Disassemble and wash all parts that come in contact with the breast and milk in warm soapy water, rinse in clear water, and air-dry.
Can I sterilize my pump components at home?
Yes, boil the kit parts for 10 minutes or sanitize by following recommended aeration procedures. Tubing can be sterilized by running it (or pouring alcohol) through.
What should I do if condensation appears in the tubing?
Take apart all parts before cleaning; run the pump with the tubing attached to separate the membrane from the valve for 1-2 minutes or until dry.
How can I sterilize the entire unit in a hospital setting?
Autoclave disassembled parts up to 272° F for 3 minutes at 29 PSIG, followed by running the tubing through hot water for 15-20 minutes at 15 PSIG.