Dell Rack Installation Instructions
Summary
This rack installation guide provides instructions for installing Dell systems using RapidRails in standard server racks. It covers safety warnings, rail installation procedures, and system mounting steps. The guide is intended for trained service technicians who need to install Dell server systems into rack enclosures that meet industry standards.
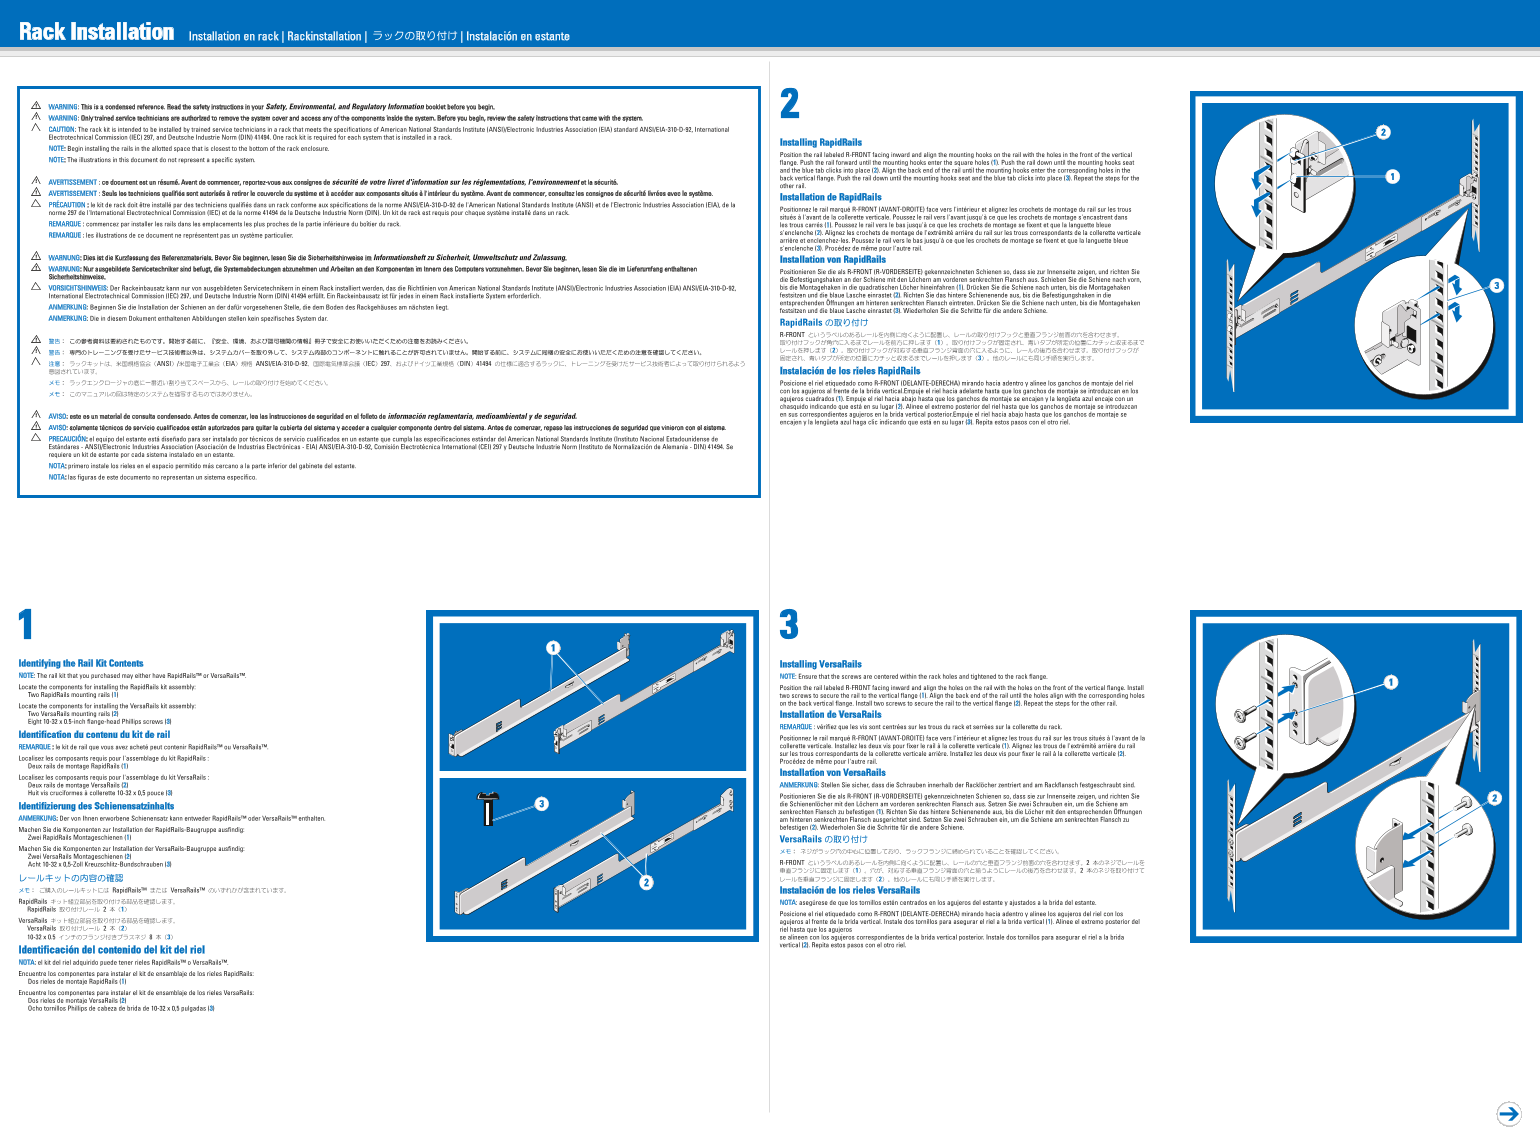
Page 1 Text Content
Rack Installation Installation en rack | Rackinstallation | | Instalación en estante
WARNING: This is a condensed reference. Read the safety instructions in your Safety, Environmental, and Regulatory Information booklet before you begin. WARNING: Only trained service technicians are authorized to remove the system cover and access any of the components inside the system. Before you begin, review the safety instructions that came with the system. CAUTION: The rack kit is intended to be installed by trained service technicians in a rack that meets the specifications of American National Standards Institute (ANSI)/Electronic Industries Association (EIA) standard ANSI/EIA-310-D-92, International Electrotechnical Commission (IEC) 297, and Deutsche Industrie Norm (DIN) 41494. One rack kit is required for each system that is installed in a rack.
Installing Rapid Rails
NOTE: Begin installing the rails in the allotted space that is closest to the bottom of the rack enclosure.
Position the rail labeled R-FRONT facing inward and align the mounting hooks on the rail with the holes in the front of the vertical
NOTE: The illustrations in this document do not represent a specific system.
flange. Push the rail forward until the mounting hooks enter the square holes (1). Push the rail down until the mounting hooks seat and the blue tab clicks into place (2). Align the back end of the rail until the mounting hooks enter the corresponding holes in the back vertical flange. Push the rail down until the mounting hooks seat and the blue tab clicks into place (3). Repeat the steps for the
AVERTISSEMENT : ce document est un résumé. Avant de commencer, reportez-vous aux consignes de sécurité de votre livret d'information sur les réglementations, l'environnement et la sécurité.
other rail.
AVERTISSEMENT : Seuls les techniciens qualifiés sont autorisés à retirer le couvercle du système et à accéder aux composants situés à l'intérieur du système. Avant de commencer, consultez les consignes de sécurité livrées avec le système.
Installation de Rapid Rails
PRÉCAUTION le kit de rack doit être installé par des techniciens qualifiés dans un rack conforme aux spécifications de la norme ANSI/EIA-310-D-92 de l'American National Standards Institute (ANSI) et de l'Electronic Industries Association (EIA), de la
Positionnez le rail marqué R-FRONT (AVANT-DROITE) face vers l'intérieur et alignez les crochets de montage du rail sur les trous
norme 297 de l'International Electrotechnical Commission (IEC) et de la norme 41494 de la Deutsche Industrie Norm (DIN). Un kit de rack est requis pour chaque système installé dans un rack.
situés à l'avant de la collerette verticale. Poussez le rail vers l'avant jusqu'à ce que les crochets de montage s'encastrent dans
REMARQUE : commencez par installer les rails dans les emplacements les plus proches de la partie inférieure du boîtier du rack. les trous carrés (1). Poussez le rail vers le bas jusqu'à ce que les crochets de montage se fixent et que la languette bleue
s'enclenche (2). Alignez les crochets de montage de l'extrémité arrière du rail sur les trous correspondants de la collerette verticale
REMARQUE : les illustrations de ce document ne représentent pas un système particulier.
arrière et enclenchez-les. Poussez le rail vers le bas jusqu'à ce que les crochets de montage se fixent et que la languette bleue s'enclenche (3). Procédez de même pour l'autre rail.
WARNUNG: Dies ist die Kurzfassung des Referenzmaterials. Bevor Sie beginnen, lesen Sie die Sicherheitshinweise im Informationsheft zu Sicherheit, Umweltschutz und Zulassung.
Installation von Rapid Rails
WARNUNG: Nur ausgebildete Servicetechniker sind befugt, die Systemabdeckungen abzunehmen und Arbeiten an den Komponenten im Innern des Computers vorzunehmen. Bevor Sie beginnen, lesen Sie die im Lieferumfang enthaltenen
Positionieren Sie die als R-FRONT (R-VORDERSEITE) gekennzeichneten Schienen so, dass sie zur Innenseite zeigen, und richten Sie
Sicherheitshinweise.
die Befestigungshaken an der Schiene mit den Löchern am vorderen senkrechten Flansch aus. Schieben Sie die Schiene nach vorn, VORSICHTSHINWEIS: Der Rackeinbausatz kann nur von ausgebildeten Servicetechnikern in einem Rack installiert werden, das die Richtlinien von American National Standards Institute (ANSI)/Electronic Industries Association (EIA) ANSI/EIA-310-D-92, bis die Montagehaken in die quadratischen Löcher hineinfahren (1). Drücken Sie die Schiene nach unten, bis die Montagehaken International Electrotechnical Commission (IEC) 297, und Deutsche Industrie Norm (DIN) 41494 erfüllt. Ein Rackeinbausatz ist für jedes in einem Rack installierte System erforderlich. festsitzen und die blaue Lasche einrastet (2). Richten Sie das hintere Schienenende aus, bis die Befestigungshaken in die entsprechenden Öffnungen am hinteren senkrechten Flansch eintreten. Drücken Sie die Schiene nach unten, bis die Montagehaken
ANMERKUNG: Beginnen Sie die Installation der Schienen an der dafür vorgesehenen Stelle, die dem Boden des Rackgehäuses am nächsten liegt.
festsitzen und die blaue Lasche einrastet (3). Wiederholen Sie die Schritte für die andere Schiene.
ANMERKUNG: Die in diesem Dokument enthaltenen Abbildungen stellen kein spezifisches System dar.
Instalación de los rieles Rapid Rails Posicione el riel etiquedado como R-FRONT (DELANTE-DERECHA) mirando hacia adentro y alinee los ganchos de montaje del riel con los agujeros al frente de la brida vertical.Empuje el riel hacia adelante hasta que los ganchos de montaje se introduzcan en los agujeros cuadrados (1). Empuje el riel hacia abajo hasta que los ganchos de montaje se encajen y la lengüeta azul encaje con un chasquido indicando que está en su lugar (2). Alinee el extremo posterior del riel hasta que los ganchos de montaje se introduzcan en sus correspondientes agujeros en la brida vertical posterior.Empuje el riel hacia abajo hasta que los ganchos de montaje se
AVISO: este es un material de consulta condensado. Antes de comenzar, lea las instrucciones de seguridad en el folleto de información reglamentaria, medioambiental y de seguridad.
encajen y la lengüeta azul haga clic indicando que está en su lugar (3). Repita estos pasos con el otro riel.
AVISO: solamente técnicos de servicio cualificados están autorizados para quitar la cubierta del sistema y acceder a cualquier componente dentro del sistema. Antes de comenzar, repase las instrucciones de seguridad que vinieron con el sistema. PRECAUCIÓN: el equipo del estante está diseñado para ser instalado por técnicos de servicio cualificados en un estante que cumpla las especificaciones estándar del American National Standards Institute (Instituto Nacional Estadounidense de Estándares - ANSI)/Electronic Industries Association (Asociación de Industrias Electrónicas - EIA) ANSI/EIA-310-D-92, Comisión Electrotécnica International (CEI) 297 y Deutsche Industrie Norm (Instituto de Normalización de Alemania - DIN) 41494. Se requiere un kit de estante por cada sistema instalado en un estante. NOTA: primero instale los rieles en el espacio permitido más cercano a la parte inferior del gabinete del estante. NOTA: las figuras de este documento no representan un sistema específico.
Identifying the Rail Kit Contents Installing Versa Rails NOTE: The rail kit that you purchased may either have Rapid Rails™ or Versa Rails™. NOTE: Ensure that the screws are centered within the rack holes and tightened to the rack flange. Locate the components for installing the Rapid Rails kit assembly: Position the rail labeled R-FRONT facing inward and align the holes on the rail with the holes on the front of the vertical flange. Install Two Rapid Rails mounting rails (1) two screws to secure the rail to the vertical flange (1). Align the back end of the rail until the holes align with the corresponding holes
on the back vertical flange. Install two screws to secure the rail to the vertical flange (2). Repeat the steps for the other rail.
Locate the components for installing the Versa Rails kit assembly: Two Versa Rails mounting rails (2) Installation de Versa Rails Eight 10-32 x 0.5-inch flange-head Phillips screws (3)
REMARQUE : vérifiez que les vis sont centrées sur les trous du rack et serrées sur la collerette du rack.
Identification du contenu du kit de rail
Positionnez le rail marqué R-FRONT (AVANT-DROITE) face vers l'intérieur et alignez les trous du rail sur les trous situés à l'avant de la REMARQUE : le kit de rail que vous avez acheté peut contenir Rapid Rails™ ou Versa Rails™. collerette verticale. Installez les deux vis pour fixer le rail à la collerette verticale (1). Alignez les trous de l'extrémité arrière du rail sur les trous correspondants de la collerette verticale arrière. Installez les deux vis pour fixer le rail à la collerette verticale (2).
Localisez les composants requis pour l'assemblage du kit Rapid Rails :
Procédez de même pour l'autre rail.
Deux rails de montage Rapid Rails (1)
Installation von Versa Rails
Localisez les composants requis pour l'assemblage du kit Versa Rails :
Deux rails de montage Versa Rails (2) ANMERKUNG: Stellen Sie sicher, dass die Schrauben innerhalb der Racklöcher zentriert and am Rackflansch festgeschraubt sind.
Huit vis cruciformes à collerette 10-32 x 0,5 pouce (3)
Positionieren Sie die als R-FRONT (R-VORDERSEITE) gekennzeichneten Schienen so, dass sie zur Innenseite zeigen, und richten Sie die Schienenlöcher mit den Löchern am vorderen senkrechten Flansch aus. Setzen Sie zwei Schrauben ein, um die Schiene am
Identifizierung des Schienensatzinhalts
senkrechten Flansch zu befestigen (1). Richten Sie das hintere Schienenende aus, bis die Löcher mit den entsprechenden Öffnungen
ANMERKUNG: Der von Ihnen erworbene Schienensatz kann entweder Rapid Rails™ oder Versa Rails™ enthalten. am hinteren senkrechten Flansch ausgerichtet sind. Setzen Sie zwei Schrauben ein, um die Schiene am senkrechten Flansch zu
befestigen (2). Wiederholen Sie die Schritte für die andere Schiene.
Machen Sie die Komponenten zur Installation der Rapid Rails-Baugruppe ausfindig: Zwei Rapid Rails Montageschienen (1) Machen Sie die Komponenten zur Installation der Versa Rails-Baugruppe ausfindig: Zwei Versa Rails Montageschienen (2) Acht 10-32 x 0,5-Zoll Kreuzschlitz-Bundschrauben (3)
Instalación de los rieles Versa Rails NOTA: asegúrese de que los tornillos estén centrados en los agujeros del estante y ajustados a la brida del estante. Posicione el riel etiquedado como R-FRONT (DELANTE-DERECHA) mirando hacia adentro y alinee los agujeros del riel con los agujeros al frente de la brida vertical. Instale dos tornillos para asegurar el riel a la brida vertical (1). Alinee el extremo posterior del riel hasta que los agujeros se alineen con los agujeros correspondientes de la brida vertical posterior. Instale dos tornillos para asegurar el riel a la brida vertical (2). Repita estos pasos con el otro riel.
Identificación del contenido del kit del riel NOTA: el kit del riel adquirido puede tener rieles Rapid Rails™ o Versa Rails™. Encuentre los componentes para instalar el kit de ensamblaje de los rieles Rapid Rails: Dos rieles de montaje Rapid Rails (1) Encuentre los componentes para instalar el kit de ensamblaje de los rieles Versa Rails: Dos rieles de montaje Versa Rails (2) Ocho tornillos Phillips de cabeza de brida de 10-32 x 0,5 pulgadas (3)
Page Summary Contents For Dell Rack Installation Instructions
Manual Details
| Brand | Dell |
|---|---|
| Pages | 2 |
| File Size | 1.85 MB |
| Published | June 20, 2026 |
Enter the captcha to get the download link:

Frequently Asked Questions
Who is authorized to install the RapidRails rack kit?
Only trained service technicians are authorized to remove the system cover and access internal components.
What rack standards must the enclosure meet for installation?
The rack must meet ANSI/EIA-310-D-92, IEC 297, and DIN 41494 standards.
Where should the first rail be installed in the rack?
Begin by installing the rails in the allotted space closest to the bottom of the rack enclosure.
How do I secure the rail in place during installation?
Push the rail down until the mounting hooks seat and the blue tab clicks into place.