Page 1
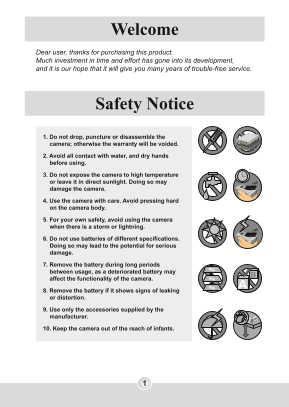
Welcome Dear user, thanks for purchasing this product. Much investment in time and effort has gone into its development, and it is our hope that it will give you many years of trouble-free service. Sa...
Page 2
Table of Contents Welcome .......................................................................... Safety Notice ................................................................... Table of Contents...
Page 3
Table of Contents Using PC Camera ........................................................... Installing the software ........................................................................... Starti...
Page 4
getting started Getting Started Knowing your camera parts Shutter button ( ) Power button ( ) Speaker Microphone Front LED indicator Battery compartment Focus switch Flash strobe SD/MMC card slot Stra...
Page 5
getting started Installing the battery 1 Open the battery compartment cover. Slide the battery compartment cover open as indicated. 2 Install the battery. Place the accessory Li-ion battery into the c...
Page 6
getting started Using the charger When the battery pack is out of power, you can use the accessory charger to recharge the battery pack. 1 Connect one end of the supplied AC adapter to the charger sta...
Page 7
getting started Inserting a memory card (optional) In addition to the built-in flash memory, your camera can store Label side data on a Secure Digital (SD) card or a Multi Media card (MMC). To insert ...
Page 8
getting started Attaching the wrist strap (optional) 1 Attach the lens cap to the strap. Thread the string on the side of the strap through the cap, and then thread the strap through the string loop t...
Page 9
basic operations Basic Operations Turning on your camera Press and hold down the power button for 1 second to turn on the camera. If the camera is not turned on after pressing the power button, please...
Page 10
basic operations Using the LCD monitor The LCD monitor can be used to compose image settings for shooting, to review recorded files, or to change menu options. The LCD panel can be rotated to the foll...
Page 11
basic operations Reading LCD indicators Digital Camcorder mode: Flash mode Selftimer Mode icon Photo resolution Video resolution White balance Storage medium*1 Zoom ratio 2.0 Battery Life Number of re...
Page 12
basic operations Setting time and language When you power on the camera for the first time, you are recommended to adjust the time and language settings. 1 Turn on the camera. 2 Press the Mode button ...
Page 13
basic operations Recording a video clip 1 Adjust the focus. Set the Focus Switch to an appropriate setting. Normally, you should set the focus to ( ) for most filming conditions. Select ( ) only for c...
Page 14
basic operations Recording a video clip (continued) 3 Press the Record button to start recording. Timer 4 Press the Record button again to stop recording. basic operations
Page 15
basic operations Taking a still picture 1 Adjust the focus. Set the Focus Switch to an appropriate setting. Normally, you should set the focus to ( ) for most filming conditions. Select ( ) only for c...
Page 16
basic operations Recording a voice clip 1 Press the Mode button and use the joystick to select the Voice ( ) mode. Then press the center of the joystick to enter. 2 Press the Record button to start re...
Page 17
basic operations Playing back your recordings 1 Press the Mode button and use the joystick to select the Playback ( ) mode. Then press the center of the joystick to enter. 2 Operations in playback mod...
Page 18
basic operations Playing MP3 music Copy MP3 files to the camera Before you can play MP3 music, you need to copy MP3 files to the camera first. 1 Connect the camera to your PC. Connect the camera to a ...
Page 19
basic operations Playing MP3 music (continued) Playing music in MP3 mode 1 Press the Mode button and use the joystick to select the MP3 ( ) mode. Then press the center of the joystick to enter. MP3 mo...
Page 20
basic operations Connecting the camera to a TV Connect your camera and TV via the accessory AV cable for real-time display. You can display your video clips, still pictures, and audio recordings direc...
Page 21
advanced operations Advanced Operations Menu operation The menu items provide several options for you to fine-tune your camera functions. The following table gives details on menu operations. How to.....
Page 22
advanced operations Menu items in Camera mode Power-on → Press the Menu button. Item Option Description Set picture resolution to 1280x960. Print up to 3x5 in. photos or display on PC. Set picture res...
Page 23
advanced operations Menu items in Camera mode (continued) Item Option Description The camera automatically adjusts white balance. This setting is suitable for outdoor recording in sunny weather. Sunny...
Page 24
advanced operations Menu items in Camera mode (continued) Item Option Description Make recordings in natural color. Normal Effect Make recordings in black and white. Make recordings in sepia-toned col...
Page 25
advanced operations Menu items in Playback mode Power-on → Press the Mode button → Enter the Playback ( ) mode → Press the Menu button. Item Option Description One Delete current file. Delete all pict...
Page 26
advanced operations Menu items in MP3 mode Power-on → Press the Mode button → Enter the MP3 ( ) mode → Press the Menu button. Item Description Delete One Delete current track. Cancel Cancel action. Me...
Page 27
advanced operations Menu items in Setting mode Power-on → Press the Mode button → Enter the Setting ( ) mode → Press the Menu button. Item Option Description Set date and time. Date & Time Enable ...
Page 28
advanced operations Menu items in Setting mode (continued) Item Option Description ZZ Disable Auto-off function. Off The camera automatically shuts down when staying inactive for over 1 minute. 1 min ...
Page 29
copying files to your pc Copying Files to Your PC Installing the driver to your PC You need to install the camera driver to ensure that video clips can be played back on your PC. To install the softwa...
Page 30
copying files to your pc Installing the driver to your PC (continued) 3 Install the driver. The Install Shield Wizard will then appear and automatically install the program. Click on Next and follow t...
Page 31
copying files to your pc Connecting the camera to your PC 1 Connect the USB cable to your computer. Turn on your computer, and then connect the accessory USB cable to the USB port of your computer. Ma...
Page 32
copying files to your pc Copying files to the PC 1 This step varies depending on your operation system: For Windows XP users: After the camera is connected to your computer, a dialogue window will app...
Page 33
copying files to your pc Copying files to the PC (continued) 2 Double-click on the DCIM file folder. 3 Double-click on the 100MEDIA file folder. 4 Drag the target file into My Documents or the destina...
Page 34
copying files to your pc Viewing/Playing files on your PC 1 Double-click on My Documents or any other folder that stores your files. 2 Double-click on the desired file, and the file will be opened by ...
Page 35
copying files to your pc File location After connecting the camera to your computer, a removable disk will appear in your computer. The removable disk actually represents the storage medium of your ca...
Page 36
using pc cam era Using PC Camera Installing the software The PC camera software is included in the camera driver, and therefore you should install the driver before using the PC camera function. If yo...
Page 37
using pc cam era Starting the application (continued) Notice for Windows 98SE users: 1. Click Next when the following screen appears. 2. When the following screen appears, select Search for the best d...
Page 38
using pc cam era Starting the application (continued) 3 Launch IS-DV program. Double-click the IS-DV icon ( ) on the Desktop to start the program. After the program starts, you can begin to use the PC...
Page 39
using pc cam era Using IS-DV PC Camera Start recording a video clip Start/Stop preview window Stop recording Setting * Snapshot Open album Format * Select video source Source * * Sub-menu available. T...
Page 40
using pc cam era Using IS-DV PC Camera (continued) Recording an AVI movie 1. Click on the icon. 2. Press to specify the path and name of the AVI file. 3. Set the frame rate and recording time accordin...