# A B C D E F G H I J K L M N O P Q R S T U V W X Y Z

Agilent 1290 Infinity Pump Service Kit Maintenance Guide User Manual

Summary

This comprehensive technical service kit is essential for maintaining peak performance of the Agilent 1290 Infinity system's core pumping mechanism. This guide provides expert, step-by-step instructions for qualified technicians to safely disassemble and reassemble both primary and secondary pump heads. It covers detailed procedures for replacing critical components, including seals, pistons, gaskets, and flow connections. Ideal for laboratory maintenance personnel, this kit ensures efficient and correct servicing of your chromatography system's pumping unit.
📄 Preview 📖 Table of Contents Contents PAGE OF 16

Page 1 Text Content

Agilent 1290 Infinity Pump Service Kit

Contents “Overview of 1290 Infinity Pump Service Kit” on page “Overview of Maintenance parts” on page “Disassembling the Pump Head” on page “Disassembling the Primary Pump Head” on page “Disassembling the Secondary Pump Head” on page “Assembling the Pump Head” on page

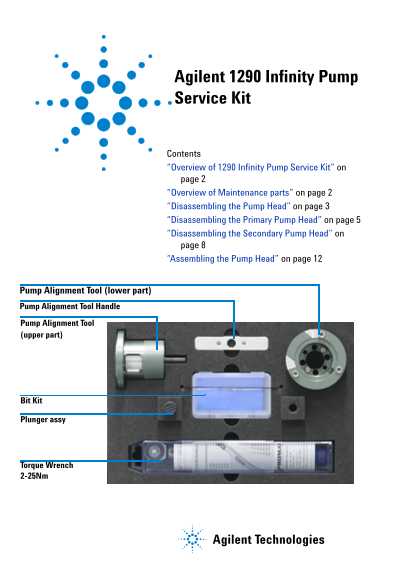
Pump Alignment Tool (lower part) Pump Alignment Tool Handle Pump Alignment Tool (upper part)

Bit Kit

Plunger assy

Torque Wrench 2-25Nm

Agilent Technologies

Page Summary Contents For Agilent 1290 Infinity Pump Service Kit Maintenance Guide User Manual

Page 1 Agilent 1290 Infinity Pump Service Kit Contents “Overview of 1290 Infinity Pump Service Kit” on page “Overview of Maintenance parts” on page “Disassembling the Pump Head” on page “Disassembling the Pr...
Page 2 Overview of 1290 Infinity Pump Service Kit Table 1 1290 Infinity Pump Service Kit Description Part Number Pump Head Alignment Tool 5023-0279 Torque Wrench 2-25Nm G4220-20012 Bit Kit 5023-0282 4 mm hex...
Page 3 Disassembling the Pump Head When If parts inside the pump head need to be replaced Tools required 14mm wrench 4mm Hex key 2.5mm hex bit Parts required See Table 2, “Maintenance parts,” on page This pr...
Page 4 Open the 4 screws holding the pump heads. Open all screws step by step, not screw by screw. Open the hex screw at the top of the primary Remove both pump heads from the link plate pump head, which fix...
Page 5 Disassembling the Primary Pump Head Figure 1 Pump Head (with seal wash option) Pump head chamber housing Pump seal Backup ring for seal holder Seal holder Film washer (seal wash) Backup seal PE for se...
Page 6 Damage of pump piston CAUTION The pump piston has an excellent stability and chemical resistance inside the pump head, but it is sensitive to shearing forces from the side. Do not try to remove the pu...
Page 7 Remove the front part of the pump head Remove the piston from the piston housing by including pump chamber housing with pump pushing it to the rear, then pull it out from the seal and support ring. If...
Page 8 Disassembling the Secondary Pump Head Loss of small spacer fitting CAUTION Inside the secondary pump head is a small spacer fitting, which can be dropped easily when removing the heat exchanger. Be ca...
Page 9 Pump head screw Pump head front plate Heat exchanger (primary pump head only) Pump chamber housing Spacer fitting Pump head hex screw Pump seal Backup ring for seal holder Seal holder Gasket (seal was...
Page 10 Remove the filter assembly at the top of the For disassembling the pump head, open the 4 pump head. See Agilent 1290 Infinity Binary hex screws at the rear of the pump head.. Pump User Manual for repl...
Page 11 Use the insert tool of the pump head If the wash seal shall be replaced by a new alignment tool for removing the pump seal one, use a screw driver for removing it. from the pump chamber housing. Do no...
Page 12 Assembling the Pump Head When Befor installing the pump. Tools required 5023-0279 Pump Head Alignment Tool G4220-20012 Torque wrench 2-25 Nm 01018-23702 Insert Tool G4220-20013 4 mm Hex bit G4220-2001...
Page 13 If the backup seal has been removed from the If the seal wash option is installed, put the seal holder, insert it in the correct orientation gasket into the support ring and insert the seal as shown b...
Page 14 Insert the primary or secondary pump head to Close the tool by closing the 3 screws at the the pump head alignment tool. There are connection ring. openings for the seal wash support ring and heat exc...
Page 15 Open the 3 screws which have closed the For the primary pump head, install the inlet pump head alignment tool and take out the valve and outlet valve. aligned pump head. Heat exchanger capillary For t...
Page 16 Insert pump piston Insert both pump heads in the link plate and make sure that the clips snap in that fix the pump heads. Pump piston Link plate Clips Insert the heat exchanger capillary into the Inst...

Manual Details

Brand Infinity
Pages 16
File Size 2.43 MB
Published May 23, 2026
66 views

Enter the captcha to get the download link:

captcha

Frequently Asked Questions

What precautions must be taken when handling the pump piston?

Do not try to remove the pump piston from the rear, and do not use it for removing pump seals.

How should I open the pump heads during disassembly?

Open all screws step by step using one service action, rather than sequentially opening each screw.

What is the torque specification for the primary pump head alignment tool?

Use a torque key to set 5 Nm and close the front of the pump head alignment tool.