Samsung J1455AC Quick User Guide for Washer
Summary
This comprehensive user guide empowers you to operate and maintain your washing machine safely and efficiently. It provides step-by-step instructions for initial installation, proper leveling, and routine cleaning of the essential debris filter components. The manual also offers crucial troubleshooting tips, detailing how to resolve common issues like drainage problems, error codes (such as '5E'), and power malfunctions, ensuring optimal wash cycles every time. Designed for both new and existing owners, it helps keep your appliance running at peak performance.
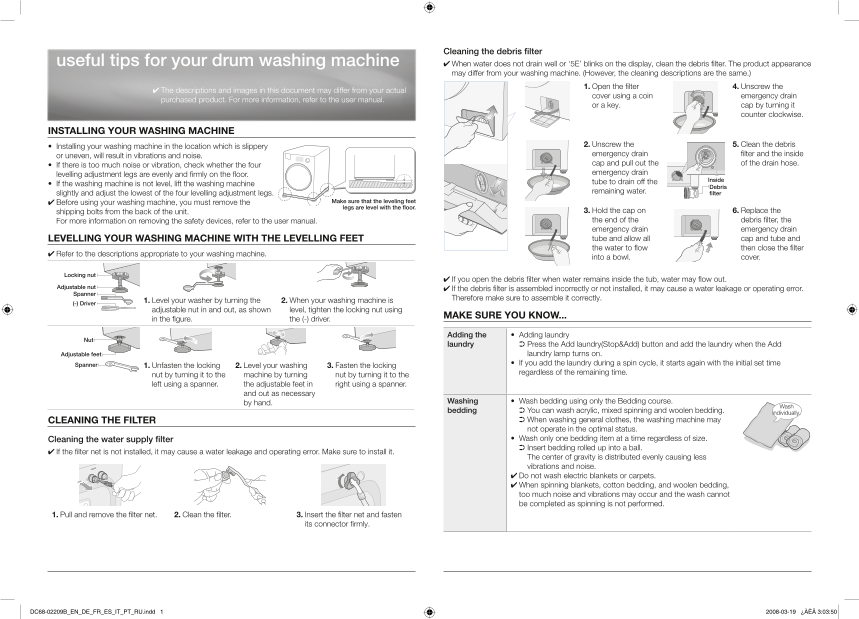
Page 1 Text Content
Cleaning the debris filter
useful tips for your drum washing machine ✔ When water does not drain well or ‘5E’ blinks on the display, clean the debris filter. The product appearance
may differ from your washing machine. (However, the cleaning descriptions are the same.)
1. Open the filter 4. Unscrew the
✔ The descriptions and images in this document may differ from your actual
cover using a coin emergency drain
purchased product. For more information, refer to the user manual.
or a key. cap by turning it counter clockwise.
INSTALLING YOUR WASHING MACHINE
2. Unscrew the 5. Clean the debris
• Installing your washing machine in the location which is slippery
emergency drain filter and the inside
or uneven, will result in vibrations and noise.
cap and pull out the of the drain hose.
• If there is too much noise or vibration, check whether the four
emergency drain
levelling adjustment legs are evenly and firmly on the floor.
Inside
tube to drain off the
• If the washing machine is not level, lift the washing machine
Debris
remaining water. filter
slightly and adjust the lowest of the four levelling adjustment legs.
✔ Before using your washing machine, you must remove the Make sure that the leveling feet legs are level with the floor.
shipping bolts from the back of the unit. 3. Hold the cap on 6. Replace the For more information on removing the safety devices, refer to the user manual. the end of the debris filter, the emergency drain emergency drain LEVELLING YOUR WASHING MACHINE WITH THE LEVELLING FEET tube and allow all cap and tube and the water to flow then close the filter
✔ Refer to the descriptions appropriate to your washing machine.
into a bowl. cover.
Locking nut
✔ If you open the debris filter when water remains inside the tub, water may flow out.
Adjustable nut
✔ If the debris filter is assembled incorrectly or not installed, it may cause a water leakage or operating error.
Spanner
Therefore make sure to assemble it correctly.
1. Level your washer by turning the 2. When your washing machine is
(-) Driver
adjustable nut in and out, as shown level, tighten the locking nut using
MAKE SURE YOU KNOW...
in the figure. the (-) driver.
Adding the • Adding laundry
laundry ➲ Press the Add laundry(Stop&Add) button and add the laundry when the Add
Adjustable feet laundry lamp turns on. Spanner • If you add the laundry during a spin cycle, it starts again with the initial set time
1. Unfasten the locking 2. Level your washing 3. Fasten the locking
regardless of the remaining time.
nut by turning it to the machine by turning nut by turning it to the left using a spanner. the adjustable feet in right using a spanner.
and out as necessary
by hand. Washing • Wash bedding using only the Bedding course.
bedding ➲ You can wash acrylic, mixed spinning and woolen bedding. individually.
CLEANING THE FILTER ➲ When washing general clothes, the washing machine may not operate in the optimal status. Cleaning the water supply filter • Wash only one bedding item at a time regardless of size. ➲ Insert bedding rolled up into a ball.
✔ If the filter net is not installed, it may cause a water leakage and operating error. Make sure to install it.
The center of gravity is distributed evenly causing less vibrations and noise. ✔ Do not wash electric blankets or carpets. ✔ When spinning blankets, cotton bedding, and woolen bedding, too much noise and vibrations may occur and the wash cannot be completed as spinning is not performed.
1. Pull and remove the filter net. 2. Clean the filter. 3. Insert the filter net and fasten
its connector firmly.
DC68-02209B_EN_DE_FR_ES_IT_PT_RU.indd 1 2008-03-19 ¿ÀÈÄ 3:03:50
Page Summary Contents For Samsung J1455AC Quick User Guide for Washer
Manual Details
| Brand | Samsung |
|---|---|
| Pages | 14 |
| File Size | 3.43 MB |
| Published | June 02, 2026 |
Enter the captcha to get the download link:

Frequently Asked Questions
How do I level my washing machine?
Turn the adjustable feet by hand or spanner until the machine is stable and level with the floor. It should distribute weight evenly to reduce vibration.
What should I do if the '5E' error appears or water drains poorly?
Clean the debris filter. The guide specifies cleaning this part when drainage issues occur.
Why won't the door open immediately after the wash finishes?
Check the internal temperature. If it is higher than 70°C or over 55°C, wait until the air/water temperatures drop before opening the door.
How do I clean the debris filter to prevent errors?
Remove the filter net, clean the main assembly (including the cap and tube), ensure all parts are securely fastened when replacing them.