Casio TQ-451 551 Operation Guide
Summary
Experience reliable timekeeping with this digital clock featuring luminous paint hands that glow in the dark for easy visibility. This comprehensive guide provides detailed instructions on setting the accurate time, programming two customizable alarms, and utilizing the snooze function. Whether you are managing daily routines or simply need a clear timepiece, the manual covers everything from initial setup to safe battery replacement and optimal use of all advanced features.
Page 1 Text Content
USER’S GUIDE TQ-451/551
ABOUT THE LUMINOUS PAINT
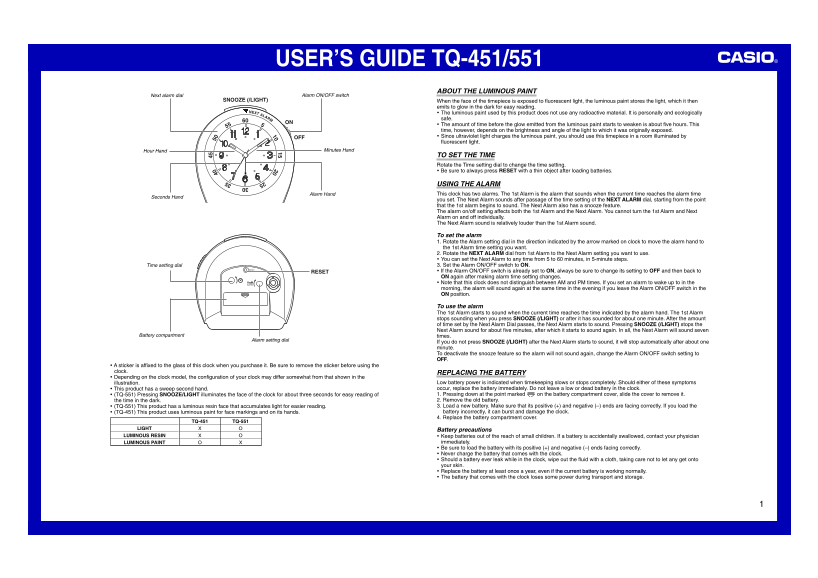
Next alarm dial Alarm ON/OFF switch
SNOOZE (/LIGHT) When the face of the timepiece is exposed to fluorescent light, the luminous paint stores the light, which it then
emits to glow in the dark for easy reading. The luminous paint used by this product does not use any radioactive material. It is personally and ecologically safe.
The amount of time before the glow emitted from the luminous paint starts to weaken is about five hours. This time, however, depends on the brightness and angle of the light to which it was originally exposed. OFF Since ultraviolet light charges the luminous paint, you should use this timepiece in a room illuminated by fluorescent light.
Hour Hand Minutes Hand
TO SET THE TIME Rotate the Time setting dial to change the time setting. • Be sure to always press RESET with a thin object after loading batteries.
USING THE ALARM Alarm Hand This clock has two alarms. The 1st Alarm is the alarm that sounds when the current time reaches the alarm time
Seconds Hand
you set. The Next Alarm sounds after passage of the time setting of the NEXT ALARM dial, starting from the point that the 1st alarm begins to sound. The Next Alarm also has a snooze feature. The alarm on/off setting affects both the 1st Alarm and the Next Alarm. You cannot turn the 1st Alarm and Next Alarm on and off individually. The Next Alarm sound is relatively louder than the 1st Alarm sound.
To set the alarm 1. Rotate the Alarm setting dial in the direction indicated by the arrow marked on clock to move the alarm hand to the 1st Alarm time setting you want. 2. Rotate the NEXT ALARM dial from 1st Alarm to the Next Alarm setting you want to use. You can set the Next Alarm to any time from 5 to 60 minutes, in 5-minute steps. Time setting dial 3. Set the Alarm ON/OFF switch to ON. RESET • If the Alarm ON/OFF switch is already set to ON, always be sure to change its setting to OFF and then back to ON again after making alarm time setting changes. • Note that this clock does not distinguish between AM and PM times. If you set an alarm to wake up to in the morning, the alarm will sound again at the same time in the evening if you leave the Alarm ON/OFF switch in the ON position.
To use the alarm The 1st Alarm starts to sound when the current time reaches the time indicated by the alarm hand. The 1st Alarm stops sounding when you press SNOOZE (/LIGHT) or after it has sounded for about one minute. After the amount of time set by the Next Alarm Dial passes, the Next Alarm starts to sound. Pressing SNOOZE (/LIGHT) stops the Next Alarm sound for about five minutes, after which it starts to sound again. In all, the Next Alarm will sound seven
Battery compartment times.
Alarm setting dial
If you do not press SNOOZE (/LIGHT) after the Next Alarm starts to sound, it will stop automatically after about one minute. To deactivate the snooze feature so the alarm will not sound again, change the Alarm ON/OFF switch setting to OFF.
• A sticker is affixed to the glass of this clock when you purchase it. Be sure to remove the sticker before using the clock. REPLACING THE BATTERY • Depending on the clock model, the configuration of your clock may differ somewhat from that shown in the
illustration. Low battery power is indicated when timekeeping slows or stops completely. Should either of these symptoms • This product has a sweep second hand. occur, replace the battery immediately. Do not leave a low or dead battery in the clock. • (TQ-551) Pressing SNOOZE/LIGHT illuminates the face of the clock for about three seconds for easy reading of 1. Pressing down at the point marked on the battery compartment cover, slide the cover to remove it. the time in the dark. 2. Remove the old battery. • (TQ-551) This product has a luminous resin face that accumulates light for easier reading. 3. Load a new battery. Make sure that its positive (+) and negative (–) ends are facing correctly. If you load the • (TQ-451) This product uses luminous paint for face markings and on its hands. battery incorrectly, it can burst and damage the clock. 4. Replace the battery compartment cover.
TQ-451 TQ-551
LIGHT Battery precautions LUMINOUS RESIN Keep batteries out of the reach of small children. If a battery is accidentally swallowed, contact your physician
LUMINOUS PAINT immediately. Be sure to load the battery with its positive (+) and negative (–) ends facing correctly. Never charge the battery that comes with the clock. Should a battery ever leak while in the clock, wipe out the fluid with a cloth, taking care not to let any get onto your skin. Replace the battery at least once a year, even if the current battery is working normally. The battery that comes with the clock loses some power during transport and storage.
Page Summary Contents For Casio TQ-451 551 Operation Guide
Manual Details
| Brand | Casio |
|---|---|
| Pages | 1 |
| File Size | 67.71 KB |
| Published | June 05, 2026 |
Enter the captcha to get the download link:

Frequently Asked Questions
How long does the luminous paint glow?
The glow lasts about five hours, though this depends on original light exposure.
What type of fluorescent lighting should I use for charging the glow?
You should use it in a room illuminated by fluorescent light.
What are the steps for replacing the battery?
First, slide the cover off; then replace the old battery and load a new one with correct polarity.
How do I set or manage the multiple alarms?
There is a 1st Alarm (current time) and a Next Alarm. The alarm ON/OFF switch controls both alarms simultaneously.