Canon LiDE Series Scanner CanoScan LiDE 90LiDE 90 Quick User Guide
Summary
This comprehensive manual provides step-by-step guidance for setting up and operating your Canon scanner. It covers essential topics including initial software installation for various operating systems (Windows XP/Vista), connecting the device via USB, and preparing the unit for use. Users will learn how to conduct successful digital scans using dedicated software like ArcSoft PhotoStudio, ensuring a seamless process from powering on to saving high-quality images or PDFs. This guide is perfect for first-time users needing reliable technical support for scanning your documents and photos.
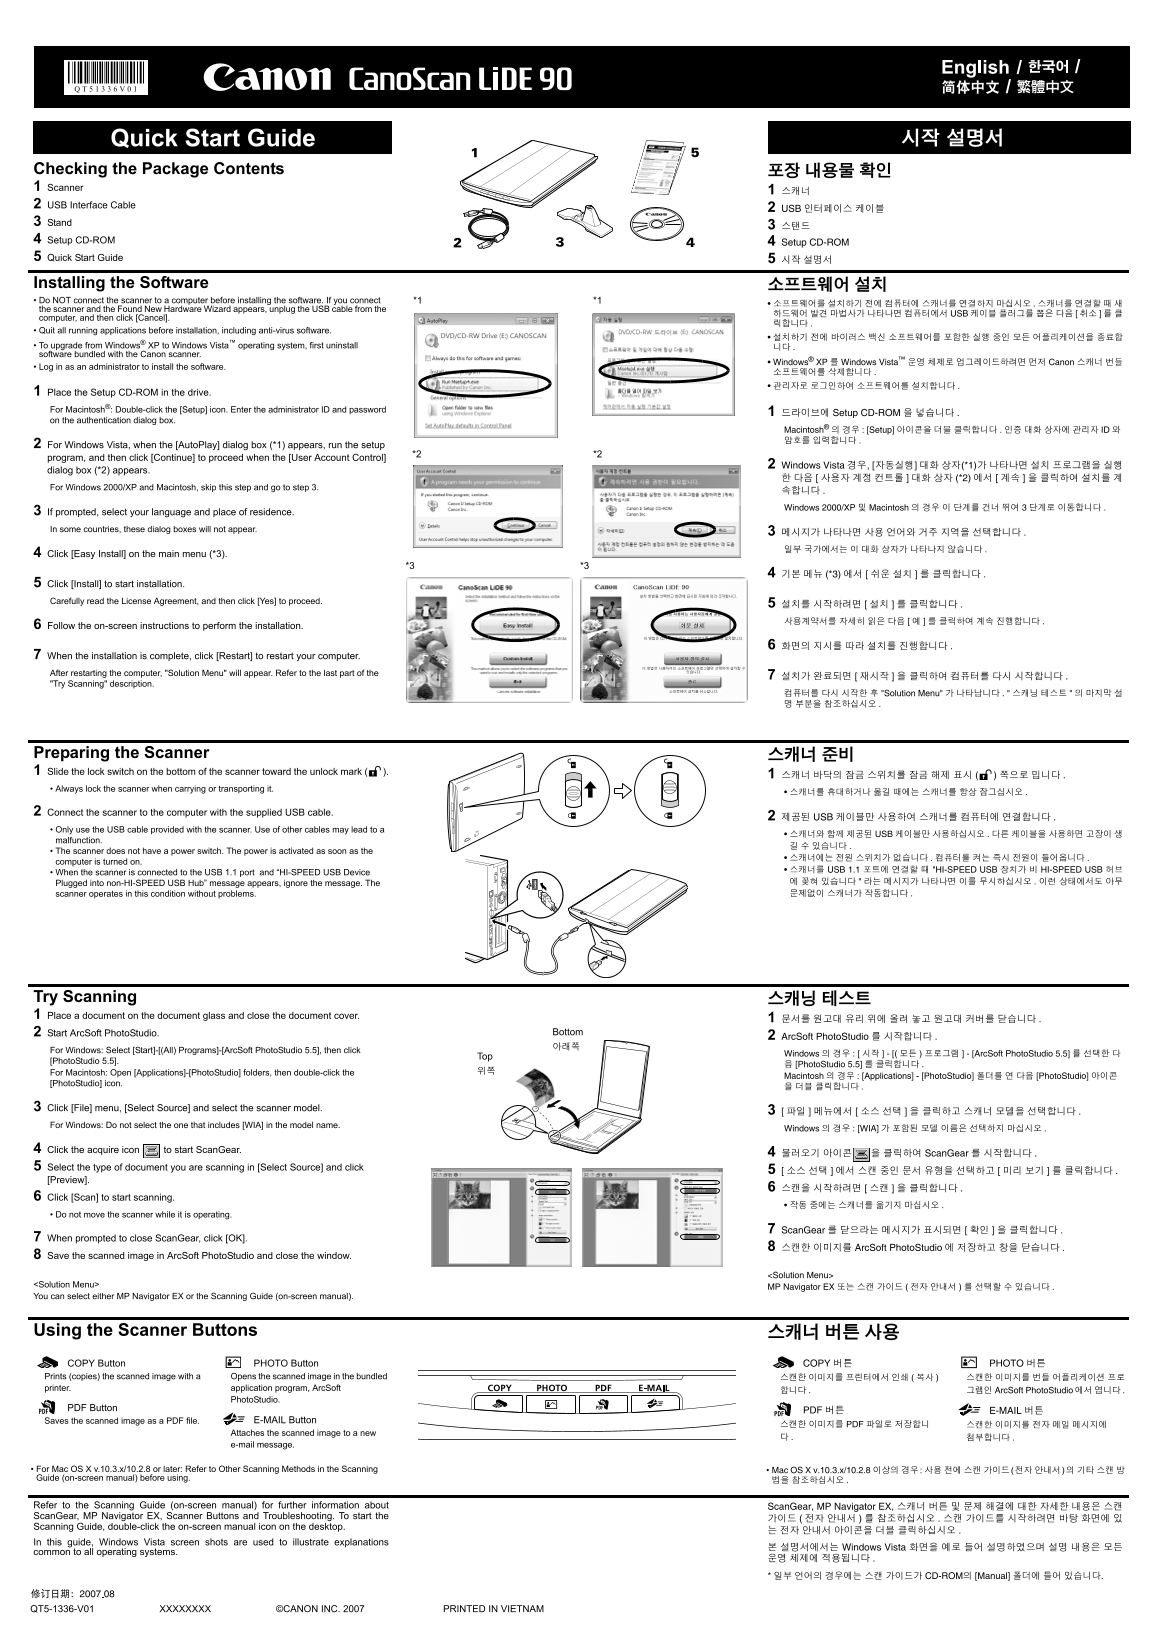
Page 1 Text Content
Checking the Package Contents 포장 내용물 확인 Scanner
USB Interface Cable
USB 인터페이스 케이블
Stand
Setup CD-ROM Setup CD-ROM
Quick Start Guide 시작 설명서
Installing the Software 소프트웨어 설치 Do NOT connect the scanner to a computer before installing the software. If you connect *1 *1
the scanner and the Found New Hardware Wizard appears, unplug the USB cable from the
하드웨어 발견 마법사가 나타나면 컴퓨터에서 USB 케이블 플러그를 뽑은 다음 [ 취소 를 클
computer, and then click [Cancel].
Quit all running applications before installation, including anti-virus software.
To upgrade from Windows® XP to Windows Vista™ operating system, first uninstall 니다 software bundled with the Canon scanner.
Windows® XP 를 Windows Vista™ 운영 체제로 업그레이드하려면 먼저 Canon 스캐너 번들
Log in as an administrator to install the software.
Place the Setup CD-ROM in the drive. For Macintosh®: Double-click the [Setup] icon. Enter the administrator ID and password
드라이브에 Setup CD-ROM 을 넣습니다
on the authentication dialog box.
Macintosh® 의 경우 : [Setup] 아이콘을 더블 클릭합니다 . 인증 대화 상자에 관리자 ID 암호를 입력합니다
For Windows Vista, when the [Auto Play] dialog box (*1) appears, run the setup
program, and then click [Continue] to proceed when the [User Account Control]
Windows Vista 경우, [자동실행] 대화 상자(*1)가 나타나면 설치 프로그램을 실행
dialog box (*2) appears.
For Windows 2000/XP and Macintosh, skip this step and go to step 3.
속합니다 Windows 2000/XP 및 Macintosh 의 경우 이 단계를 건너 뛰여 3 단계로 이동합니다
If prompted, select your language and place of residence. In some countries, these dialog boxes will not appear.
Click [Easy Install] on the main menu (*3).
Click [Install] to start installation. Carefully read the License Agreement, and then click [Yes] to proceed.
Follow the on-screen instructions to perform the installation.
When the installation is complete, click [Restart] to restart your computer. After restarting the computer, "Solution Menu" will appear. Refer to the last part of the
"Try Scanning" description.
컴퓨터를 다시 시작한 후 "Solution Menu" 가 나타납니다 . " 스캐닝 테스트 의 마지막 설 명 부분을 참조하십시오
Preparing the Scanner 스캐너 준비 Slide the lock switch on the bottom of the scanner toward the unlock mark (
Always lock the scanner when carrying or transporting it.
Connect the scanner to the computer with the supplied USB cable.
제공된 USB 케이블만 사용하여 스캐너를 컴퓨터에 연결합니다
Only use the USB cable provided with the scanner. Use of other cables may lead to a
스캐너와 함께 제공된 USB 케이블만 사용하십시오 . 다른 케이블을 사용하면 고장이 생
malfunction.
The scanner does not have a power switch. The power is activated as soon as the
computer is turned on.
스캐너를 USB 1.1 포트에 연결할 때 "HI-SPEED USB 장치가 비 HI-SPEED USB 허브
When the scanner is connected to the USB 1.1 port and “HI-SPEED USB Device
Plugged into non-HI-SPEED USB Hub” message appears, ignore the message. The 에 꽂혀 있습니다 라는 메시지가 나타나면 이를 무시하십시오 . 이런 상태에서도 아무 scanner operates in this condition without problems. 문제없이 스캐너가 작동합니다
Try Scanning 스캐닝 테스트 Place a document on the document glass and close the document cover.
Start Arc Soft Photo Studio.
Arc Soft Photo Studio 를 시작합니다
For Windows: Select [Start]-[(All) Programs]-[Arc Soft Photo Studio 5.5], then click
Windows 의 경우 : [ 시작 ] - [( 모든 ) 프로그램 ] - [Arc Soft Photo Studio 5.5] 를 선택한 다
[Photo Studio 5.5].
음 [Photo Studio 5.5] 를 클릭합니다
For Macintosh: Open [Applications]-[Photo Studio] folders, then double-click the 위쪽
Macintosh 의 경우 : [Applications] - [Photo Studio] 폴더를 연 다음 [Photo Studio] 아이콘
[Photo Studio] icon.
Click [File] menu, [Select Source] and select the scanner model.
For Windows: Do not select the one that includes [WIA] in the model name.
Windows 의 경우 : [WIA] 가 포함된 모델 이름은 선택하지 마십시오
Click the acquire icon to start Scan Gear.
불러오기 아이콘 을 클릭하여 Scan Gear 를 시작합니다
Select the type of document you are scanning in [Select Source] and click
[Preview].
Click [Scan] to start scanning.
Do not move the scanner while it is operating.
Scan Gear 를 닫으라는 메시지가 표시되면 [ 확인 을 클릭합니다
When prompted to close Scan Gear, click [OK].
스캔한 이미지를 Arc Soft Photo Studio 에 저장하고 창을 닫습니다
Save the scanned image in Arc Soft Photo Studio and close the window.
<Solution Menu>
<Solution Menu>
MP Navigator EX 또는 스캔 가이드 전자 안내서 를 선택할 수 있습니다
You can select either MP Navigator EX or the Scanning Guide (on-screen manual).
Using the Scanner Buttons 스캐너 버튼 사용 COPY Button PHOTO Button COPY 버튼 PHOTO 버튼 Prints (copies) the scanned image with a Opens the scanned image in the bundled 스캔한 이미지를 프린터에서 인쇄 복사 스캔한 이미지를 번들 어플리케이션 프로 printer. application program, Arc Soft
합니다 그램인 Arc Soft Photo Studio 에서 엽니다
Photo Studio.
PDF Button
PDF 버튼 E-MAIL 버튼
Saves the scanned image as a PDF file. E-MAIL Button
스캔한 이미지를 PDF 파일로 저장합니 스캔한 이미지를 전자 메일 메시지에
Attaches the scanned image to a new
e-mail message.
For Mac OS X v.10.3.x/10.2.8 or later: Refer to Other Scanning Methods in the Scanning Mac OS X v.10.3.x/10.2.8 이상의 경우 : 사용 전에 스캔 가이드 (전자 안내서 )의 기타 스캔 방 Guide (on-screen manual) before using.
Refer to the Scanning Guide (on-screen manual) for further information about Scan Gear, MP Navigator EX, 스캐너 버튼 및 문제 해결에 대한 자세한 내용은 스캔 Scan Gear, MP Navigator EX, Scanner Buttons and Troubleshooting. To start the
Scanning Guide, double-click the on-screen manual icon on the desktop.
In this guide, Windows Vista screen shots are used to illustrate explanations
본 설명서에서는 Windows Vista 화면을 예로 들어 설명하였으며 설명 내용은 모든
common to all operating systems.
운영 체제에 적용됩니다 * 일부 언어의 경우에는 스캔 가이드가 CD-ROM의 [Manual] 폴더에 들어 있습니다.
QT5-1336-V01 XXXXXXXX ©CANON INC. 2007 PRINTED IN VIETNAM
Page Summary Contents For Canon LiDE Series Scanner CanoScan LiDE 90LiDE 90 Quick User Guide
Manual Details
| Brand | Canon |
|---|---|
| Pages | 4 |
| File Size | 4.80 MB |
| Published | May 17, 2026 |
Enter the captcha to get the download link:

Frequently Asked Questions
What must I do before installing the scanner software?
Quit all running applications, including antivirus software, and log in as an administrator.
How should I secure the scanner when moving or transporting it?
Slide the lock switch on the bottom toward the unlock mark to always keep the scanner locked.
What are the steps to begin scanning a document?
Place your document, close the cover, start ArcSoft PhotoStudio, select your model, and click the acquire icon.
Beyond scanning, how else can I use the captured image?
Scanned images can be printed, opened in ArcSoft PhotoStudio, or saved as PDF files through dedicated buttons.