Brother PT-1160 User's Manual
Summary
Master label text customization with this comprehensive guide for thermal tape printers. This technical manual walks users through every aspect of label creation, enabling precise control over formatting, cursor positioning, deleting characters, and managing diverse ribbon types. It provides detailed instructions for utilizing accessories like the lettering stick and mastering advanced features such as mirror printing. Ideal for professionals or hobbyists who require high-quality, customized labeling solutions for labels, addresses, warning signs, and more.
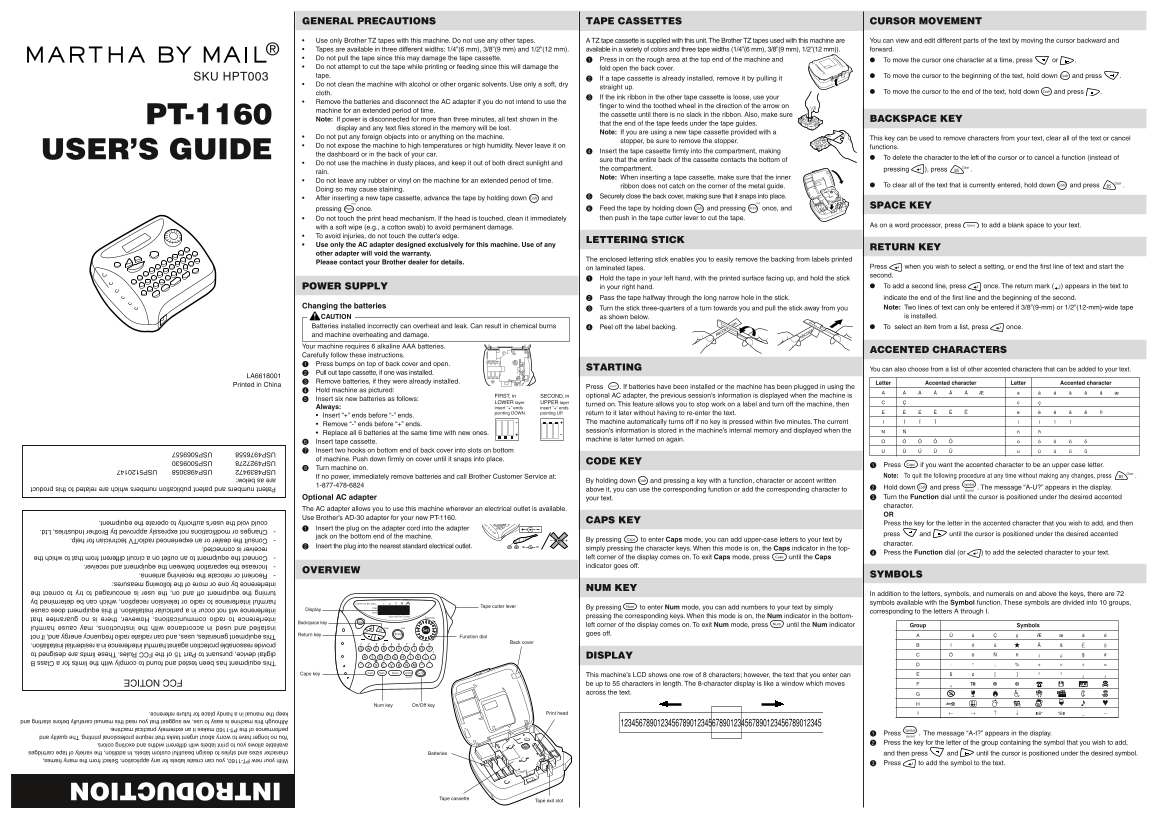
Page 1 Text Content
GENERAL PRECAUTIONS TAPE CASSETTES CURSOR MOVEMENT
INTRODUCTION
Use only Brother TZ tapes with this machine. Do not use any other tapes. A TZ tape cassette is supplied with this unit. The Brother TZ tapes used with this machine are You can view and edit different parts of the text by moving the cursor backward and Tapes are available in three different widths: 1/4”(6 mm), 3/8”(9 mm) and 1/2”(12 mm). available in a variety of colors and three tape widths (1/4”(6 mm), 3/8”(9 mm), 1/2”(12 mm)). forward.
Do not pull the tape since this may damage the tape cassette. With your new PT-1160, you can create labels for any application. Select from the many frames,
Press in on the rough area at the top end of the machine and To move the cursor one character at a time, press or .
Do not attempt to cut the tape while printing or feeding since this will damage the character sizes and styles to design beautiful custom labels. In addition, the variety of tape cartridges
fold open the back cover.
available allows you to print labels with different widths and exciting colors.
SKU HPT003 tape. To move the cursor to the beginning of the text, hold down and press .
If a tape cassette is already installed, remove it by pulling it
You no longer have to worry about urgent tasks that require professional printing. The quality and
Do not clean the machine with alcohol or other organic solvents. Use only a soft, dry
straight up. performance of the PT-1160 makes it an extremely practical machine.
cloth. To move the cursor to the end of the text, hold down and press . If the ink ribbon in the other tape cassette is loose, use your Although this machine is easy to use, we suggest that you read this manual carefully before starting and
Remove the batteries and disconnect the AC adapter if you do not intend to use the
finger to wind the toothed wheel in the direction of the arrow on keep the manual in a handy place for future reference.
machine for an extended period of time.
the cassette until there is no slack in the ribbon. Also, make sure
PT-1160 Note: If power is disconnected for more than three minutes, all text shown in the BACKSPACE KEY
that the end of the tape feeds under the tape guides.
display and any text files stored in the memory will be lost.
Note: If you are using a new tape cassette provided with a
Do not put any foreign objects into or anything on the machine. This key can be used to remove characters from your text, clear all of the text or cancel FCC NOTICE
stopper, be sure to remove the stopper.
Do not expose the machine to high temperatures or high humidity. Never leave it on functions.
Insert the tape cassette firmly into the compartment, making
USER’S GUIDE the dashboard or in the back of your car. This equipment has been tested and found to comply with the limits for a Class B
To delete the character to the left of the cursor or to cancel a function (instead of
sure that the entire back of the cassette contacts the bottom of
Do not use the machine in dusty places, and keep it out of both direct sunlight and digital device, pursuant to Part 15 of the FCC Rules. These limits are designed to
the compartment. pressing ), press .
rain. provide reasonable protection against harmful interference in a residential installation.
Note: When inserting a tape cassette, make sure that the inner
Do not leave any rubber or vinyl on the machine for an extended period of time. This equipment generates, uses, and can radiate radio frequency energy and, if not
ribbon does not catch on the corner of the metal guide. To clear all of the text that is currently entered, hold down and press .
Doing so may cause staining. installed and used in accordance with the instructions, may cause harmful
After inserting a new tape cassette, advance the tape by holding down and Securely close the back cover, making sure that it snaps into place.
interference to radio communications. However, there is no guarantee that Feed the tape by holding down and pressing once, and SPACE KEY interference will not occur in a particular installation. If this equipment does cause
pressing once.
then push in the tape cutter lever to cut the tape. harmful interference to radio or television reception, which can be determined by
Do not touch the print head mechanism. If the head is touched, clean it immediately
As on a word processor, press to add a blank space to your text. turning the equipment off and on, the user is encouraged to try to correct the
with a soft wipe (e.g., a cotton swab) to avoid permanent damage.
interference by one or more of the following measures:
To avoid injuries, do not touch the cutter’s edge.
LETTERING STICK -Reorient or relocate the receiving antenna.
Use only the AC adapter designed exclusively for this machine. Use of any
RETURN KEY -Increase the separation between the equipment and receiver.
other adapter will void the warranty.
The enclosed lettering stick enables you to easily remove the backing from labels printed -Connect the equipment to an outlet on a circuit different from that to which the
Please contact your Brother dealer for details.
on laminated tapes. Press when you wish to select a setting, or end the first line of text and start the receiver is connected. second. Hold the tape in your left hand, with the printed surface facing up, and hold the stick -Consult the dealer or an experienced radio/TV technician for help. POWER SUPPLY in your right hand. -Changes or modifications not expressly approved by Brother Industries, Ltd. To add a second line, press once. The return mark ( ) appears in the text to could void the user’s authority to operate the equipment.
Pass the tape halfway through the long narrow hole in the stick. indicate the end of the first line and the beginning of the second.
Changing the batteries Note: Two lines of text can only be entered if 3/8”(9-mm) or 1/2”(12-mm)-wide tape
Turn the stick three-quarters of a turn towards you and pull the stick away from you
CAUTION as shown below. is installed.
Batteries installed incorrectly can overheat and leak. Can result in chemical burns GH
Peel off the label backing. To select an item from a list, press once. Patent numbers and patent publication numbers which are related to this product
and machine overheating and damage. ABCDEF
ABCDEF are as below:
Your machine requires 6 alkaline AAA batteries. USP4839472USP4983058USP5120147
ACCENTED CHARACTERS
Carefully follow these instructions. USP4927278USP5009530 Press bumps on top of back cover and open. USP4976558USP5069557
STARTING You can also choose from a list of other accented characters that can be added to your text.
Pull out tape cassette, if one was installed.
LA6618001
Remove batteries, if they were already installed. Letter Accented character Letter Accented character
Printed in China
Press . If batteries have been installed or the machine has been plugged in using the
Hold machine as pictured:
FIRST, in SECOND, in optional AC adapter, the previous session’s information is displayed when the machine is
Insert six new batteries as follows:
LOWER layer UPPER layer
turned on. This feature allows you to stop work on a label and turn off the machine, then
Always: insert ˝+˝ ends insert ˝+˝ ends
pointing DOWN. pointing UP. return to it later without having to re-enter the text.
Insert “+” ends before “-” ends.
The machine automatically turns off if no key is pressed within five minutes. The current
Remove “-” ends before “+” ends.
session’s information is stored in the machine’s internal memory and displayed when the
Replace all 6 batteries at the same time with new ones.
machine is later turned on again.
Insert tape cassette. Insert two hooks on bottom end of back cover into slots on bottom of machine. Push down firmly on cover until it snaps into place.
CODE KEY
Press if you want the accented character to be an upper case letter.
Turn machine on.
If no power, immediately remove batteries and call Brother Customer Service at: Note: To quit the following procedure at any time without making any changes, press .
By holding down and pressing a key with a function, character or accent written
Hold down and press . The message “A-U?” appears in the display.
above it, you can use the corresponding function or add the corresponding character to
Optional AC adapter your text. Turn the Function dial until the cursor is positioned under the desired accented character.
The AC adapter allows you to use this machine wherever an electrical outlet is available.
Use Brother’s AD-30 adapter for your new PT-1160.
CAPS KEY
Press the key for the letter in the accented character that you wish to add, and then
Insert the plug on the adapter cord into the adapter
press and until the cursor is positioned under the desired accented
jack on the bottom end of the machine.
By pressing to enter Caps mode, you can add upper-case letters to your text by
character.
Insert the plug into the nearest standard electrical outlet.
simply pressing the character keys. When this mode is on, the Caps indicator in the top-
Press the Function dial (or ) to add the selected character to your text.
left corner of the display comes on. To exit Caps mode, press until the Caps indicator goes off.
OVERVIEW
SYMBOLS
NUM KEY
In addition to the letters, symbols, and numerals on and above the keys, there are 72 symbols available with the Symbol function. These symbols are divided into 10 groups,
Tape cutter lever By pressing to enter Num mode, you can add numbers to your text by simply
Display
corresponding to the letters A through I.
pressing the corresponding keys. When this mode is on, the Num indicator in the bottom-
Backspace key
left corner of the display comes on. To exit Num mode, press until the Num indicator Group Symbols Return key goes off.
Function dial
Back cover
DISPLAY
Caps key This machine’s LCD shows one row of 8 characters; however, the text that you enter can
be up to 55 characters in length. The 8-character display is like a window which moves TM
across the text.
Num key On/Off key
Print head
Press . The message “A-I?” appears in the display. Press the key for the letter of the group containing the symbol that you wish to add,
Batteries and then press and until the cursor is positioned under the desired symbol.
Press to add the symbol to the text.
Tape cassette
Tape exit slot
Page Summary Contents For Brother PT-1160 User's Manual
Manual Details
| Brand | Brother |
|---|---|
| Pages | 2 |
| File Size | 262.57 KB |
| Published | May 17, 2026 |
Enter the captcha to get the download link:

Frequently Asked Questions
What tape types can I use with this machine?
Only Brother TZ tapes are compatible; do not use any other types.
How long does the memory retain text if power is disconnected?
If power is disconnected for more than three minutes, all displayed and stored text will be lost.
What steps should I take when cleaning the machine?
Use only a soft, dry cloth and avoid using alcohol or other organic solvents.
How do I move to the beginning or end of the text to edit?
Hold down SHIFT and press LEFT/RIGHT arrow keys, or use the function keys detailed in the manual.