Nikon Compact Digital Cameras COOLPIX L31 Quick Start Guide - English (for customers in the Americas)
Summary
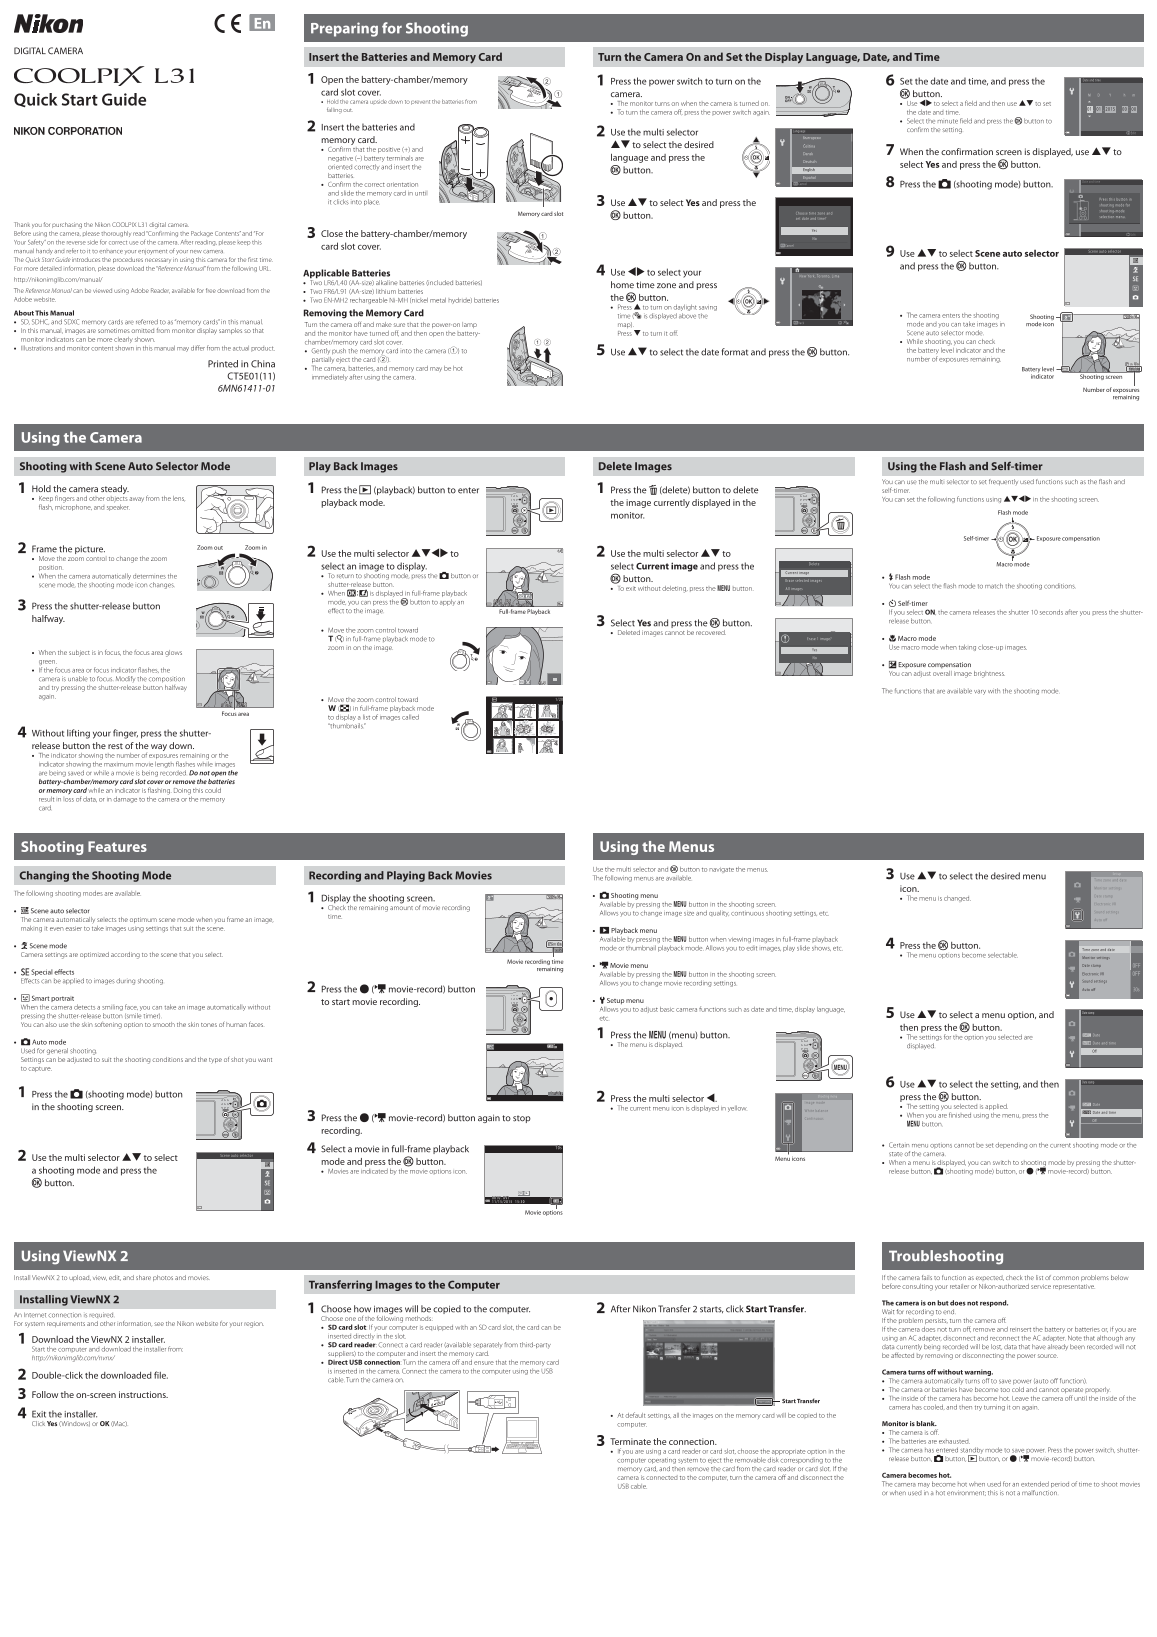
Get started with your Nikon COOLPIX L31 digital camera using this essential quick start guide. The user manual provides a comprehensive walkthrough of basic operations for new photographers, covering everything from initial setup and battery insertion to mastering various shooting modes (like Scene Auto Selector) and advanced features such as self-timers and flash control. Ideal for first-time owners, this guide ensures you can confidently capture brilliant photos and videos immediately while providing key details on memory card formatting and maintenance tips.
Page 1 Text Content
Preparing for Shooting
DIGITAL CAMERA
Insert the Batteries and Memory Card Turn the Camera On and Set the Display Language, Date, and Time
Open the battery-chamber/memory Date and t ime
Press the power switch to turn on the Set the date and time, and press the
card slot cover. camera. k button. DM Quick Start Guide Hold the camera upside down to prevent the batteries from
The monitor turns on when the camera is turned on. Use JK to select a field and then use HI to set
falling out.
To turn the camera off, press the power switch again. the date and time. Select the minute field and press the k button to
Insert the batteries and Language confirm the setting.
Use the multi selector Edit
memory card.
HI to select the desired
Confirm that the positive (+) and
When the confirmation screen is displayed, use HI to
negative (–) battery terminals are language and press the
oriented correctly and insert the select Yes and press the k button.
k button.
batteries.
Date and t ime
Confirm the correct orientation Cancel Press the A (shooting mode) button.
and slide the memory card in until
Press this button in
it clicks into place. Use HI to select Yes and press the
shoot ing mode for shoot ing-mode
Memory card slot Choose t ime zone an
k button. set date and t ime? selec ion menu.
Thank you for purchasing the Nikon COOLPIX L31 digital camera.
Before using the camera, please thoroughly read “Confirming the Package Contents” and “For Close the battery-chamber/memory Edit
Your Safety” on the reverse side for correct use of the camera. After reading, please keep this
Cancel
card slot cover.
manual handy and refer to it to enhance your enjoyment of your new camera. Scene auto selec tor
Use HI to select Scene auto selector
The Quick Start Guide introduces the procedures necessary in using this camera for the first time.
For more detailed information, please download the “Reference Manual” from the following URL. and press the k button.
Applicable Batteries Use JK to select your
New York Toronto, ima
http://nikonimglib.com/manual/
Two LR6/L40 (AA-size) alkaline batteries (included batteries)
home time zone and press
The Reference Manual can be viewed using Adobe Reader, available for free download from the Two FR6/L91 (AA-size) lithium batteries
Adobe website. Two EN-MH2 rechargeable Ni-MH (nickel metal hydride) batteries the k button. Press H to turn on daylight saving
About This Manual Removing the Memory Card
time (W is displayed above the The camera enters the shooting Shooting
SD, SDHC, and SDXC memory cards are referred to as “memory cards” in this manual. mode icon
Turn the camera off and make sure that the power-on lamp map). mode and you can take images in
In this manual, images are sometimes omitted from monitor display samples so that
and the monitor have turned off, and then open the battery- Press I to turn it off. Scene auto selector mode.
monitor indicators can be more clearly shown.
chamber/memory card slot cover. While shooting, you can check
Illustrations and monitor content shown in this manual may differ from the actual product.
Gently push the memory card into the camera (1) to the battery level indicator and the
Use HI to select the date format and press the k button.
partially eject the card (2). number of exposures remaining.
Printed in China
The camera, batteries, and memory card may be hot Battery level
CT5E01(11) immediately after using the camera. indicator Shooting screen
6MN61411-01 Number of exposures
remaining
Using the Camera
Shooting with Scene Auto Selector Mode Play Back Images Delete Images Using the Flash and Self-timer You can use the multi selector to set frequently used functions such as the flash and
Hold the camera steady. Press the c (playback) button to enter Press the l (delete) button to delete self-timer. Keep fingers and other objects away from the lens, You can set the following functions using HIJK in the shooting screen.
playback mode. the image currently displayed in the
flash, microphone, and speaker.
Flash mode
monitor.
Self-timer Exposure compensation
Zoom out Zoom in
Frame the picture.
Use the multi selector HIJK to Use the multi selector HI to
Move the zoom control to change the zoom
Delete Macro mode
position. select an image to display. select Current image and press the
Current image
When the camera automatically determines the To return to shooting mode, press the A button or X Flash mode
k button. Erase selec ted images
scene mode, the shooting mode icon changes. shutter-release button. You can select the flash mode to match the shooting conditions.
To exit without deleting, press the d button. Al images
When e is displayed in full-frame playback mode, you can press the k button to apply an n Self-timer
Press the shutter-release button
effect to the image. Full-frame Playback If you select ON, the camera releases the shutter 10 seconds after you press the shutter-
halfway. release button.
Select Yes and press the k button.
Move the zoom control toward
Deleted images cannot be recovered.
g (i) in full-frame playback mode to Erase 1 image? p Macro mode
zoom in on the image. Yes Use macro mode when taking close-up images.
When the subject is in focus, the focus area glows
green.
o Exposure compensation
If the focus area or focus indicator flashes, the
You can adjust overall image brightness.
camera is unable to focus. Modify the composition and try pressing the shutter-release button halfway
The functions that are available vary with the shooting mode.
again.
Move the zoom control toward
f (h) in full-frame playback mode
Focus area
to display a list of images called “thumbnails.”
Without lifting your finger, press the shutter- release button the rest of the way down. The indicator showing the number of exposures remaining or the indicator showing the maximum movie length flashes while images are being saved or while a movie is being recorded. Do not open the battery-chamber/memory card slot cover or remove the batteries or memory card while an indicator is flashing. Doing this could result in loss of data, or in damage to the camera or the memory card.
Shooting Features Using the Menus
Use the multi selector and k button to navigate the menus.
Set up
Changing the Shooting Mode Recording and Playing Back Movies The following menus are available. Use HI to select the desired menu
Time zone and date
Monitor sett ings
icon.
The following shooting modes are available. Date stamp
A Shooting menu
Display the shooting screen. The menu is changed.
Available by pressing the d button in the shooting screen. Elec tronic VR
Check the remaining amount of movie recording
x Scene auto selector Sound sett ings
Allows you to change image size and quality, continuous shooting settings, etc.
time.
The camera automatically selects the optimum scene mode when you frame an image, Auto o
making it even easier to take images using settings that suit the scene.
G Playback menu Available by pressing the d button when viewing images in full-frame playback
b Scene mode Press the k button.
mode or thumbnail playback mode. Allows you to edit images, play slide shows, etc. Time zone and date
Camera settings are optimized according to the scene that you select. The menu options become selectable.
Monitor sett ings
Movie recording time
D Movie menu Date stamp
remaining
E Special effects Elec tronic VR
Available by pressing the d button in the shooting screen.
Effects can be applied to images during shooting. Sound sett ings
Allows you to change movie recording settings.
Press the b (e movie-record) button Auto o
F Smart portrait
to start movie recording. z Setup menu
When the camera detects a smiling face, you can take an image automatically without
Allows you to adjust basic camera functions such as date and time, display language,
Date stamp
pressing the shutter-release button (smile timer). Use HI to select a menu option, and
You can also use the skin softening option to smooth the skin tones of human faces.
then press the k button.
Press the d (menu) button. Date
The settings for the option you selected are
A Auto mode Date and t ime
The menu is displayed. displayed.
Used for general shooting. Settings can be adjusted to suit the shooting conditions and the type of shot you want to capture.
Date stamp
Use HI to select the setting, and then
Press the A (shooting mode) button Shooting menu
Press the multi selector J. press the k button.
Image mode
in the shooting screen. The current menu icon is displayed in yellow. The setting you selected is applied.
White balance Date and t ime
When you are finished using the menu, press the
Press the b (e movie-record) button again to stop Continuous
d button.
recording.
Certain menu options cannot be set depending on the current shooting mode or the
Select a movie in full-frame playback
Scene auto selec tor state of the camera.
Use the multi selector HI to select Menu icons
mode and press the k button. When a menu is displayed, you can switch to shooting mode by pressing the shutter-
a shooting mode and press the Movies are indicated by the movie options icon. release button, A (shooting mode) button, or b (e movie-record) button. k button.
Movie options
Using View NX 2 Troubleshooting
Install View NX 2 to upload, view, edit, and share photos and movies. If the camera fails to function as expected, check the list of common problems below
Transferring Images to the Computer before consulting your retailer or Nikon-authorized service representative.
Installing View NX 2
The camera is on but does not respond.
Choose how images will be copied to the computer. After Nikon Transfer 2 starts, click Start Transfer.
Wait for recording to end.
An Internet connection is required.
Choose one of the following methods:
If the problem persists, turn the camera off.
For system requirements and other information, see the Nikon website for your region.
SD card slot: If your computer is equipped with an SD card slot, the card can be
If the camera does not turn off, remove and reinsert the battery or batteries or, if you are
inserted directly in the slot.
Download the View NX 2 installer. using an AC adapter, disconnect and reconnect the AC adapter. Note that although any
SD card reader: Connect a card reader (available separately from third-party
data currently being recorded will be lost, data that have already been recorded will not
Start the computer and download the installer from:
suppliers) to the computer and insert the memory card.
be affected by removing or disconnecting the power source.
http://nikonimglib.com/nvnx/
Direct USB connection: Turn the camera off and ensure that the memory card is inserted in the camera. Connect the camera to the computer using the USB Camera turns off without warning.
Double-click the downloaded file.
cable. Turn the camera on. The camera automatically turns off to save power (auto off function).
The camera or batteries have become too cold and cannot operate properly.
Follow the on-screen instructions.
The inside of the camera has become hot. Leave the camera off until the inside of the
Start Transfer
camera has cooled, and then try turning it on again.
Exit the installer. At default settings, all the images on the memory card will be copied to the Click Yes (Windows) or OK (Mac). computer. Monitor is blank.
The camera is off. Terminate the connection. The batteries are exhausted. If you are using a card reader or card slot, choose the appropriate option in the The camera has entered standby mode to save power. Press the power switch, shutter- computer operating system to eject the removable disk corresponding to the release button, A button, c button, or b (e movie-record) button.
memory card, and then remove the card from the card reader or card slot. If the
Camera becomes hot.
camera is connected to the computer, turn the camera off and disconnect the
The camera may become hot when used for an extended period of time to shoot movies
USB cable.
or when used in a hot environment; this is not a malfunction.
Page Summary Contents For Nikon Compact Digital Cameras COOLPIX L31 Quick Start Guide - English (for customers in the Americas)
Manual Details
| Brand | Nikon |
|---|---|
| Pages | 2 |
| File Size | 2.73 MB |
| Published | May 29, 2026 |
Enter the captcha to get the download link:

Frequently Asked Questions
How do I set the date and time?
Press the A button, select Date and time, use JK to select fields, and press k button when done.
What types of batteries are recommended for this camera?
The camera supports LR6/L40, FR6/L91, and EN-MH2 rechargeable Ni-MH batteries.
Does the memory card need to be formatted before use?
Yes, if you insert a used memory card from another device, format it using this camera for optimal function.
How do I enter playback mode?
Press the c (playback) button and select an image to display. You can navigate with HIJK.