CASIO PQ-70 User Guide and Manual
Summary
Manage timekeeping and monitor your environment with this advanced digital alarm clock. The manual provides comprehensive instructions on activating reliable time settings, customizing snoozing alarms, and utilizing integrated thermometer and hygrometer functions. Perfect for households requiring accurate, continuous monitoring of both time and climate conditions, it is designed for easy setup and precision use in any modern home setting.
Page 1 Text Content
MA0811-EB
PQ-70
2. While the screen you want is displayed, use the + and – buttons (23) to change the flashing digits. Holding down + or – changes the flashing digits at high speed. You can set the year in the range of 2000 to 2069. The day of the week is set automatically in accordance with the date setting. Pressing + or – while the Time Setting Screen is on the display causes the seconds count to be reset to 00. Each press of + or – while the 12-hour/24-hour Timekeeping Screen is on the display toggles between 12-hour and 24-hour timekeeping.
(–) Decrease
(+) Increase
3. After making the settings you want, use the SET button (5) to display the Normal Timekeeping Screen. The clock automatically returns to the Normal Timekeeping Screen if you leave a setting screen on the display for about five minutes without performing any operation.
USING THE ALARM The alarm sounds when the alarm time you set is reached. You can also use the Alarm Mode selector (6) to select the snooze alarm feature. Setting the Alarm Time Use the + and – buttons (23) to set the alarm time. Pressing the + and – buttons (23) causes the alarm time to appear in place of the date on the display. Holding down + or – changes the digits at high speed.
(–) Decrease
CR2032 3V
(+) Increase
Turning the Alarm On and Off Use the Alarm Mode selector (6) to turn the alarm on and off, and to select the snooze feature.
Alarm Mode selector Description
The alarm sounds at the preset time for one minute, and up to seven more times every five minutes thereafter. Even if you stop the alarm by pressing the SNOOZE button (7), SNZ ( ) the alarm sounds again five minutes later. The indicator flashes on the display to indicate that the snooze feature is activated.
ON ( ) The alarm sounds at the preset time for one minute.
CR2032
3V OFF The alarm does not sound.
The alarm time appears in place of the date on the display whenever the Alarm Mode selector (6) is set to ON or SNZ. The alarm sound changes over four levels as it sounds.
Stopping the Alarm When the alarm is sounding, press the SNOOZE button (7) to stop it. When the snooze feature is turned on, the alarm will sound again in about five minutes. To turn off the snooze feature, slide the Alarm Mode selector (6) to OFF.
Demo Alarm Press the DEMO button (4) to sound the alarm.
ENGLISH
A sticker is affixed to the glass of the clock when you purchase it. Be sure to remove the sticker before using the THERMOMETER FUNCTIONS clock.
Depending on the clock model, its configuration may differ somewhat from that shown in the illustration. Display Range: –19.9°C (Under: LL) to 49.9°C (Over: HH) Guaranteed Range: 0°C to 40°C
Alarm Off Snooze Alarm On
Day of the week Current
temperature HYGROMETER FUNCTIONS
(month - day) Current Alarm time
humidity Alarm on Display Range: 20% (Under: LL) to 90% (Over: HH) PM indicator indicator
Sensor Precision: ±10% when temperature is 0°C to 40°C.
Current time
(Hour, minutes, Snooze on seconds) indicator USING THE STAND
You can pull the stand out of the back of the clock to support it during use. When re-folding the stand, press until you feel it click into place.
OPERATING PRECAUTIONS Do not use or store this clock in areas exposed to temperature extremes, strong magnetism, strong vibration, or
USING THE STRAP HOLE
strong impact. Heat can shorten battery life and cause malfunction. Keep the clock away from heaters and direct sunlight when A hole is provided for a strap that you can use while carrying the clock. using it. The clock does not come with a strap. Never use the clock in a bathroom or any other area subject to high humidity. Never try to take the clock apart. Doing so can cause malfunction.
To clean the clock, use a soft, dry cloth or a cloth moistened in a solution of water and a mild neutral detergent. USING THE SPECIAL CASE
Wring out all excess moisture from the cloth. Never use thinner, benzene, alcohol or other similar agents.
Use of a separately available special case is recommended to protect the clock against damage when carrying it in
The LCD may become difficult to read at temperatures outside of the operating temperature range (0 to 40°C).
a bag, etc.
Display figures may be difficult to read when viewed from an angle. Be sure to keep all user documentation handy for future reference.
CASIO COMPUTER CO., LTD. assumes no responsibility for any loss, or any claims by third parties that may arise through the use of this clock.
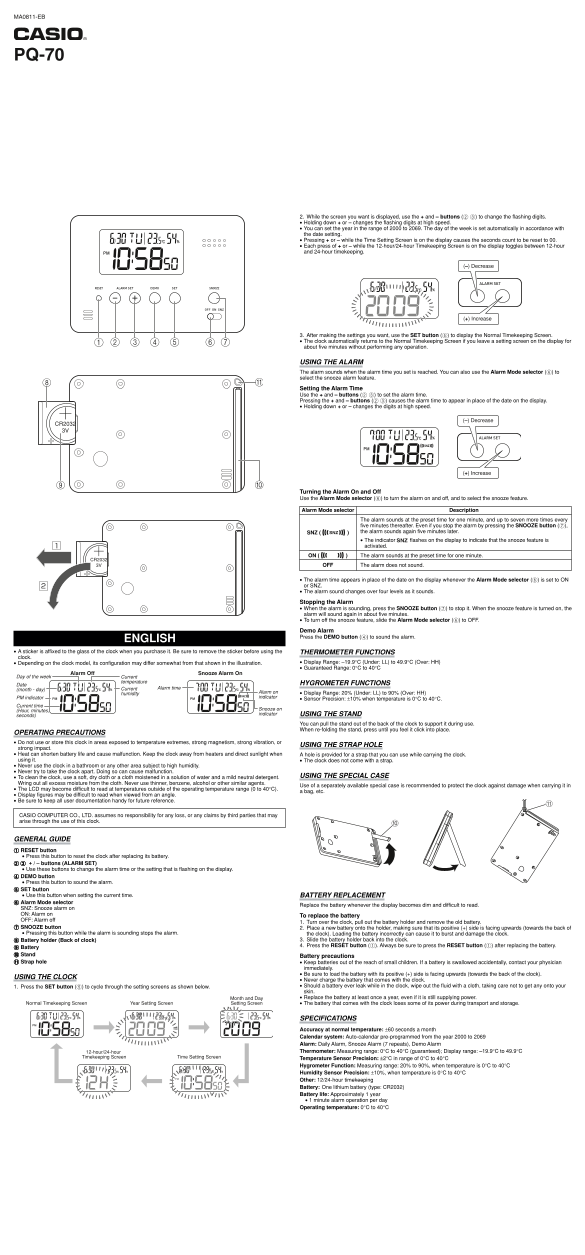
GENERAL GUIDE RESET button Press this button to reset the clock after replacing its battery. 2 3 + / – buttons (ALARM SET) Use these buttons to change the alarm time or the setting that is flashing on the display. DEMO button Press this button to sound the alarm. SET button Use this button when setting the current time. BATTERY REPLACEMENT Alarm Mode selector
Replace the battery whenever the display becomes dim and difficult to read.
SNZ: Snooze alarm on ON: Alarm on To replace the battery OFF: Alarm off
1. Turn over the clock, pull out the battery holder and remove the old battery.
SNOOZE button 2. Place a new battery onto the holder, making sure that its positive (+) side is facing upwards (towards the back of Pressing this button while the alarm is sounding stops the alarm. the clock). Loading the battery incorrectly can cause it to burst and damage the clock.
Battery holder (Back of clock) 3. Slide the battery holder back into the clock. Battery 4. Press the RESET button (1). Always be sure to press the RESET button (1) after replacing the battery.
Stand Battery precautions Strap hole Keep batteries out of the reach of small children. If a battery is swallowed accidentally, contact your physician
immediately. Be sure to load the battery with its positive (+) side is facing upwards (towards the back of the clock).
USING THE CLOCK
Never charge the battery that comes with the clock. 1. Press the SET button (5) to cycle through the setting screens as shown below. Should a battery ever leak while in the clock, wipe out the fluid with a cloth, taking care not to get any onto your skin. Month and Day Replace the battery at least once a year, even if it is still supplying power.
Setting Screen Year Setting Screen Normal Timekeeping Screen The battery that comes with the clock loses some of its power during transport and storage.
SPECIFICATIONS Accuracy at normal temperature: ±60 seconds a month Calendar system: Auto-calendar pre-programmed from the year 2000 to 2069 Alarm: Daily Alarm, Snooze Alarm (7 repeats), Demo Alarm 12-hour/24-hour Thermometer: Measuring range: 0°C to 40°C (guaranteed); Display range: –19.9°C to 49.9°C
Timekeeping Screen Time Setting Screen Temperature Sensor Precision: ±2°C in range of 0°C to 40°C
Hygrometer Function: Measuring range: 20% to 90%, when temperature is 0°C to 40°C Humidity Sensor Precision: ±10%, when temperature is 0°C to 40°C Other: 12/24-hour timekeeping Battery: One lithium battery (type: CR2032) Battery life: Approximately 1 year • 1 minute alarm operation per day Operating temperature: 0°C to 40°C
Page Summary Contents For CASIO PQ-70 User Guide and Manual
Manual Details
| Brand | Casio |
|---|---|
| Pages | 1 |
| File Size | 581.23 KB |
| Published | June 05, 2026 |
Enter the captcha to get the download link:

Frequently Asked Questions
How do I reset the clock after changing the battery?
Slide the battery holder back into the clock, then press the RESET button (1).
How do I toggle between 12-hour and 24-hour timekeeping?
Pressing + or – while on the Time Setting Screen toggles the format.
Does the device have all-day functioning capabilities?
It supports Daily Alarm and Snooze Alarm, which sounds up to seven times every five minutes.