# A B C D E F G H I J K L M N O P Q R S T U V W X Y Z

ASUS ROG Player's Nation Notebook ASUS TUF Gaming FX505FX505GD & FX505GE & FX505GM Upgrade Guide (English Version) Manual User Guide

Summary

Empower your Notebook PC with our comprehensive hardware upgrade guide. This manual provides expert, step-by-step instructions for improving system performance by upgrading key internal components. Learn how to safely install new RAM modules, replace hard drives (HDDs), and add compatible M.2 SSDs. Designed for the user ready to enhance their laptop’s capability, this resource walks you through compartment removal and component installation, allowing you to boost your machine's power.
📄 Preview PAGE OF 12

Page 1 Text Content

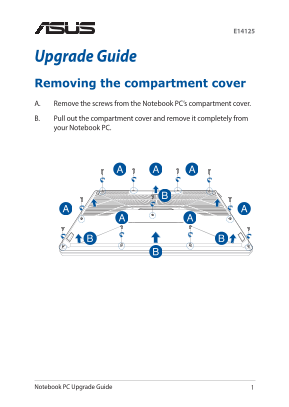
Upgrade Guide Removing the compartment cover A. Remove the screws from the Notebook PC’s compartment cover. B. Pull out the compartment cover and remove it completely from your Notebook PC.

Notebook PC Upgrade Guide

Page Summary Contents For ASUS ROG Player's Nation Notebook ASUS TUF Gaming FX505FX505GD & FX505GE & FX505GM Upgrade Guide (English Version) Manual User Guide

Page 1 Upgrade Guide Removing the compartment cover A. Remove the screws from the Notebook PC’s compartment cover. B. Pull out the compartment cover and remove it completely from your Notebook PC. Notebook P...
Page 2 To reattach the compartment cover: A. Align and reattach the cover of the compartment. B. Secure the cover using the screws you removed earlier. Notebook PC Upgrade Guide
Page 3 Installing a RAM module Upgrade the memory capacity of your Notebook PC by installing a RAM (Random Access Memory) module in the memory module compartment. The following steps show you how to install ...
Page 4 A. Remove the compartment cover. NOTE: For more details, refer to the Removing the compartment cover section in this manual. B. Align and insert the RAM module into the RAM module slot. C. Push down t...
Page 5 Installing the Hard Disk Drive Refer to the following steps if you need to install a new HDD (Hard Disk Drive) to your Notebook PC: IMPORTANT! Purchase an HDD from authorized retailers of this Noteboo...
Page 6 A. Remove the compartment cover. NOTE: For more details, refer to the Removing the compartment cover section in this manual. B. Remove the screws securing the HDD bay to the compartment. C. (Optional)...
Page 7 D. (Optional) If an HDD is currently attached to the HDD bay, refer to the following steps on how to remove the old HDD: 1. Remove all the screws on the sides of the HDD bay. 2. Remove the old HDD fro...
Page 8 E. Place the new HDD with its PCB (Printed Circuit Board) facing the HDD bay. Ensure that the port connectors of your HDD are not obstructed by any part of the HDD bay. F. Reattach and secure the HDD ...
Page 9 G. Replace the HDD bay back in the compartment with the HDD connector aligned with the Notebook PC’s HDD port. Push the HDD bay until it connects with the Notebook PC. H. Secure the HDD bay with the s...
Page 10 Installing an M.2 card Refer to the following steps when installing a compatible M.2 card in your Notebook PC: IMPORTANT! Purchase your M.2 card from authorized retailers of this Notebook PC to ensure...
Page 11 A. Remove the compartment cover. NOTE: For more details, refer to the Removing the compartment cover section in this manual. B. Lift the flap covering the card module slot, then align and insert the M...
Page 12 Notebook PC Upgrade Guide

Manual Details

Brand Asus
Pages 12
File Size 2.13 MB
Published May 15, 2026
87 views

Enter the captcha to get the download link:

captcha

Frequently Asked Questions

What safety steps must I take before replacing any internal component?

You must disconnect all connected peripherals, telephone lines, and power connectors before accessing the compartment cover.

Where should I purchase components to guarantee compatibility for my upgrade?

To ensure reliability, purchase RAM modules, HDDs, or M.2 cards exclusively from authorized retailers of this Notebook PC.

What types of storage media are supported by the M.2 slot?

The M.2 2280 slot is compatible with both PCIe (NVMe) SSD and SATA SSD formats.

Is it necessary or recommended to hire a professional for these upgrades?

Yes, the manual highly recommends installing RAM, HDD, and M.2 cards under professional supervision or at an authorized service center.